I still don't have a 137MHz bandpass filter, but by carefully adjusting the software RF gain control in the receiver program, along with a few antenna tweaks, I've got this process fairly well nailed down.
First, the antenna.
I came home from work Friday ("Moldable Plastic Shim" class...MESSY!), and as I turned down the street, I didn't see the eggbeater sticking up.
Uh-Oh!
WELL.....the dogs (Pebbles, I'd bet on it!) decided the extra length of RG-6QS coax I had coiled up where it came into the house looked like a great tug-of-war toy, and they (she?) yanked on it hard enough to destroy the connector before it pulled through my bulkhead pass-through, and pulled the antenna over!
Fortunately ( ? ) it laded across the telephone and FiOS cable drops from the utility pole in the back yard, and didn't come crashing down to the ground.
Since I had just cable-tied it to my "portable" satellite mount and antenna, I had to take all that stuff apart, cut the super-duty cable ties I used, and get everything separated,
Since I now had the mount completely stripped, I was able to get the mast with the eggbeater on it mounted parallel to the large diameter mast on the mount, and secure it with some large stainless hose clamps. I was then able to get the whole shebang vertical again, and this time I put four concrete blocks on the base to keep it vertical!
I took about 90 minutes to get that "almost disaster" was averted, and the antenna back in the air where it belongs.
Gqrx Configuration
This is what I've found works acceptably well with a FUNCube dongle, and the antenna I have. This only applies to the "Gqrx SDR" program I'm running, which is freely downloadable for Linux of Mac OSX. He includes the source code on his website, so you might be able to compile it for Windows, but that's beyond this little post.
This first part concerns controls on the "Input Controls" tab.
#1. Calibrate the frequency! You do this by tuning in a known station, and adjusting the "Frequency Corr." to get the carrier of the station centered on the red fiducial line. I used NOAA Weather Radio on 162.550 MHz to do this. Click either the "up" arrow or "down" arrow to adjust the frequency as required.
In my case the dongle needed a -17ppm correction to center NOAA on the red line. Your dongle will be different.
The screenshot below shows the correct Frequency Correction, along with the RF Gain slider being reduced, and the "DC Cancel" box checked, so the next two steps are included in it,. You don't need to drag the RF Gain slider with your mouse. Just click it to change the focus, and use the left and right arrow keys for better granularity in adjusting it.
The screenshot below shows the correct Frequency Correction, along with the RF Gain slider being reduced, and the "DC Cancel" box checked, so the next two steps are included in it,. You don't need to drag the RF Gain slider with your mouse. Just click it to change the focus, and use the left and right arrow keys for better granularity in adjusting it.

#2. Set the RF Gain slider (in the "Input Controls" tab) to no more than 5 "ticks" to the right of the "zero" setting. You might be able to get away running more gain if you live in an area with few strong signals, but here in the "RF Alley" of Los Angeles, any more than this will cause you grief if you don't have some decent bandpass filters between the antenna and receiver. I was able to verify this by inserting a DCI-146-4H 2 Meter bandpass filter between the receiver and antenna to listen to the Amateur Radio satellites with 2 Meter downlinks. It pretty much eliminated all the crud and spurs that get internally generated by the dongle when the RF Gain slider is higher than about half way.
The box with the "A" in it to the right of the slider sets the AGC to "Auto", but this isn't supported by all devices.
#3. Check the "DC Cancel" box. This (mostly) gets rid of the "spike" in the center of the screen when no signals are tuned in. The "Swap I/Q" and "I/Q Balance" controls aren't need for this application, so leave the check boxes UNchecked.
This part concerns the controls on the "Receiver Options" tab.
The sceenshot below shows how I have mine set up.

#4. Set the mode to "Narrow FM". Ignore the "Filter" choices as you'll be setting the to a "User" value. Click the little box that looks like a crossed screwdriver and wrench to open the "Mode Options" menu. Set "Max dev" to "APT (17k)", and tun the "Tau" to "OFF". "Tau" is another term for the de-emphasis time constant, and since we want the flattest audio we can get, turn it off.
#5. Grab one side of the gray window in the upper display (it shows the bandwidth), and pull it wider until the "Filter" box changes to "User (40k)". This indicates you have set the receiver bandpass to 40 kHz, wide enough to recover the audio properly, and a little bit more so the Doppler tuning isn't so critical.
#6. The "AGC" and "NB1/NB2" boxes don't need to be adjusted, as they have little effect on FM.
#7. Slide the "SQL" (squelch) slider all the way to the left to turn it off.
This part concerns the "FFT Settings" tab.
#8. These control the spectrum and waterfall displays. The "Averaging" slider controls how fast the spectrum display updates, while the "Panadapter" slider controls how much of the screen the waterfall takes up.
I leave the "FFT size" at the 4096 default, and the "Rate" at the 15fps default.
The "Zoom" "Color" and the "F" in the box are cosmetic, so play with them to see what they do.
This part concerns the "Audio" tab.
And here's the screen you get after you pick or create file save location.

And here's the screen you get after you pick or create file save location.

#9. SET A LOCATION TO RECORD YOUR FILES!
If you don't, the default is a null string, and the program will terminate if you click the red button under the gain slider to start recording the received audio. To select a director, click on the crossed wrench and screwdriver box to open the "Audio Options" menu. The default is the "Documents" folder in your /home directory, but you can save them anywhere.
This should get you set up well enough to hear the satellites, and record them, if you have a decent antenna.
Today's images came out quite well. I suppose I could write some scripts to automate all this, but that would mean leaving a PC running 24/7, something I'd rather not do.
Here's some images from today:
NOAA-18 "A" Channel enhanced:

NOAA-18 "B" Channel enhanced:

NOAA-18 color IR:

NOAA-18 Multi-Spectral:
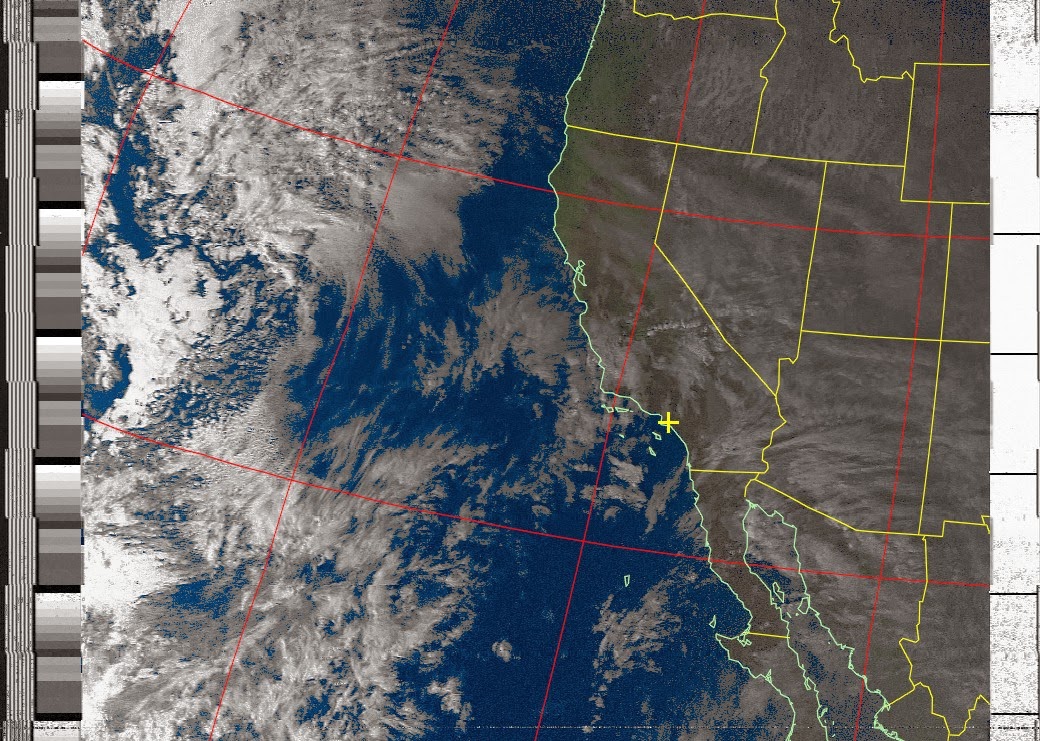
NOAA-18 Sea Surface Temp:

NOAA-18 Thermal:


Nicely done, and those do look good! And I'm betting puppy chew toy with the cable was right.
ReplyDeleteThanks for the tutorial. Looks like a fun weekend. I'll have plenty of time over the holidays to play with this.
ReplyDeleteBandpass filters? My specialty. I must have enough stuff around the shack to make something for 137. It doesn't look like extremely weak signal stuff, so a couple dB loss won't kill it.
Awesome! I love this!
ReplyDeleteAdded a few screenshots showing the adjustments.
ReplyDeleteGB.....I have enough "stuff" around here to build and test a decent filter. Just don't have the time right now!
Maybe over Christmas (I've got SIXTEEN DAYS off!), or if you come up with something send me the specs, and I'll wind a few coils!