Wednesday, August 31, 2022

It's Alive!


 Backed her out of the garage, washed her, and went for a 45 minute ride around the area. Runs good for 2 year old gas (with Sta-Bil in it), and while it still has a "hot oil" smell, it's not dripping oil everywhere.

I'd forgotten how nice it is to drive, even though I didn't push it hard. The alternator needs replacing (new one is on the bench) as it holds 13.9 Volts, barely enough to charge the battery and power the car. The new one is from a later year Camry, which drops right in, and raises the output from the OEM 35 Amps to 80 Amps.

Tuesday, August 30, 2022

Minor Setback From An Oil Leak

 Thankfully I pulled the dipstick the other day before I ran the start-up procedure.

It was bone dry!

The second-to-the-last time the oil was changed was in Long Beach, and besides putting in 5W-30 instead of 10W-30, they used a gasket on the drain plug that was too big, and didn't seal properly.  When my son and I changed the oil last fall, I reused the gasket, as it looked "OK" to me. Over the last 10 months, it's been dripping slowly, and lost ALL the new oil we put in. Just happy I had cardboard and carpet scraps under the car, but I'm going to have to pressure wash "my" side of the garage. Since I use the pressure washer to wash the car, I'll give it a try when I have the car out in the next day or so.

Trip to the auto parts store got me a selection of new gaskets, AND a magnetic oil drain plug, which I was going to use. With the magnet on the new plug, it goes into the oil pan far enough to hit the oil pickup, meaning I can't tighten it, meaning I can't use it.

Oh, well.....One of the gaskets in the kit fit the OEM plug, so that went back in, with the new gasket.

It's been holding a pan full of oil for about four hours now, and not a sign of a drip. I'll run the car tomorrow, and check again after I shut it down to see if it dripped any after warm up.

Sunday, August 28, 2022

Ms. Swan's Nose Job

 Is just about finished. Still have some cleaning to do, and the front license plate has to get bolted on, but otherwise, she's about ready to go around the block a few times. That will happen later this week, after I get the jacks out, drop her on the ground, roll her out and give her a good bath.

More to come this week.....


Friday, August 26, 2022

The Unveiling.....

 Posted these last night at the bottom of the previous post, but I think everybody missed it.


Have a safe weekend. SLW and I are are off to my belated Birthday Dinner. No, not at Sonny Lubick's Steakhouse. Were going to Austin's American Grill tonight.

The bison meatloaf is to die for....and there's enough for lunch tomorrow.....

Thursday, August 25, 2022

I'll Call This Segment "Back In Black"!

 Did some minor sanding today, then read the instructions on the can, and sprayed the special flexible "Bumper and Trim Paint" on. 

Only has four medium-light coats of paint, so after it sits another hour I'll spray it again.

Huh....how'd the heck did I miss this?

A couple of pinholes on the left, and a divot in the center.

I'm not terribly concerned about the blemishes I missed that show through the paint because they're in areas that can be spotted in later without tearing the lights and grill out. I'll address those in the future. I don't know how well this paint holds up, but I don't think it matters much because of the environment the car is sitting in most of the time.

Tomorrow is clean up the garage and take the tape and paper off to see if I messed up anything else, like not masking it properly.

OK, time's up! Pulled the tape and paper, and found a couple of small areas where some paint got through. Easy-Peasy cleanup with some solvent on a Q-Tip, but the rest of it was masked off OK.

Starting to look like a car again!

I still have to scrub the front valence under the bumper, and I'll do that while it's still on stands and 10" higher in the air. Just can't crawl around on the concrete as well as I could when I was younger.

Wednesday, August 24, 2022

"Pretty In Primer", c'est Fini!

 GROOOAN...............Six-and-a-half hours of block-sanding later, it's ready for the topcoat.

I'd been worried about some of the sanding scratches that were showing through the primer/surfacer/filler, but after I remembered I have like four coats of the primer on it, I went ahead and blocked it out with 240 grit. There's was plenty of primer to sand on, and they just about went away.

Blocking it again with 320 grit made them disappear.

I was temped to tack it off and spray the edges tonight, but.......I'm going to hold off until tomorrow. I'll inspect it again with fresh eyes, and if I decide it's ready.....SHOWTIME!


In celebration of this joyous event, I brought out the grill, fog lamps, and turn signals that I restored oh....two years ago?

Having my hip get crazy, along with the scamdemic being set loose upon us, AND having issues with my medications (lose 60lbs, and you'd better adjust the dose!), kinda knocked the stuffings out of me for about a year. Oh, well....I'm still on this side of the turf, so Press On Regardless!

I even dug out my front license plate and bracket, which had to come off so I could mask the area.

The rest of tonight will be spent down in the Electronics Workshop coming up with arcane things to do.....

Tuesday, August 23, 2022

"Pretty In Primer", Part Deux

 Scuff sanded it (again!) with 320 grit, tacked it off, and shot another coat of SEM "Flexible Part Primer Surfacer" this afternoon. I'm going to let it sit for 48 hours so the primer bonds and shrinks, then scuff it again, and paint it black. The car needs a proper paint job (about $15k at current rates) that I'm not going to do, so having a "Pebble Beach Class" front bumper just ain't gonna happen!

Since I have to get it smogged again in April, when my 5-year "Classic Car" tags expire, I figured I'd better get off my duff and GET TO WORK...!

I wanted this done well over a year ago, but then the scamdemic was released, and I had some serious issues with one of my heart meds, AND had the hip problem.

I wanna have my SLW plop down in the shotgun seat, and go to Freddy's for a burger, something I'd promised her when the car first arrived.

And then there's my favorite Rist Canyon Road/Stove Prairie Road/Poudre Canyon Road loop I like to drive. I'll have my son the ace photog take some pix and submit them to nest years "MKII Supra Calendar" that a friend publishes.


Monday, August 22, 2022

Busy Lately, So Here's Some Music....


 Bonus points if you guess from the name of the song what's got a fire going under me....

Sunday, August 14, 2022

Pioneer CT-F950 Rebuild - Those Pesky Pinch Rollers

 Got tied up yesterday with The Little Guy, as he unexpectedly stayed over Friday night, so this is a day late.

In fact, it's now TWO days late as I got sidetracked (what's new?) by some things on Saturday. If this was for a paying customer, it would have been out of here two weeks ago, but I've never worked on a cassette deck before. Which is why it's NOT for a paying customer. These things are a marvel of compact packaging of a complex mechanical assembly, all done to a "High End Prosumer" price level. It's one thing to make an extremely high-quality, rugged, reliable Reel-to-Reel tape recorder, and another thing entirely to do it for a Compact Cassette recorder. I can do all the basic service and repair on a good quality R2R deck as easily as the radio stuff I work on. Think Big-Block Chevy. Getting into one a cassette deck is more like getting in to a DOHC, Direct-Injected, Turbocharged, all aluminum, Indy Car engine. Whole different level of stuff needed. Smaller hardware and smaller components, all metric sized hardware, and different ways to measure things. Doable, but took some time to learn.

ANYWAY.....back to those Pinch Rollers. Yep, I screwed the pooch, f*cked the duck, and shot myself in the foot on this one. Well, gee, Jim........How'd That Happen? I got lazy, and didn't scrupulously clean all the old rubber from the bronze bearings they were vulcanized to.

See all the black stuff on the bearing? Yup....shoulda cleaned it ALL off before I pressed the new rubber sleeves on. I didn't, and I knew better because "They Didn't Look That Bad...".

Well, they were, but I used them anyway. Remember about all these parts being scaled down for a R2R machine? That means the defects on the little rollers "scaled up", and the molehills became mountains, and the audio quality suffered tremendously because of it. These rollers don't keep pressure on the tape; they drive the tape in conjunction with the two capstan shafts. And speed variance, or lumps and bumps in it's operation, directly affects how smoothly the tape goes past the heads. Wow and Flutter, those two dizty twins, made an appearance and wrecked the place. Evan Van Halen sounded horrible!

I tried several solvents to get the rubber loose, but no joy. All they did was clean it. I tried soaking them for 48hrs in a small container with SLW's "Skin-Safe! Non-Toxic!!" "paint stripper", and nada. They're soaking right now in some Aircraft-Grade Coating Remover that I use once in a while.


In the meantime....I bit the bullet and ordered a set from Athan, a company that specializes in any-and-all rollers, idlers, and tires for high-end equipment.


They're not only made of a better, longer-lasting Urethane compound, but they ditched the bronze Oilite bearing for a ball-bearing.

The rubber sleeves were about $25 for a pair. The Athan rollers are $50.....each. Plus tax and shipping.

Oh, well, these should last "forever"....

And here they are, living in their Forever Home...


With the front panel on:


 And just about ready to begin the Electrical tests as per the Service Manual.


Y'all be safe out there in the coming week!


Thursday, August 11, 2022

Pioneer CT-F950 Reel Motor Rebuild

 As I mentioned yesterday, the first electrical issue I ran across in rebuilding this deck is that it kept dropping out of Play. A bit of sleuthing around revealed that the Reel Motor was the most likely culprit, so in I went.

These pictures aren't mine. I borrowed them from the HiFi Haven website, where member Pustelniakr was kind enough to document the entire procedure.

It's a small DC motor, with a couple of centrifugal switches on it to control the speed. In "Play", it runs at a reduced voltage, regulated speed, and in "Fast Forward" and "Rewind" it gets full voltage and really spins.

And it's a "can motor" inside another can!

The coiled strip of metal on the right is a strip of Mu-Metal for magnetic shielding. Even though the permanent magnet inside the motor can on the right is pretty well shielded, Pioneer used to the "belt and suspenders" approach to really keep the magnetic flux bottled up inside the cans so it couldn't degauss the tape as it was in the deck.

The two round grey things are silicone rubber shock mounts that suspend the motor can inside the shield can. It mechanically isolates the motor from the chassis, so vibrations from one don't upset the other.
 

The armature assembly out of the case after prying open some crimps:

The small toroid inductor is in series with the DC Voltgae coming in. There's a capacitor to ground on the other brush, and they form a filter to keep the electrical noise from the brushes on the commutator from getting into the other electronics.

Brushes:

My brush plate wasn't this dirty, but I cleaned it very well anyway. The brushes themselves appear to be a carbon/copper composition, they're brazed to the little arms that hold them, and showed practically ZERO wear when examined under  20X magnification.

This is the entire armature for the motor. The centrifugal switches are on the left, and the commutator on the right:


 Yep, the commutator is filthy, grooved, and not as "flat" as it should be. This is the same as on a starter motor for a car. That operation is called "cutting the comm", "turning the comm", or other phases I forget. For a starter motor you chuck the armature into an "Armature Lathe", and use a cutter to refinish the surface.

Before:


This is a whole bunch more delicate, so I chucked the motor shaft into my cordless Dremel tool, ran it at the lowest speed possible, and used a strip of 2000 grit sanding film to clean it up.

Again, these aren't my pictures, but this is essentially what I did:


After, but mine has a more uniform nice, bright copper look on all the surfaces:

These are the contacts for the two centrifugal switches. Just clean them gently with a strip of paper, and DO NOT adjust them, or you'll turn the motor into a paperweight:


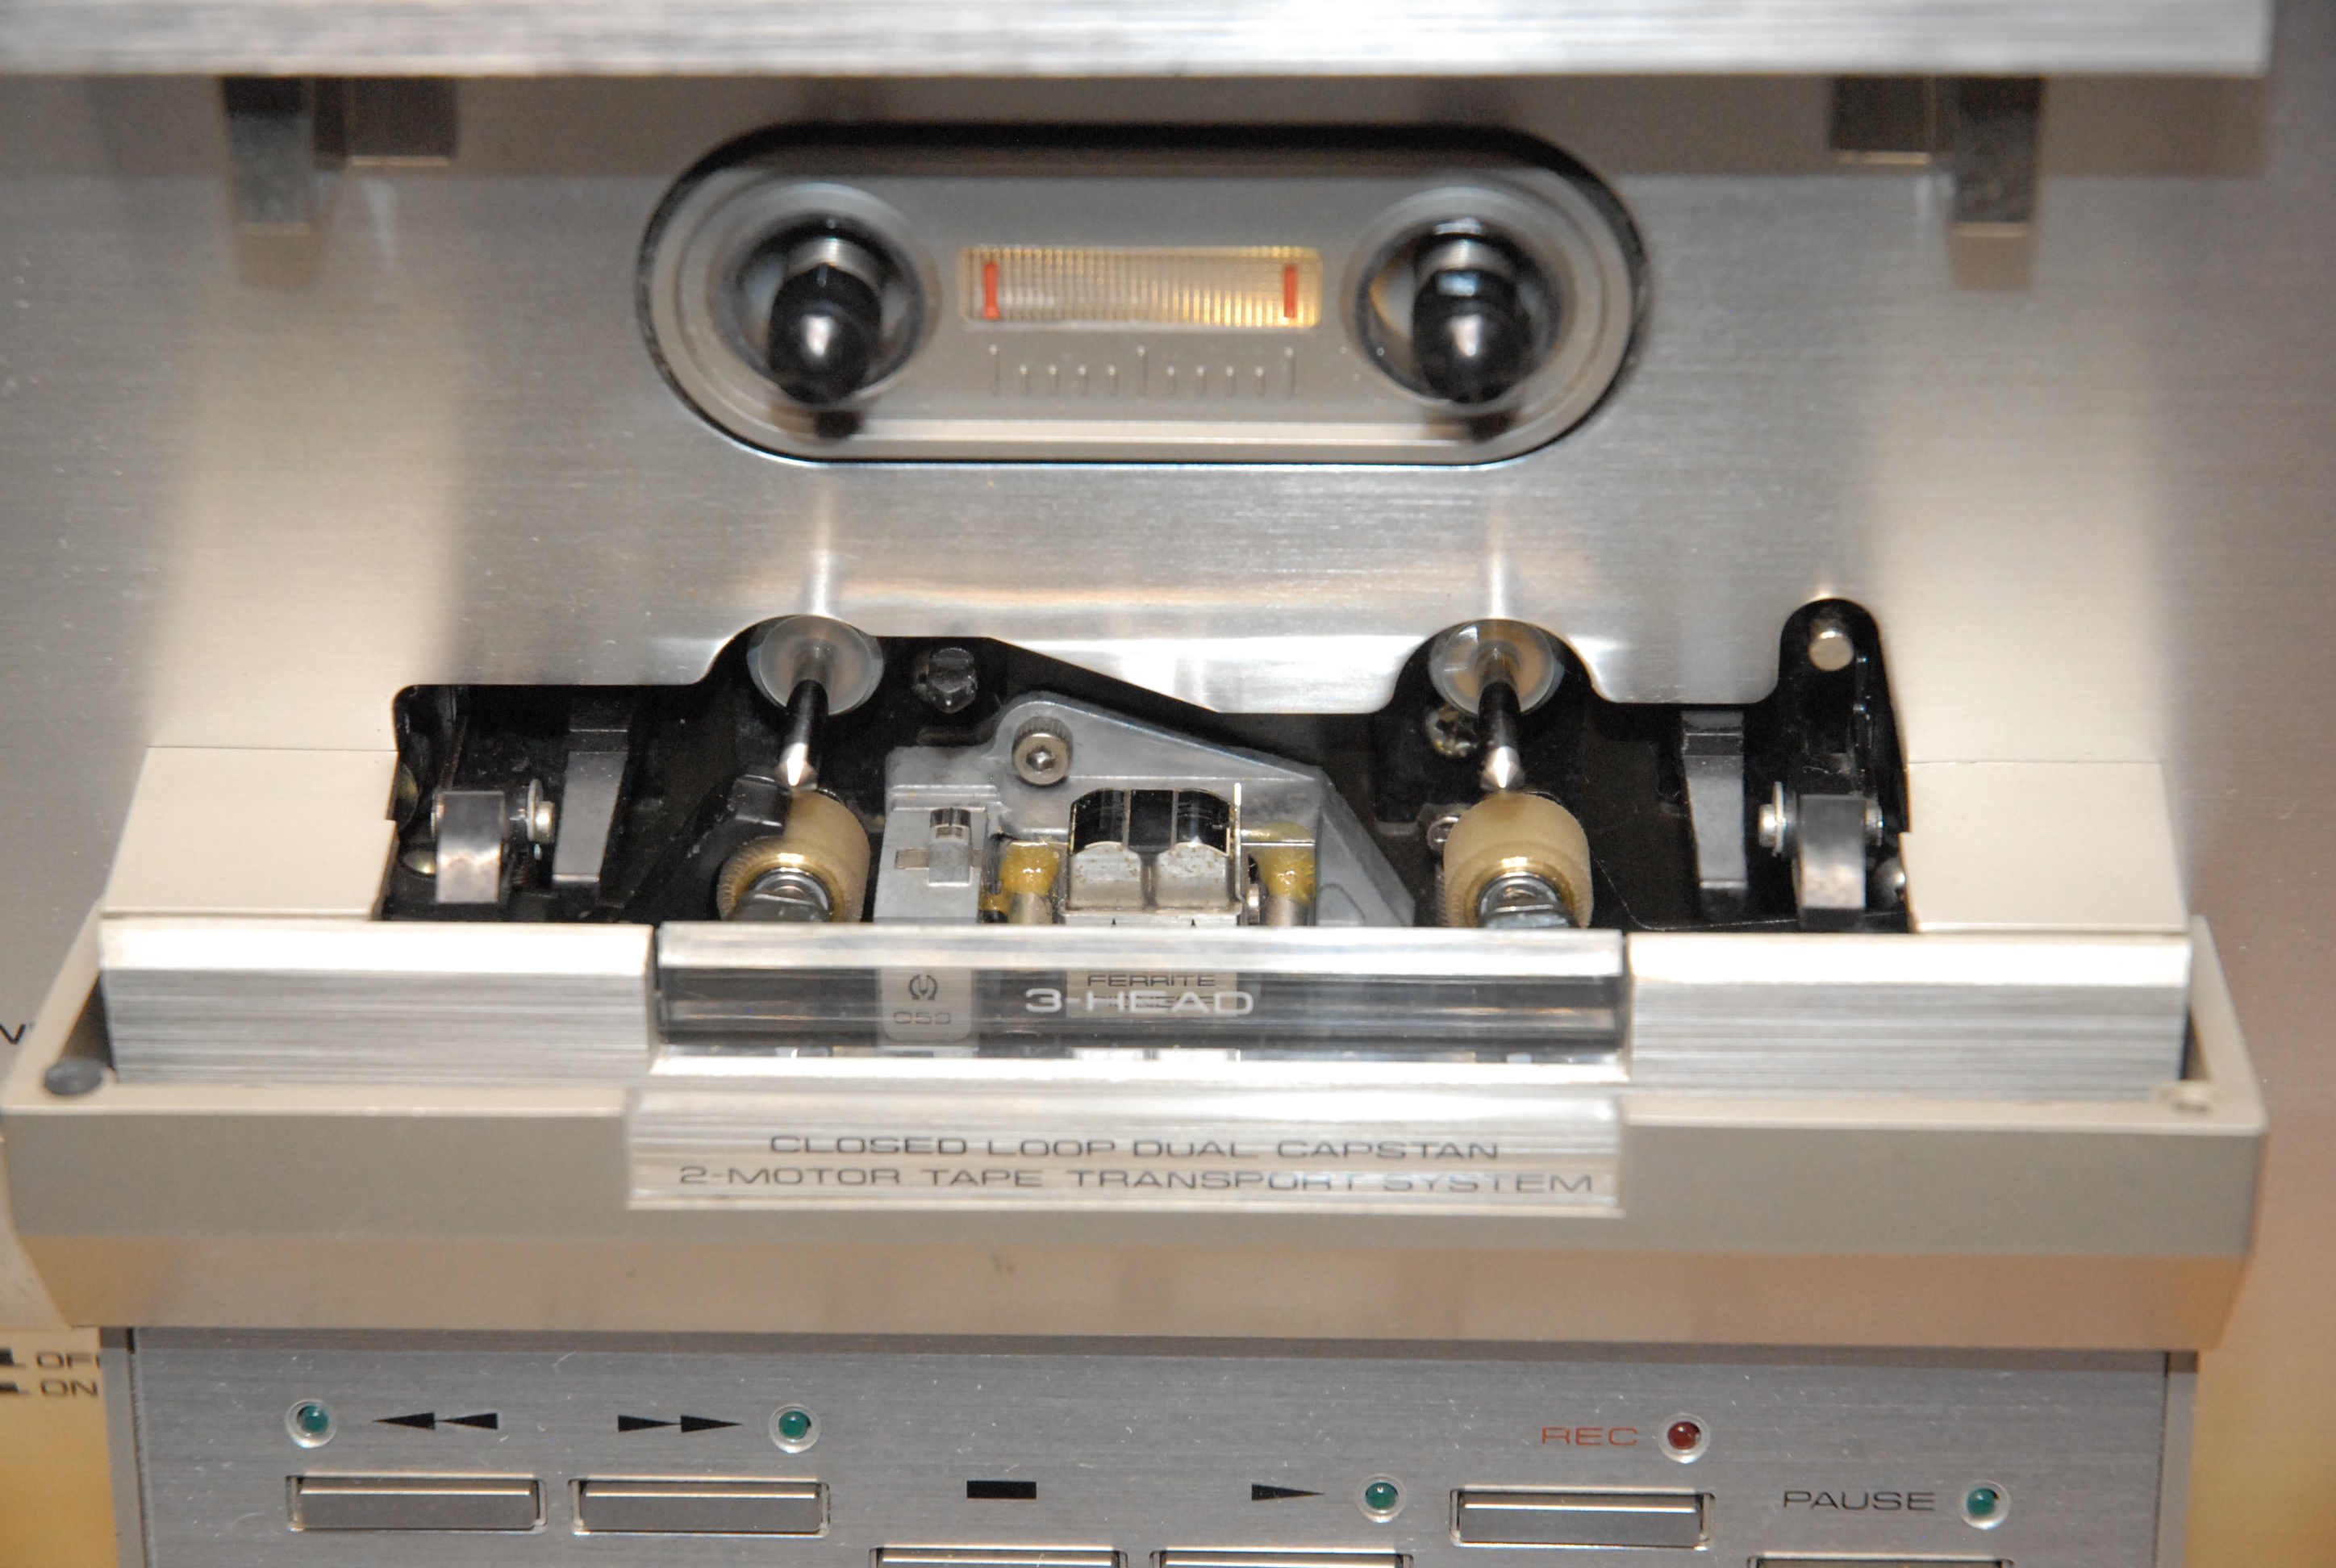
SO....after spending a week diagnosing this, then taking the transport apart again to pull the motor, rebuilding the motor and reinstalling it, and finally putting the entire transport back together The Verdict Is.....Problem Resolved!

It now stays in play, the voltages across the motor are by-the-book, and Fast Forward/Rewind blast along MUCH faster than they did before.

Tomorrow's installment will be "Those Pesky Pinch Rollers, and What to Do About Them".


Wednesday, August 10, 2022

Still Tinkering on the Pioneer CT-F950 Cassette Deck

 Kinda shot myself in the foot on one section of this.

These are the "Pinch Rollers" that hold the tape to the Capstan, and pull the tape through the machine. This is the OEM unit, and you can see the wear on it. Yes, they're tiny.

The replacements I bought were just rubber sleeves to fit over the bronze "Oilite" bearing. They came with ZERO instructions, and required you to press off, or otherwise remove, the OEM rubber from the bearing. OEM assembly on your left, removed from the arm it normally resides in, and the new sleeve on the right.

I pressed the bearing out using two properly sized sockets and a small machinist's vise:

BUT.....(always a "but", eh?) I neglected to scrupulously clean the bronze bearing of all traces of the original rubber. The stuff would NOT come off easily, and it may have been vulcanized on to the bearing. I cleaned off as much as I could, pressed the new sleeves back on, and put it all back together.


 I moved it from the "Mechanical Bench" over to the "Final Test and Adjustment Bench".

It randomly dropped out of play, so the testing stopped until I could address that. It would Fast Forward and Rewind properly at a high speed, but sometimes it would play for 2 minutes, sometimes for 10 minutes, but it always dropped out. It was dropping out because the Reel Motor, that motivates the Supply and Take-Up reels inside the cassette  was stopping. When that happens, the tape counter no longer functions, the controller sees "No Tape Motion", and drops everything offline. When it stopped you could always see some slack tape over on the take-up side, which is what clued me into the Reel Motor being flaky.

Using a search of the forums I found several threads on this, and followed their troubleshooting guide. Measured the voltages recommended while trying to play the unit, and those measurements confirmed the Reel Motor needed some serious servicing. Turns out it's quite common in these 40 year old Pioneers. New motors are NLA from anybody, and the ones from a parts unit would be highly suspect. They can be refurbished, however, so I read and re-read the instructions, and printed them out so I could go into the little electric motor and do the work. It's about 75% bigger than the "Mabuchi 540" motors we used in out slot cars, so it didn't bother me to do the work.

I'll go into the "Reel Motor Rebuild" tomorrow, and then back to those pinch rollers.

I'm about 99% finished with the mechanical stuff at this point tonight, and when I button it back up (again....) I can continue on the electronic adjustments, and whoo-boy....there's a whole slug of them to check/adjust.


Friday, August 5, 2022

Welcome To The Weekend!

 And we're off to the Larimer County Fair!


Photo crew will be SLW and my son. TLG has been talking about it all week....


Have fun and be safe out there!

Tuesday, August 2, 2022

RATS! Bought Wrong Chains for My Chainsaw....


 Oh, well....now I understand the difference between .043" pitch, and ,050" pitch. The new chains wouldn't slide easily in the bar, and it drove nuts until I did some googlin', and looked at Gen-You-Ine Makita chains vs the Brand-X chains I bought at Cheapo Depot. The Brand-X chains were poorly marked, and had no "Also Fits" guide on the package. Rookie mistake, I guess.

Proper chains on the way, and I can finally finish cutting up all the logs in the backyard. I'll go rent a splitter later in the year so I can turn them into easily digestible sizes for the fireplace.

The OEM chain got severely dull from cutting out some of the dead juniper bushes earlier this year. Cutting that stuff is like trying to cut steel.....tougher than snot, and rapidly dulls the blade.

A Week With Luna....

 She's settling in quite nicely. She's very obedient, affectionate, friendly, and amazingly good with both our grandsons. She's ...