Didn't get a bunch done on the car today. Installed the second half of the new braided stainless steel brake hose after I figured out how the mounting clip holds it to the strut.
To do that, I had to jack the car up and put a jack stand on the passenger side and pull the wheel and tire off. Once I saw how the OEM hoses were routed and attached, it was perfectly clear to me. This was a case of "I should have taken a few pix of it all stock", which I promptly did of the passenger side while it's all intact.
And I busted all the bolts loose on the passenger side so the strut is 90+% ready to be removed.
I'm hoping that now that I have a bunch of tools I didn't have before I started this, and the experience of doing it, that the rebuild of the passenger side will go much smoother than the driver's side did.
The other thing I did was to clean up and organize the workbench, throw out the trash can full of the dirty paper shop towels I use, wipe down some tools and put them back where they belong, and throw out a bunch of now empty ( !! YAY !! ) parts boxes.
Thursday should be a good day, and I figure I can easily get the strut pulled, pull the hub/brake disk assembly, and replace the spring and shock absorber insert.
Friday I'll be on the Iowa all day as we're having a radio event to commemorate VJ Day, and if I'm not too frazzled after all the "L.A. Fleet Week" activities, I'll take my wife out for dinner.
I really wanted to be an active participant in Fleet Week this year, but the "Supras in Vegas" event is a month earlier this year, and I let myself get jammed in a scheduling conflict by not getting off my duff and starting the work on the Supra earlier.
Oh, well...at least I'll be down there one day to support the Iowa.
Wednesday, August 31, 2016
Tuesday, August 30, 2016
Rebuilt Left Strut Installed
GROAN.......what a pain.
My wife helped, learning how to operate and adjust my floor jack as I muscled the 50+ pound assembly into place.
I think she learned a few new words, too.....
I had to use two long, tapered drift pins to get the alignment correct between the bolt holes in the steering knuckle and the threaded holes in the bottom of the strut housing.
A couple of pumps on the floor jack, and POP!, the parts lined up, and the steel locating sleeves on the steering knuckle piloted in to their bores on the strut housing, and the bolts went all the way in by hand.
Always pays to clean the threads when you take something apart....
Wednesday I'll replace what's left of the OEM brake hose with the mate to the new braided stainless steel hose already in the caliper, and bleed this side of the system, and put the end link for the sway bar back in. I had to pull it out so I could get the lower control arm to drop far enough so the strut would fit back in.
Then I'll make a final check to make sure all the hardware is "Finger Tight +10%", put the wheel and tire back on, and drop her to the ground.
Then I can do the final torque on all the suspension bolts, and everything on my checklist for this side of the car should be finished.

One more little item that I haven't discussed is also coming along:

This is a mounting plate for a reinforcing bar that ties the two front suspension towers together. It's just roughed in for now, as the final positioning of the plate on the other side and the connecting bar have to be done with the car sitting on it's wheels.
Shelby Mustangs had a bar similar that Ford called an "Export Brace" and included on all Mustangs that were exported. It stiffens the front structure of the car, and supposedly improves the handling. The guys on the Supra forums swear you can really tell a difference, so when one of the forum members did a "Group Buy", I signed up and ordered one.
I also have one for the rear that ties the spring/shock towers together, and I'll do that one (hopefully) next week when I start on the rear suspension.
Time to gather up my tools, wipe them down, and go grab a burger!
Lower Control Arm Installed
Got the LCA (Lower Control Arm) and other bits installed last night. Had to use my 15W LED
rechargeable work light, but "Got 'Er Done". Won't do final torque until
she's on her wheels, on the ground. And I had to make another Tool Run
to Harbor Freight because I lacked a large enough tapered drift to get
the bushing inner spacer properly aligned with the holes in the frame
pocket.
No, I DON'T just wail away on the bolt with a hammer to drive it through!
The LCA bolt and nut are "finger loose" at the moment, as I was just too beat to bother to put the nut and the steering rack "boot protector" back on. I'll get that done today before I install the strut.

This is the end link that might be over tightened. Tried to get it to the TSM (Toyota Service Manual) torque spec, but the nut bottomed out on the bolt before that happened. I'll check the Energy Suspension website to see if they have anything to say about it, but their website is woefully lacking in detailed information.

And props to my "Straw Boss" who makes sure I do things correctly, take proper hydration breaks, and don't get upset and start throwing tools around!

This afternoon's project will be to assemble the 10' x 10' canopy I bought from the place that a CelicaSupra forum member recommended. The temps are bearable outside today as long as you're in the shade. Working out in the hot sun really drains me these days, so the canopy was really a needed item.
And I'm going to make another tool run to get a floor fan for the garage. There's NO breeze against the back wall where the workbench is located, and I wind up soaked in sweat and with sweat running into my eyes, which also slooows me down.
More pix tonight after I get the strut installed.
Sunday, August 28, 2016
YAY! Got The Steering Arm Off! With Updates!
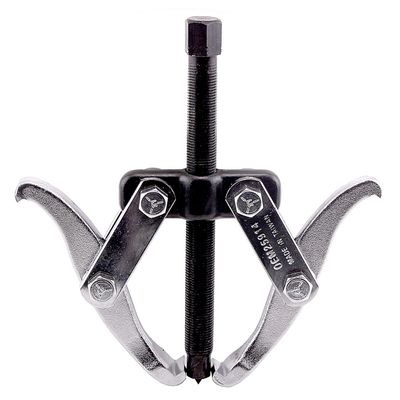
AutoZone didnt have the puller I wanted in stock, even though their website said they did.
SO....I settled for a two-jaw puller, like this:

The firs time I tried, I just cranked down on the screw, like I've always done. After a few mighty cranks, it popped off the ball joint stud!
So I put it back on, cranked it down a bunch, and rapped the steering arm with a suitably large persuader, and the steering arm popped off.
Now to get the plastic pan, parts cleaning brush, and Gunk out so I can scrub all the grease off the parts. Then I'll regrease the ball joint with Mobil 1 synthetic grease (the red stuff), install the new dust cover/rubber boot, mount the steering arm back on the stud, torque the nut, install the cotter pin, and start reinstalling the left front suspension.
Putting it all back together, in my humble experience, usually goes faster than tearing it apart. Hopefully I'll have the left front back on the car by tomorrow afternoon, and then start in on the right side.
Pix to follow when reinstallation is complete.....
****UPDATE****
The steering arm is now scrubbed clean. As expected, I had to chop the bristles on the cleaning brush off about half-way. When cleaning caked on grease and dirt, you need pretty STIFF bristles to knock the crud off. Otherwise you'll just move it around on the part, rather than 'flicking' it off with the short, stiff bristles.
Another "Helpful Hint from The Doctor" is to scrape off as much of the solid stuff and big chunks as you can before you start applying the solvent and scrubbing the part. The cleaner the parts are before you start, the longer the solvent is good for before it becomes too loaded up with crud to do any cleaning, and the less time you'll spend hanging over a pan of solvent happily (?) scrubbing away.
Oh, and wear TWO pairs of nitrile gloves, as the parts invariably have some sharp edges, and when the gloves split, and they will, the second set will give you enough time to change them out before grease and dirt loaded solvent leaks into the gloves, and all over your hands. I've had pretty good luck with the 5-mil thick ones from Harbor Freight. The vinyl gloves they sell seem to split about two minutes after you put them on, but the nitrile ones are pretty tough, and reasonably priced. I see they also sell 7-mil and 9-mil thick ones, so when I go buy some more, I'll try the thicker ones.
This also reminds to add "washing up sink" to the items I'll want in the Colorado shop if we have to build one.
Back in the late 1970s, early 1980's when my buddy George and I ran the shop, we had a Safety-Kleen solvent-based parts washer in the shop. Since we were a low-volume place, the Safety-Kleen guy would only come around every couple of months to check our solvent, and swap out the barrel of it that the machine sat on when it needed it. I don't remember how much it cost, but it was pretty reasonable, and that thing paid for itself many, many times over.
Now to work on the control arm........
****UPDATE 2****
Steering arm and lower control arm are now scrubbed "pretty damn clean". They both had 30+ years of grease, mud, oil, and other road grime caked on them that was 1/4 thick in places.
The ball joint was regreased with Mobil 1 synthetic grease after replacing the zerk fitting, which would no longer accept grease.
After watching the new grease come through the joint, I installed the new rubber boot/duct cover, as the old one was split from "Quick Change Grease Monkeys" pumping in WAY too much grease. Then I installed the now clean steering arm, torqued the nut to 58 ft-lbs, plus "a bit more" to get the castellations to line up with the cotter pin hole, and installed a new cotter pin.
I then added more grease until I saw the new rubber boot "inflate" slightly, at which point the fresh grease oozed out of the vent hole in the boot, and I stopped adding grease.
That, boys and girls, is how you properly grease a ball joint.....just until you see the rubber boot inflate slightly. And if you cleaned off the boot like you're supposed to before you started blindly pumping grease in to it, you'd also see the new grease ooze out of the vent hole, and then you'd STOP pumping grease in!
Sorry about this rant, but I've seen countless rubber dust boots on automotive steering linkages destroyed by excessive grease application, and there's no reason for it other than carelessness.
IF you always go back to the same grease pit on a regular basis, then you're probably OK, because the fresh grease pumped in every 6 months or so will keep the dirt that gets past the split boot from getting into the ball joint and wearing it out.
If you don't, then dirt gets in, the ball joint rapidly wears out, and your steering gets all sloppy and unsafe.
This probably all moot, as I don't think many (probably "any") new vehicles even have grease fittings on them any more.
ANYWHO......I'm sweaty, greasy, oily, and stink like kerosene from spraying and brushing Gunk on parts all afternoon.
BUT.....all the parts are now refurbished, CLEAN, and ready to go back together Monday morning.
Here's the completed Lower Control Arm. The "Steering Arm" is on the left, the new polyurethane bushing is on the right, and the loooong rod sticking out is the Strut Rod that had the "tatered-up" thread at the very end.


SO....I settled for a two-jaw puller, like this:
The firs time I tried, I just cranked down on the screw, like I've always done. After a few mighty cranks, it popped off the ball joint stud!
So I put it back on, cranked it down a bunch, and rapped the steering arm with a suitably large persuader, and the steering arm popped off.
Now to get the plastic pan, parts cleaning brush, and Gunk out so I can scrub all the grease off the parts. Then I'll regrease the ball joint with Mobil 1 synthetic grease (the red stuff), install the new dust cover/rubber boot, mount the steering arm back on the stud, torque the nut, install the cotter pin, and start reinstalling the left front suspension.
Putting it all back together, in my humble experience, usually goes faster than tearing it apart. Hopefully I'll have the left front back on the car by tomorrow afternoon, and then start in on the right side.
Pix to follow when reinstallation is complete.....
****UPDATE****
The steering arm is now scrubbed clean. As expected, I had to chop the bristles on the cleaning brush off about half-way. When cleaning caked on grease and dirt, you need pretty STIFF bristles to knock the crud off. Otherwise you'll just move it around on the part, rather than 'flicking' it off with the short, stiff bristles.
Another "Helpful Hint from The Doctor" is to scrape off as much of the solid stuff and big chunks as you can before you start applying the solvent and scrubbing the part. The cleaner the parts are before you start, the longer the solvent is good for before it becomes too loaded up with crud to do any cleaning, and the less time you'll spend hanging over a pan of solvent happily (?) scrubbing away.
Oh, and wear TWO pairs of nitrile gloves, as the parts invariably have some sharp edges, and when the gloves split, and they will, the second set will give you enough time to change them out before grease and dirt loaded solvent leaks into the gloves, and all over your hands. I've had pretty good luck with the 5-mil thick ones from Harbor Freight. The vinyl gloves they sell seem to split about two minutes after you put them on, but the nitrile ones are pretty tough, and reasonably priced. I see they also sell 7-mil and 9-mil thick ones, so when I go buy some more, I'll try the thicker ones.
This also reminds to add "washing up sink" to the items I'll want in the Colorado shop if we have to build one.
Back in the late 1970s, early 1980's when my buddy George and I ran the shop, we had a Safety-Kleen solvent-based parts washer in the shop. Since we were a low-volume place, the Safety-Kleen guy would only come around every couple of months to check our solvent, and swap out the barrel of it that the machine sat on when it needed it. I don't remember how much it cost, but it was pretty reasonable, and that thing paid for itself many, many times over.
Now to work on the control arm........
****UPDATE 2****
Steering arm and lower control arm are now scrubbed "pretty damn clean". They both had 30+ years of grease, mud, oil, and other road grime caked on them that was 1/4 thick in places.
The ball joint was regreased with Mobil 1 synthetic grease after replacing the zerk fitting, which would no longer accept grease.
After watching the new grease come through the joint, I installed the new rubber boot/duct cover, as the old one was split from "Quick Change Grease Monkeys" pumping in WAY too much grease. Then I installed the now clean steering arm, torqued the nut to 58 ft-lbs, plus "a bit more" to get the castellations to line up with the cotter pin hole, and installed a new cotter pin.
I then added more grease until I saw the new rubber boot "inflate" slightly, at which point the fresh grease oozed out of the vent hole in the boot, and I stopped adding grease.
That, boys and girls, is how you properly grease a ball joint.....just until you see the rubber boot inflate slightly. And if you cleaned off the boot like you're supposed to before you started blindly pumping grease in to it, you'd also see the new grease ooze out of the vent hole, and then you'd STOP pumping grease in!
Sorry about this rant, but I've seen countless rubber dust boots on automotive steering linkages destroyed by excessive grease application, and there's no reason for it other than carelessness.
IF you always go back to the same grease pit on a regular basis, then you're probably OK, because the fresh grease pumped in every 6 months or so will keep the dirt that gets past the split boot from getting into the ball joint and wearing it out.
If you don't, then dirt gets in, the ball joint rapidly wears out, and your steering gets all sloppy and unsafe.
This probably all moot, as I don't think many (probably "any") new vehicles even have grease fittings on them any more.
ANYWHO......I'm sweaty, greasy, oily, and stink like kerosene from spraying and brushing Gunk on parts all afternoon.
BUT.....all the parts are now refurbished, CLEAN, and ready to go back together Monday morning.
Here's the completed Lower Control Arm. The "Steering Arm" is on the left, the new polyurethane bushing is on the right, and the loooong rod sticking out is the Strut Rod that had the "tatered-up" thread at the very end.

Compared to the assembly when it was still in the car:

I'm sure the guy who'll be doing the front end alignment will be happy to have nice, clean parts to adjust!
Fleet Week L.A. Coming Up
Was on the Iowa all day to help conduct some VIP tours of the radio areas and the CEC.
Had good, steady crowds all day, and they were setting up for some kind of "Bacon and Beer" festival tonight.
The "Bacon Nation" food truck was there, along with a couple of others, and the people handling the beer concession brought in THREE trucks of kegs of specialty brews from the local brewers.
The shore power installation is 99% finished, and there's talk they might cut over, and get OFF the generator, on Monday.
Finished up the day with a one hour presentation on the state of "drones" in various areas of aerial and undersea use.
Pretty good talk by my friend and radio compadre "Mr. Z".
More HERE at the PBC website.
I'm beat, and have to get back to work on the Supra Sunday. Left front suspension is 99.9% finished, and ready to go back in the car. Hopefully the right front wont take me THREE WEEKS to rebuild now that I have all the proper tools, and learned a whole bunch from the left side!
Saturday, August 27, 2016
RATS! Gotta Make ANOTHER Tool Run
Doggone it.....my tie rod end puller wasn't big enough to get the steering arm loose from the ball joint stud, so I ran out to O'Reilly's to get their "Pitman Arm" puller.
You guessed it......it's not big enough to slip over the steering arm and center on the ball joint stud.
So, as much as I HATE going to AutoZone, I'll stop there Saturday on my way home from the Iowa.
You guessed it......it's not big enough to slip over the steering arm and center on the ball joint stud.
So, as much as I HATE going to AutoZone, I'll stop there Saturday on my way home from the Iowa.
Thursday, August 25, 2016
Still Here, Still Gettin' Greasy!
Just been busy.
I boogered up the threads on the end of the Strut Control Rod by improperly removing it (long story...), so I had to get some BIG metric taps and dies to clean up the external threads on the rod, and the internal threads in the nut.
Would have greatly preferred to use "Rethreading" taps and dies, as they remove less metal, but the "repair" came out OK, and the nut still has an acceptable level of "looseness" to the way it fits.
And I'll use some BLUE Loctite on it when I reassemble it!
*****UPDATE*****
Got this done after I made the post....
Old control arm bushing is pressed out, and the new Energy Suspension bushing is pressed in.
Used a combination of long bolts, nuts, washers, and a couple of sockets to press it out. Pressed the new polyurethane bushing in with a big "C" clamp and my bench vise, and then got the inner metal sleeve centered with the same long bolt and nuts I used to press the old one out.
The ball joint checks out OK...NO play at all in it. I'll clean as much of the old grease (which is clean) out of it as I can, replace the rubber boot which is split, and relube it with Mobil 1 synthetic grease. Then I can put the lower control arm and strut back in, and be DONE with the driver's side of the car!
Friday, August 19, 2016
Failed / Worn Out Parts
I my other post about Ms. Swan I mentioned that the top strut mounts were cracked "scary bad".
This is what I meant:

As you can see, this crack runs about 180* around the rubber, and if you look at it from a different angle, you can see the reinforcing fabric in the rubber.
The rubber parts on the sway bar end links were worse than this. The rubber parts fell apart as I was taking them out, and the cushions that mount the bar to the chassis were equally bad.
These were the original parts the car was "born" with, and I think it's a testament to the design and manufacturing quality that the Toyota Engineers put into them that they lasted 30+ years, and 167,000 miles.
The last time I did a complete front end rebuild like this was in about 1979 or so, when I did it to my 1975 Volkswagen Scirocco.
That car was only 4 years old, and the parts looked this bad.
Almost everything on the driver's side of the front suspension has now been rebuilt or replaced. The last thing I have to do is to replace the lower control arm bushing and the ball joint, and then start putting it all back together.
The nice thing about putting it back together is that everything is CLEAN!
Which reminds me.....I really NEED to buy a Parts Washer!
Wednesday, August 17, 2016
Ms. Swan's Front End Rebuild....
OK, here's what I've been doing.....
Here's the car up on jacks with the left front strut removed. She should be in the garage, BUT, my wife has started "staging" things to get rid of before we move to Colorado, and the garage has become loaded with "junque" again.

And here's the rest of the left front, with a bunch of worn out parts in evidence.

And to remove the BIG nuts on the struts, I bought a BIG wrench at Harbor Freight. My wife calls this my "Clown Wrench" because it's so big (to her) that it "doesn't look real".
When I removed the nut, I clamped the strut in the vise, got ready to give a mighty grunt, and the nut came loose with hardy any pull at all!
The wrench came in handy to tighten the new nut, though....

The top strut mount was toast, as seen by this "bottom view" of the bearing...

br /> Don't know if you can see the cracks in the rubber on the top, but when the car was sitting with the weight on the suspension, they were scary big....

Here's the junky old Monroe "Sensatrac" insert. When the spring was off, I grabbed the rod and gave it a pull. It had about a HALF INCH of free play both ways before you could feel anything, and it gurgled when you cycled it.
TOTALLY shot.....

Here's the OEM front spring on the right, along with the new Dobinsons #C59-070 that I bought from George at Raptor Racing. The wire diameter on the OEM spring is .550" / 14mm, and the free overall length is about 13.8" / 350mm.

Here's another view of the springs. The wire diameter on the new Dobinsons C59-070 spring is .603" / 15.3mm, and the free overall length is about 11" / 280mm.

And for those that might care (the American Iron guys go nuts for this type of information!), there was a violet paint stripe / color code on the OEM spring.

And here's the end result. A nice new shiny spring, new protective boot for the shock rod, and a new top strut mount.
Don't freak out about it being clamped in the vise jaws. It's barely tightened down to hold it for the photo, and when I did have it clamped down tight so I could torque the nut at the top of the new strut to 40 ft-lbs, I had two pieces of hardwood in there to cushion it so the jaws wouldn't bite into the new spring, possibly inducing stress fractures and weakening it.
As they used to say in the old Heathkit manuals..."This completes the assembly of this unit"!

I'll get this one back in the car after I R&R the lower control arm and strut rod bushings and replace the rubber boot/bellows on the power steering rack. It's completely dry on this side, so that means the seals are OK, but a torn boot like that just bugs me, and since I have a new one, REPLACE IT, JIM!!!
Then all I have to do is wash, rinse, and repeat this on the passenger side, and the front end is finished for now.
I blew off going down to the Iowa today as I'm on a roll here, and if I keep going I can have both sides of the front finished by Monday or Tuesday.
I learned a couple of tips and tricks from the guys on the Celica Supra forum, and I now have a couple of tools that make the job much easier, along with a huge assortment of Cotter Pins that Ill need to bolt everything back together.
I have a pair of brand new lower control arms with OEM bushings and new ball joints, so I might just swap out the new bushings for the Energy Suspension PolyGraphite ones I have, rather than spend the extra time to change out the ball joints in the lower control arms that are on the car.
At the pace I work at, that would probably save a whole day.......
So stay tuned for another exciting episode of "The Continuing Adventures of Dr. Jim and Ms. Swan"!
Not quite as much fun as Doctor Who and his companions, but a whole lot more real.....
Monday, August 15, 2016
"Driving Ms. Swan", the Continuing Story....
Well, I've been banging away on my 1985 Supra in preparation for the "Supras in Vegas" show in September.
Got the gearbox oil changed, and my "Short Throw Shifter" installed.
No, it's not the "snick-snick" you'd get from a Hurst Competition PLUS shifter, but it's light years ahead of the one that was in the car. Part of the installation was the removal of a totally worn out metal/rubber/metal bushing in the shift rod inside the transmission, and replacing it with a bronze "Oilite" bushing kit made by one of the Celica Supra forum members. This change, along with replacing the plastic bushing on the bottom of the ball that engages it with a superior grade Delrin plastic, and the new shifter, made a tremendous improvement.
Today I pulled the driver's side strut/spring assembly out so I can replace the top strut mount plate, shock absorber insert, and install the new front spring that drops the car about 3/4".
I was planning on replacing a lot of other parts, and now after evaluating the general state of the suspension, it looks like I'll be replacing a few other things. I already have the parts, so rather than pulling it all apart later, I'll just do it now, as I have all the PROPER tools to do the job.
The top strut mount plate was full of cracks and splits, and looked pretty scary from the top. After removing it, I spent some time checking it, and some of the cracks go all the way through the rubber. The bearing was also very gritty and rough feeling, and all the grease was dried up. It's lasted 30 years and 167,000 miles, so I think it's due for retirement!
The lower control arm bushings have some nasty cracks in them, and the rubber boot over the ball joint is split allowing all the grease to come oozing out. Since I have these parts on hand, they'll be changed.
The flexible hose to the brake caliper was in worse condition than I expected. The outer jacket was peeled away in several places, revealing the fabric reinforcement inside the hose, so that definitely has to go! I have a full set, front and rear, of stainless steel braided lines that I'll be using as replacements. I've used these before on other cars, and besides being very sturdy, they also give a better pedal feel due to the fact that they don't expand when you hit the brakes.
The pads in the caliper looked almost new, as well as the rotor, but they're being replaced as well. The rotors are StopTech "Sport Rotors", drilled for cooling, and the pads are high-performance ceramic "street" pads. And the brake system will get a flush and fluid replacement with DOT4 fluid.
And one surprise was the rubber boot for the tie rod arm that comes out of the steering rack. It's split, also, like the one I already knew about on the passenger side!
Again, I ordered two boots, so those will be swapped out.
And I'll be scrubbing off all the accumulated grease/gunk/road grime, and hitting any bare metal with a shot of paint.
Wednesday, August 10, 2016
Godspeed, Mike.......
I'd write something poignant, but I'm not, and never will be, good enough to eulogize Mike....


Godspeed, Mike, and God Bless your family. Thanks for all you did.
Monday, August 8, 2016
HAARP to Reactivate in 2017

Oh, boy. The conspiracy nuts will have a field day (no pun intended) over this one.
Courtesy of the ARRL:
Let the conspiracy theories resume! Alaska’s High-Frequency Active Auroral Research Program (HAARP) facility will reopen in 2017. The sprawling facility now is under the ownership of the University of Alaska Fairbanks (UAF), and the UAF Geophysical Institute is preparing HAARP for a new sponsored research campaign that’s set to begin early next year, UAF Researcher Chris Fallen, KL3WX, told ARRL.
“This involves, for example, reinstalling the vacuum tubes in each of the 10 kW amplifiers — eventually 360 in total — that were removed by the US Air Force [the facility’s former owner] for warm storage in the main facility,” Fallen said. He noted that the transmitter shelters have been unheated since the previous campaign in the summer of 2014. “The five generators — approximately 3 MW each — have recently been tested individually and are verified operational.”
Fallen said the HAARP ionosonde (DPS4D “Digisonde”) will be brought back online. “Some instruments on site need to be repaired or replaced,” he said. Those would include riometers and a UHF radar. “Optical instruments will be brought back. The flux-gate magnetometer is operational again.”
Fallen said other researchers are planning to install instruments at the science pads. “We are still investigating models for increasing Amateur Radio involvement with HAARP, which, in addition to announcing operating schedules, can potentially include hosting one or more ham stations on or near the science pads,” he said.
UAF describes HAARP as “the world’s most capable high-power, high-frequency transmitter for study of the ionosphere.” Constructed in 1990 at a cost of some $300 million, HAARP over the years has inspired a wide range of conspiracy theories that became grist for late-night radio talk shows. Some have claimed that HAARP’s 3 GW transmitter and 30-acre antenna farm have been used to control the weather, while others have argued that HAARP has caused earthquakes.
The FCC recently granted two Part 5 Experimental Service licenses for HAARP ionospheric research “across multiple bands.” WI2XFX will cover experiments in discrete parts of the HF spectrum, including 2650-2850; 3155-3400; 4438-4650; 4750-4995; 5005-5450; 5730-5950, and 7300-8100 kHz. A second Experimental license, WI2XDV, covers ionospheric research between 1 and 40 MHz.
UAF is hosting an open house at HAARP, located near Gakona, Alaska, on August 27. The event will feature facility tours, a mobile planetarium, a permafrost exhibit, science demonstrations and talks, and barbecue.
Fallen will deliver a free science lecture on Friday, August 26, at the Wrangell-St Elias National Park Visitor Center Auditorium, “Radio Modification of the Ionosphere, and Who Uses This HAARP Thing Anyway?” in partnership with the Wrangell Institute for Science and the Environment (WISE)
HAARP is aimed at studying the properties and behavior of the ionosphere. Operation of the research facility was transferred from the US Air Force to the University of Alaska Fairbanks last August, allowing HAARP to continue exploring ionospheric phenomena via a land-use cooperative research and development agreement.
Friday, August 5, 2016

Tuesday, August 2, 2016
"Phase 1" Painting Finished
Living room and dining room areas are done, and put back together.
Kinda shot the "Working on my Supra all weekend" plans, but, sigh......
Not sure what the wife has planned next, but I'm sure it will be another "Big Deal".
Going to a meeting tonight of the Los Angeles Area Council of Amateur Radio Clubs, which is an organization composed of all the Ham Radio clubs in the area. I'm the rep for the Battleship Iowa Amateur Radio Association, so I get to go to attempt to keep BIARA informed of future plans.
LAACARC is the group that puts on HAMCON in SoCal every few years. Since one of the clubs has backed out this year, we'll be hosting it again at the end of 2017. I'm planning on being out of here by then, but I'll help right up until we move.
Subscribe to:
Posts (Atom)
<i>The Supra Files....</i> Getting Wired, part II
So the slow, tedious job of rebuilding all the engine compartment wiring harnesses continues. You have to remove the harness, unwrap it, cl...

-
 FOURTH time I've written this post. MY Muse has apparently vacated the premises, leaving me too busy doing other things to keep both m...
 -
With apologies to The Control Voice.... Yup.....got The Busies the last few weeks. Lots of stuff happening this week, including my Nuclea...