Friday, June 28, 2019

Coaxial Cable Entrance Box Installation

Plans are still on to bore the holes either Saturday or Sunday, weather permitting.

It was 96* here today, and the NWS is forecasting 94* on Sunday....BUT.....There;s some weather forming up right now, the winds have picked up, the temperature is falling, and the barometer is 29.85 and rising. The lightning detector has been going off sporadically, indicating distances of 15~30kM, and I've seen lightning in the distance. So we'll see!

There's still plenty to do, and one of the tasks on the punch-list was getting the cable entrance finalized, and installed. It was originally going to have a single connection to the wire antenna, and have the Choke Balun/Line Isolator inside. and the control cable for the autocoupler.

It looked like this, before 'mission creep' set in:


WELL.....one the things I learned in getting the wire antenna up, and reading tons of books on antennas and transmission lines, is that the choke balun/line isolator MUST go at the antenna. It's entire purpose is to keep currents off the outside of the shield, and since those currents originate at the transmission line/antenna interface, that's where you put it. Now I've read this for years, but didn't understand the exact mechanism of how the currents got on the outside of the shield in the first place. Like a lot of Hams, I pretty much assumed the currents on the outside of the shield were induced on the shield by the radiating element's RF field.....WRONG! The currents get on the outside of the shield At The Feedpoint. It's a subtle thing, but the RF energy not only "sees" one side of the antenna as a conductor, but also "sees" the outside of the shield as another parallel path, and unless you choke the current at the feedpoint, the outside of the side becomes part of the antenna, and can cause a lot of mischief.

SO.....the Line Isolator has been removed from the outside-of-the-house enclosure, and has been relocated to the enclosure for the SGC autocoupler, as close to the input of the tuner as possible. The "permanent" 20 Meter vertical was also being put through it's paces and measurements during this learning period, and it has a Home Brew choke balun that looks like this:


Quite simple, almost 'free', and very effective. Just a coil of coax, nicely wound (NOT "Scramble Wound"), and secured to the antenna as close as practically possible to the feedpoint.

So the vertical is proved in, and will get mounted to it's new 4x4 post in the next week or so. It'll just get removed from the tripod, and attached to the post as-is. It works. It ain't broke. I don't need to "fix it", and the only way to "improve" it would be to raise it higher and add another radial or two.

The new wire antenna has been fabricated, the enclosure and mounting structure for the SGC autocoupler has been fabricated, and it'll be ready-to-install as soon as the quickrete sets on the post.

So the whole question of the cable entrance box gets easier, as I now have the outside box pretty empty, except for connectors, and inside box was always going to be pretty empty, except for the connectors.

Well, I got off-the-dime last week, and finished making some more back-up plates to support the connectors in the box.

Here's a pair of Type UHF bulkhead connectors installed using the home brew aluminum plates:


Lather, rinse, and repeat until both boxes have four of these connectors in them. Oooops.....didn't take any pix of them before I mounted them outside and inside 'cuz I was on a roll!

Outside box, solidly mounted:


From a bit further back:


And on the inside:


The connectors are on the bottom of the enclosures for weather proofing and appearance reasons, and wonder of wonders.......I was within 1/8" of getting things to line up perfectly.

So this item is pretty much crossed off. I still have to make four RG-8X 'jumper cables' to pass through the wall and a few dozen other things to do, and the poor Supra still has the winter dust on her.

Gotta get back on that car! Winter caught me off guard last year, and now I have to get that Supra Swing back.....

Tuesday, June 25, 2019

Got the Auger Started for the First Time

After returning from the DVM yesterday, I went out and put gas in the Jeep, and filled my little two gallon gas can. I already had 11 ounces of oil and a half-ounce of StaBil "Marine 360" in the can, so it gave me two gallons of treated, 25:1 two-stroke 'premix'. My neighbor's snow blower is a two-stroke, and he just buys the little cans of premix. I looked at those, and all the ones I could find were 40:1 or 50:1, which is way too light on the oil for this engine. They make a HUGE deal about 25:1, stabilizer-treated fuel in the operating manual for this thing, so I got another gas can, a quart of Lucas semi-synthetic two-stoke oil, and a small bottle of StaBil, and dedicated them to the auger engine.

I put about half a tank of fuel in it, and pulled it over a few times to get fuel into the carb and priming bulb, then set the choke to "Start", turned on the ignition, and gave it the pumps on the bulb. I pulled it over a few times, and nothing. Checked everything again, and pulled it over some more. Still nothing. I fiddled with the throttle and choke, pulling it over with the choke set to "Run", and still nothing.

Well, between giving it a few more shots of gas with the primer bulb and fiddling with the choke, I flooded it. I could smell raw gas, so rather than get a can of Ether and risking a muffler explosion, I just put everything back. Tonight I vowed to "Get It Running or Take It Back", so I started by pulling the spark plug out and looking at it. It wasn't soaked, but it definitely looked wet, so I blew it off with some brake cleaner and checked the gap, which was OK. Making sure the ignition and choke were OFF, I pulled it over easy to clear the cylinder, and see how it felt. As expected, it pulled over very easy with plug out, and while I didn't see anything like liquid come blowing out of the plug hole when I cranked it (yep, I've seen that), I'm pretty sure I flooded it last night. So, I put the plug back in with a dab of anti-seize on the threads (NEVER put a steel spark plug into an aluminum head dry! Just don't do it!), checked everything again, flipped the switch ON, but left the choke OFF (hey, it's 80* here today!), and gave it a pull. It popped a bit, so I gave it another pull, and it came to life with a nice, smooth idle. I ran it for about 20 minutes at various throttle settings to break it in a bit, and then grabbed a handful of throttle.

This little thing SINGS! I haven't owned a two-stroke since my last Yamaha RD-400, and I'd forgotten how responsive they are.

So it runs OK, hardly vibrates at all, isn't really too loud (I'll still wear ear muffs, though), and doesn't appear to smoke very much, even at 25:1 oil mix.

I predict hole boring and post setting for this weekend!

Monday, June 24, 2019

Back From The DVM.....

And it looks like Pebbles has a partial tear in her right rear Anterior Cruciate Ligament (ACL), similar to what many athletes suffer during their careers.

We have no idea when or how she injured herself, but a good SWAG is she was chasing something in the backyard, and hit one of the divots or bare spots at full chat twisting her right rear leg enough to injure it.

So, since it appears to be a partial tear, the DVM has recommended we keep her on the gabapentin for pain, and prescribed her carprofen (an NSAID) to reduce the inflammation.

We take her back in two weeks for a follow-up to see how the treatment is working, but for now, he said to keep her on "Rest and Relaxation", and to clear the yard of rabbits and squirrels before we take her out, lest she pop into Attack Mode, and attempts Warp 9 trying to catch a critter.

Sunday, June 23, 2019

Uh-Oh.....Dog Has to Go See the Vet.....

Little Miss Pebbles has been having some problems with her left hind leg. She started limping a bit last week, so we checked her out as best we could, and didn't see anything out of the ordinary. So, we started giving here an 81mg Aspirin three times a day, and she responded well.

Then Thursday night she started limping really bad, and by Friday morning she couldn't put any weight on that leg. We called the Vet and they said to bring her in Monday afternoon, and to STOP giving her Aspirin because it can cause stomach ulcers, even if you give the dog a 'coated' Aspirin. So we went over to the Vets and they gave her some Gabapentin instead. By Monday all the Aspirin should be out of her system, and they'll prescribe something else after they examine her.

The Kid's dog Diamond had a similar problem last year, and The Kid's Vet told them it was a ligament or tendon injury, and short of a $4k operation, all they could do was give her some meds and let it heal. Diamond is 95% OK now, but still has slight limp.

We'll have to wait to see what the Vet says about Pebbles.

Friday, June 21, 2019

First Day of Summer, Winter Storm Warning, and Field Day 2019

Expecting rain through Sunday, so no post hole diggin' this weekend!

And as we welcome Summer to the year, the NWS in Denver has issued a Winter Storm Warning, with up to 10" of new snow above 9000', along with a Tornado Warning for Elbert County, which is East of Colorado Springs. Must be GloBULL Warming!

And this weekend is the ARRL Field Day, and as last year, I'm sitting this one out. Strangely enough, I didn't get any announcements from the local club concerning the when/where of the event this year, but from their website, it's in the same location as last year. Seeing as how the weather is going to be miserable for Ham Radio Field Ops, I'm not planning on making the 45 minute drive out to observe.....

Enjoy the weekend!

Tuesday, June 18, 2019

Diggn' Holes, and Settin' Poles!

WELL.....getting ready to do so. It's been raining here the last few days, so hopefully the ground is soft.

We have the Technology.....


And besides the QuikCrete mix we have the 4x4 posts, and the ground rods. Other grounding and bonding hardware, and some 4 gauge solid copper wire, are out of the picture.....


So as soon as the weather cooperates, I'll be digging a couple of holes for the permanent antennas.

But seeing as we went shooting two weeks ago, and the guns hadn't been cleaned, we took some time today to attend to that chore. I didn't snap any pix when we were doing the wife's revolver, as I was in Instructor Mode, but I took a couple of my incredibly filthy Kimber on the bench.....


All the supplies were on-hand, and it only took me about an hour to completely scrub the slide, barrel, and all the other fiddly bits.

All nice and clean, and ready for reassembly.


So how did we do at the family range? meh.....not very well. The small holes are from the wife's 357 and my 45 at 25 yards. We're both terribly out of practice, and used to shooting at more typical "Home Defense Distances", on the order of 10 yards.


The BIG holes are from 100 yards with my slug gun. Not too bad for a standing unsupported position with some wind blowing. This gun will do ~1" groups shooting from a rest at 100 yards, and if I would have properly used the sling on the gun, I would have done much better. BUT...not having shot the gun in over two years, I'd say I could still put meat on the table if required.

Sunday, June 16, 2019

Arduino Based Lightning Detector

Moving to Colorado from Southern California resulted in huge changes to the "Radio Environment" I'm used to tinkering in. When we first came here, I talked to some local Hams about the effects of snow on antennas, and they all kind of chuckled and said "The wind will kill your antennas much faster than a snow/ice storm", which was change #1. We can get days of 40+ MPH winds with gusts to over 60MPH, so I adapted to the new wind loads, and beefed up all my mounting structures. We also get much more rain than in SoCal (DUH!), but that's easy to manage with proper weather proofing procedures, so no big change there.

And then we have the lightning, which didn't occur very often in SoCal, but can be a daily event here at certain times of the year. The NWS has charts of thunderstorm activity, and we historically get "60 Days" per year. We don't have as much lightning as SiliconGraybeard has where he lives, but we have enough that I think it's prudent to take some precautions.

Lightning protection is a complex subject, and I've worked at places that had extensive Perimeter Ground and Chemical ("Wet") Ground Systems installed, but that gets really expensive, and would involve tearing up the yard to install such a system. For a home-based Amateur Radio Station, it's nice, but not required.

I've gathered up most of the bits and pieces to provide a minimal (to me) amount of lightning protection, and that part of the station will be installed when I set the 4x4 posts for the permanent antennas. Each antenna will have an 8' ground rod at it's base, with a PolyPhaser Lightning Surge Protector mounted on the rod. The coax will come from the feedpoint, through the PolyPhaser, and on to the entrance panel mounted on the house wall. This should provide some protection from nearby strikes and induced surges, and the antennas will be disconnected and grounded when thunderstorm activity is in the area.

Like this, but with only a single Surge Protector per ground rod:


This probably wouldn't last more than a few tens of microseconds if it took a direct hit, but I have several 60'~70' trees in the immediate vicinity, and according to the "Cone of Protection" method, they should get hit first, and these will be for protection from induced surges.......I just hope they never "get used".

So even though I have some precautions taken, it would be nice to know if/when lightning is in the area. We had high-end lightning detection equipment at Boeing, so I knew equipment was available, but at what cost? Investigating further, I found there were several lightning detection methods in use, with the most common one being a glorified "Crystal Set" very broadly tuned in the 300kHz~500kHz range. There's a burst of wide-band radio energy during a lightning event, and the little "crystal radio" detects it, and then blinks a light or sounds a buzzer. Well, it turns out that there's now a complete lightning detection system on a chip, made by ams AG of Austria. It includes the circuitry for a 500kHz radio receiver, and some fancy Digital Signal Processing to discriminate real lightning from man-made noise. Pretty spiffy, and SwitchDocLabs sells a "kit" (here we go again.....) with a lightning sensor module, a display, a preprogrammed Arduino module, a piezo tweeter, a WiFi module, an "I2C-to-USB" module to commincate with and program the Arduino, and all the cables you need to plug it together.

Here it is up and running on the radio desk:


The three boards in front of the Arduino module are the lightning sensor, the tweeter, and the display.

This is the complete lightning sensor. The chip is about in the middle of the board, and the itty-bitty ferrite bar antenna is at the board edge, with a white sticker on it.


This is the Arduino board with the interface module plugged in.


Most of the time it just sits here displaying "Waiting For Lightning". When it detects a strike, it changes to "LIGHTNING!!", the backlight turns red, and a range estimate in kilometers is displayed.

So far, every time I heard thunder, the board had alerted a few seconds earlier, and when it's alerted and I didn't hear anything, the NWS radar indicated rain activity.

Looks good so far, but I want to read the datasheet 'between the lines', and see what other information I can get from the sensor other than "Event Detected" and "Estimated Range = xx km". At the very least, I need to be able to record and timestamp whatever it triggers on so I can merge that data with the data from the weather station.

Time to crack open the "Arduino for Dummies" book!

Saturday, June 15, 2019

Moving Day for The Kids

So we have The Little Guy for most of the weekend. Our DIL's father and mother bought another property in Laporte, a duplex, and now that Dear Old Dad has finished the place (with ample help from The Kids), it's Moving Day!

The kids were living at what I call "The Country House" up in Bellvue, where we first stayed. Their place was a converted double-wide that had another structure attached to it that had the kitchen, dining room, laundry room, and another bathroom. In the back was the big shop with the little 'bachelor apartment' where we stayed the first month after our CALEXIT. Would have been a killer place for a single guy to live in! Anyway.....the house the kids were in only had one bedroom, and now that The Little Guy is well into the toddler stage, everybody decided he needed his own room, hence the Great House Hunt. They're not quite ready to buy their own place just yet; they'll be in the market seriously in a year or so. So when this place popped up for sale at a very good price, her parents jumped on it. Her dad had his crew tear the insides out down to the studs, and they completely replumbed, rewired, redrywalled, repainted, recarpeted, etc, etc, etc the whole place. The roof is only two years old, so they didn't replace it, but otherwise the entire duplex has been gutted and rebuilt.

And The Fence Guy came in a rebuilt the falling down fence around the property so the dogs can run, and The Little Guy can be kept away from the creek that runs through the back of the property. Well, kept away from it until he can climb the fence, and then EXPLORE!

Expecting some rain this afternoon, per the NWS, but I'll believe it when I see it. After last year's fiasco with the lawn, we're sticking to our watering schedule, rather than relying on Mother Nature to do the watering for us.

Thursday, June 13, 2019

Oooops.....No Auger, So Garage Shopped

They sold out, and the next shipment is due in Sunday afternoon.

But I got two 4x4x8 posts and three 8' ground rods inside the Jeep, along with the ground rod driver bit, two bags of dense shade/bright sun grass seed, six bags of soil, 1 cuft each, 3 bags of QuickCrete, and some other misc stuff, without punching out my new stereo or ripping up the dash.

I could have fit the auger in there, but no joy at Harbor Freight. I picked up several 4" magnetic parts dishes (never have enough of them!), a new "Bauer" True RMS Digital Multimeter for the garage, another magnifying lamp to clamp on this radio desk so when the wife or The Little Guy wander up with something to "fix" I can see what I'm doing, a combination tire inflator/gauge with a nice hose whip on it to replace my $6 HF hose whip that disintegrated after 10 years, some air fittings, and some of the HF "Thunderbolt" AA and AAA batteries.

And I shopped air compressors and floor jacks while I was there. These are two items I "need" replacements for, as my little "air compressor" is barely good enough for filling tires and blowing (light) dust off things, and my aluminum "1.5 Ton" rated floor jack struggles to lift ONE front corner of the Jeep. These are the "1.5" ton aluminum "Racing Jacks" you see for $60 at HF, and that's about what they're worth. It picks up the Supra and the wife's Hyundai Elantra just fine, but starts to grunt lifting the rear end of the Jeep, and really groans picking up ONE front corner. The wife agrees 100% about the jack, seeing as it's a Safety Item, so I know which one I'm buying "As Needed". It's a 3 ton, low-profile, long-reach model, and even has a foot pedal to pump it up, something I haven't seen on a big floor jack in like forever.

Makes it easy on us Olde Fartes....

Air compressors are another matter. The little "hot dog" (one small tank) oil free compressor I have is better suited for an air brush than garage duty, but I'm severely spaced constrained. If I clean off the bottom shelf of the workbench, I *think* I can fit one of these down there:

Otherwise I'll have to get something like this:


Since I won't be running air tools, I can squeak by with one of these small jobs. The highest air demand will be from the small touch-up spray gun I have, and these two compressors are rated to deliver more air than the gun requires. And either one will be far better for tires and blow-gun stuff than the itty-bitty compressor I have now.

So no hole digging this weekend, and I'll use the time to get Ms. Swan out of the garage so I can sweep it out and do some shelf reorganization that'll require the ladder on that side of the garage.

Almost Friday!

And I'm just about ready to head out to Home Depot and Harbor Fright to pick up some stuff like 4x4x8 fence posts to mount the "permanent" antennas, some 8' ground rods and a driver bit to install them using my neighbor's demolition hammer, and a few bags of "QuickCrete" to set the posts.

Then over to Harbor Fright to pick up an auger:


Yes, I could rent one, BUT...these are on-sale, and I have a "25% off one item" card from Hot Rod Magazine, so I'll 'only' pay about $125 for it. The rental place wants $30/day to rent one, and at the speed I work at, I'll be money ahead to just buy the thing! After we "bore the holes and set the poles" and the QuickCrete cures, I'll be able to drive the ground rods in at the base of the poles, install the PolyPhaser Lightning Surge Protectors, bond the ground rods together with some 4 gauge wire. Then I'll transfer the 20 Meter vertical from the tripod to it's own post, and get the SGC autocoupler and mast mounted to the other post to finish up the 88' wire antenna.

And I haven't forgotten the Supra.


I've cleaned up enough of the "Winter Storage" debris to get all around the car, and I'll take her out tomorrow and blow the dust off with the pressure washer and a 'gentle' spray head. Then I can get back to finishing up the front bumper so I can get the grille, fog lamps, and corner lights back on.

Saturday, June 8, 2019

New Audio Addition - Heathkit AA-1640 "Basic Power Amplifier" -

Yeah, like I really need another project. But, like Phil at Bustedknuckles, it was "An Offer/Counter Offer I Couldn't Refuse".

Well, I suppose I could have, seeing as I made the first offer, and the seller responded quite reasonably.

This thing had been languishing on eBay for several weeks, with a bunch of watchers, but no sale. It was at a decent price ($350), but the shipping on it was $145! I low-balled him at $175, and he came back with $250. I countered with "Split The Shipping?", and he responded he would. Ruh-Roh! Well, I agreed, and it arrived today.

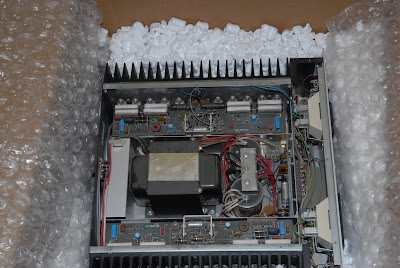
It's a Heathkit AA-1640 "Basic Power Amplifier" in very nice condition.


One of the reasons the shipping was so high, is that it's another "Analog Godzilla" like the Yaesu, and it weighs in at Sixty Pounds. Definitely a Heavyweight Contender, as all it is, is an amplifier. No tone controls, no equalizer, no speaker or input switching, just a big honkin' stereo amplifier, rated at a very conservative Two Hundred Watts per channel at 8 Ohms. Recent lab tests have shown these really put out more like 275 Watts at 8 Ohms, and 350 Watts at 4 Ohms.


It's built like an Iowa-class Battleship, and I'll bet the power transformer weighs at least thirty pounds. The only option available for these amps Back In The Day was a set of power output meters, and this one has them. You can see the backs of the meters in the picture above, and the front panel in the picture below.


Saying it's "Just An Amp" is a bit like saying a Dodge Demon or Hellcat is a good grocery getter. It's a stupendous amp in terms of clean, wideband power output, and is perfect for driving inefficient speaker systems.

 It was listed as "Won't Power Up", and when I closely examined the listing pix I saw the fuse holder was missing! Since I don't smell or see anything burnt/crispy/vaporized, it's in very good cosmetic and mechanical condition, and it uses an usual type of fuse holder, I'm rolling the dice that it'll work after I replace the fuse holder and do some resistance checks.

Anyway...this will get all the electrolytic capacitors replaced, the output connections for the speakers will be replaced with "5-Way" binding posts, all the connections will be tightened up, the gain controls cleaned and lubed, and I'll give it a very good cleaning.

For now it's sitting over in a corner of the downstairs storage area. I have too many other projects ahead of this one, but seeing as these have reached Cult Status, and go for upwards of $1000 all shined up and ready to go, I couldn't pass it up for $325.

Wednesday, June 5, 2019

Yaesu Surgery

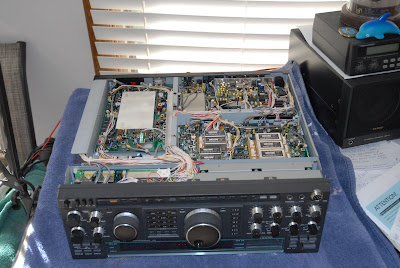
Well, I got really tired of not being able to use 40 Meters (7~7.3MHz) on this radio, so today I hoisted it off the operating table, had my wife lay a nice fluffy towel on the table, and then grunted this 50-pound beast back on the aptly named "Operating Table".

Off with the covers!


This thing is wall-to-wall packed under the hood(s). From the symptoms the radio shows (looks like power recycling or something pulling a logic bus to zero causing a reset), I went through the schematics to see what got switched, and when. A few weeks ago, I "crept up" on what frequency this odd behavior at, and what frequency it stopped at. I started at 4Mhz, and began tuning up. As soon as I hit 6.5MHz, the radio clicked when it switched filter banks, and started acting up. Coming down in frequency, it started acting up at 7.5MHz.

Gee....that pretty neatly brackets the 40 Meter band. What gets switched when it hits these transition frequencies between "General Coverage", and "Amateur Radio" frequencies? Hmmm....the only thing like that is the Low Pass Filter assembly on the output of the transmitter. Groan....that's on the top side of the radio. Have to flip this beast over again. While I had access to this side of the radio, I turned down the volume on the "Button Press Beep", which was annoyingly LOUD. Now it's a nice, reserved 'beep', letting the operator, and not everybody in the house, know that a button has been pressed.


The Low Pass Filter assembly is in the metal shield can behind the speaker. Let's pop it open!


The coils and capacitors that make up the individual filters for each frequency segment are in the center of the board. The small, grey rectangular boxes are relays, one for the input, and one for the output, that select each one of the eight filters on the board. The large grey cables with silver connectors are the RF cables into/out of the board. On the lower left corner of the board is a small, plastic, multi-pin connector with the wires running to the aptly named Control Unit, which tells what relays to activate. AH!!  A place to split the circuit! Pulling the connector out would remove all the incoming control voltages to the board, resulting in it going into bypass, or "General Coverage" mode. I pulled the connector and inspected the female connector sockets, and the male pins on the board, and all looked well. No pinched wires or chafed insulation, either. Turned the radio on, tuned through the band, and it worked! No clicking, clacking, and resetting. OK! Plug it back in to confirm the problem is indeed with this assembly, and ........uh-oh.....it still works fine, and now when I tune through the previously wonky frequency range, it continues to work, and now I hear the relays click in at 6.5MHz, and drop out at 7.5MHz, just like it should.

RATS! But Jim, didn't you just "fix" it? No, because I didn't find out what "it" was. There's always a possibility that removing and reseating the connector (a very common practice) cleaned off some corrosion through the 'wiping' action of the contacts, or that the connector wasn't seated properly to begin with, but for now I have to write this off as a "No (Hardware) Problem Found", and consider it one of the dreaded "Intermittents".

I still have several issues left to resolve with this radio. Four of the buttons don't work on the panel, meaning I can't 1)monitor my own transmitted audio, 2) get the second receiver to function other than as the "B" VFO, and 3) & 4), the rapid tuning "Up" and "Down" buttons don't work.

All four of the buttons share a common wire/path/circuit board trace on one side, so a fault on that one line takes all four out. Could be (another) connector issue, a "wire" issue, or a cracked/damaged printed circuit board trace or "via" between the two layers of the board.

I'll tear into that tomorrow.....

Sunday, June 2, 2019

Final Tally for Museum Ships Weekend

Band conditions were poor, with a Solar Flux Index of 70. This indicates we're right around The Bottom of the current sunspot cycle. It was down to 68 on Friday, which is really low. I can't remember the lowest SFI I've seen, maybe 65, but it should start to increase in the next 12~18 months.

The new vertical antenna works quite well, and has "Textbook Curves" for the VSWR and Reactive Components (aka "Impedance") at and near resonance, and so far, if I can hear them, they can hear me. It also helps that this radio is set to put out about 175 Watts, and my little Elecraft K2 was "only" pumping out around 65~75 Watts. A bit over a 3dB power increase, and combined with the advanced (for the time) speech processing/compression of the transmitted audio, can make "just enough" of a difference to get through sometimes.

So how many Museum Ships did I contact? A dismal FIVE.

W1M at the Lake Champlain Maritime Museum in Vermont

NS7DD aboard the USS Turner Joy in Oregon

W8COD aboard the USS Cod in Ohio

WW2LST aboard the LST 325 in Indiana

and NI6BB aboard the Battleship Iowa in Southern California, where I had a nice 30 minute chat with two of my friends.

I also heard, but couldn't contact, the following:

W5LEX aboard the USS Lexington in Texas

N4WIS aboard the Battleship Wisconsin in Virginia

NJ2BB aboard the Battleship New Jersey in New Jersey

N5E aboard the Tall Ship Elissa in Texas

and WA4USN in South Carolina.

I heard people working KH6BB aboard the Battleship Missouri in Pearl Harbor, but I couldn't hear them at all. All four Iowa-class Battleships were on-the-air this weekend, a very rare occurrence.

I heard a lot of DX (distant) stations from Italy, France, the Azores, and Slovenia, too, so even though the band conditions were not good, there was a lot of activity. Signals were weak, and went from consistently weak (S4~S5) but very stable and readable, to "S9 Plus", fading to zero in 15~20 seconds, and then back to very strong (S9) in about the same time. Since I haven't been this "RadioActive" in quite a while, I'm still getting used to cruising around the bands, what they sound like, and how propagation changes during the day. I really have to get into the FT-1000D and see why it goes bonkers between 6.5MHz and 7.5MHz, as that fault renders 40 Meters at 7MHz unavailable to me. I'm suspecting a bad component on the filter assembly, as when it tries to switch in that bank, the radio starts blinking on and off and resetting like the power's being interrupted. Maybe a bad "flyback diode" across a relay, causing a supply to short when that bank is switched on.

Anyway....I'd really like to get on 40 Meters again now that I have a more suitable antenna. The Elecraft KAT100 tuner I use with my K2 could load the 20 Meter Buddistick just fine on 40, but it's a bit short to be an efficient antenna on that frequency. Oh, well....it's apples-to-oranges anyway, as the 88' wire ain't anywhere near being a 17' vertical, so the "pattern" of the wire antenna is anybody's guess. Mostly straight UP under 14MHz due to it being less than half a wavelength above ground at that frequency, good for what's called NVIS use, but not terribly effective as a long-distance antenna. My 33' vertical (the "Long Beach Antenna") shines at that on 40 Meters, just like this new one does on 20 Meters.

Just gotta dig into that radio and get 'er done!


Saturday, June 1, 2019

Poor Propagation on 20 Meters

Bands aren't too good today. I've been searching the bands for any and all Museum Ships, and although I've heard 5 of them, I've only managed to contact W1M at the Lake Champlain Maritime Museum, and NS7DD aboard the USS Turner Joy.

The guys on the Turner Joy told me they'd contacted the Iowa today, but I haven't heard them.

So I'll continue to scour the 20 Meter band looking for other ships. The FT-1000D loads into the new vertical on 17, 15, 12, and the low end of 10 Meters, so while it's probably got a really screwy radiation pattern on those bands, at least I can load it with the 'tuner' in the radio, and use it on those bands.

Just for grins, I tuned in WWV on 15Mhz and compared the signal levels between the two antennas. The vertical is noticeably better, about two 'needle widths' on the S meter, so I'll see how it compares on the other bands that are close to WWV frequencies.

Annnnd.....We Got Zip.....

 Total snow was about 6~8", but half o0f it melted as soon as it hit, and we never had more than 3" on the ground at any one time....