Showing posts with label ham radio. Show all posts

Sunday, February 7, 2016

Battleship Iowa's "Original" 1980's Transmitters Possibly ON-THE-AIR This Coming Wednesday!

WELL....it's been a long, slow, slog, but we're 90+% there.

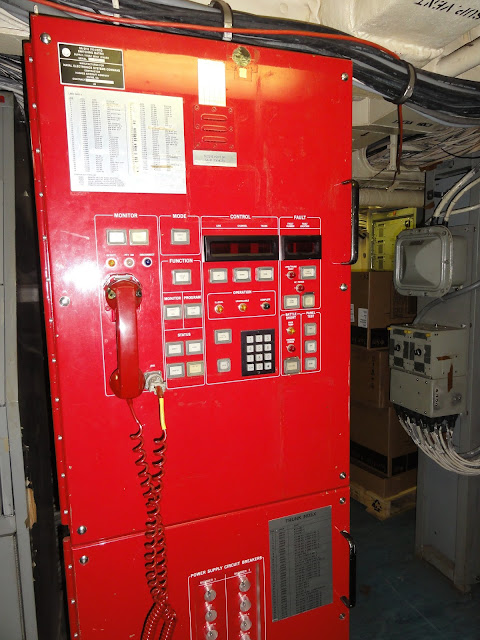
We have two "Red Phones" mapped out through the "Coke Machine", the audio interface boxes, the transmit and receive switchboards, and the R-1051 receivers and the AN/URT-23A transmitters.

We've verified that we have correct receive audio through the receive path, and the transmit audio from the "Red Phones" also makes it down to the Transmitter Room, and drive the #3 transmitter to full (1000 Watts +) power into a dummy load.

For the receive antennas we're using the "Twin Whips" mounted up on the bridge, and for transmit, we'll be using the "Goal Post" or "Bull's Horns" antenna located just forward of the #2 stack. The "Goal Post" antenna is fed with (I think) 3-1/2" Heliax cable from the transmitter room, and some time ago I made up an adapter that connected the Andrew flange to a Type-N female so we could run coax into one of the large antenna couplers down in the transmit room.

I used my Comet CAA-500 Antenna Analyzer to verify that adjusting the controls on the coupler caused the impedance to vary, and the manner in which it varied it varied in "looked" just like we were tuning a random length antenna with a good old Johnson Matchbox.


The players are as follows:


A "Red Phone":


The Infamous "Coke Machine":


R-1051 Receiver:


Receive Antenna Couplers:


"Twin Whips" Receive Antennas:


AN/URT-23 Transmitter:


Transmit Antenna Coupler(s):


"Goal Post" Transmit Antenna:


I'm posting this early so those who are interested in trying work us will have plenty of time to get ready. We know we transmit better than we receive, even running 100 Watts from the Amateur Radio gear, so please be patient with us if we manage to make this happen.

Not all of us are "Contest Operators", so pile-ups will be dealt with "Loudest Heard First", and then we'll try to get to the weaker stations.


Look for us in the upper half of the General section of the 20 Meter phone band. *IF* we get the gear On-The-Air, it will be after 2000 UTC, and before 2359 UTC.

We'll be using an individual's callsign, not NI6BB, and we'll include "Battleship Iowa" in all our CQ's.

Hope to see you On The Air!


I'll have my tablet computer with me, so if this is a "GO!", I'll make a post here right before we go live OTA.

Sunday, June 5, 2011

Field Day Preparations

Was going to get started yesterday on Saturday, but I had a breakfast meeting with my club, and then I finished installing all the software on the PC I use to run my FlexRadio 5000A. The motherboard in that PC had been giving me random BSOD's, even from when it was new. It finally bit the dust early last week and wouldn't boot up at all. I ordered a new motherboard for it a couple of weeks ago, and installed it last Saturday. I left the Windows 7 installation alone, and while it worked OK, I just get all queasy inside running a new motherboard with the previous installation of Windoze. I think Windows has gotten much better in that respect, as I've done the same to to Vista installations, and after spending 20 minutes or so sorting itself out, they booted up and ran fine. Still, I prefer a clean installation when making a major hardware change.
SO......Spent some time cleaning up the garage this morning (ALWAYS a losing battle here at Casa de Radio!), and getting things rounded up (a.k.a. "One Big Pile") to make sure I have all the bits and pieces to put the portable satellite station back together.
The first thing I did after that was crank up my little Honda EU2000i generator, which hasn't been run in almost a year. I always put StaBil in the fuel, but it still took about 10 pulls to get it running, and it wasn't too happy at first. It took longer on the choke to keep running, and surged badly for about the first ten minutes of running. I ran it about 30 minutes with a 1000 Watt load, and shut it down to cool. Now it starts on the first pull, like a good little Honda should.
I really like this generator; it has an "Economy Mode" that conserves fuel, and with the light loading on it at Field Day, it will run a good 8~9 hours on one tank (1.1 gallons) of gas. Plus it's really quiet compared to some of the cheaper gensets on the market that use "lawnmower" engines. I've had people ask me if it was running, because the noise it makes was drowned out by the Coleman, Sears, and Harbor Freight generators!
Anyway.....back to work rounding up my stuff. I suppose if I did The Big Push I could get things running today, but I'd rather take the time to *make sure* all my gear is in good shape, and ready to go.
And I still haven't got the trailer licensed. That's on my To Do list for this week!

Sunday, March 29, 2009

Awwww.....RATS!!!

Grrrrrrr.....I threw in the towel yesterday on getting my Kenwood TM-D710 mounted in my Jeep Grand Cherokee. The last straw was when the backseat bottom cushion wouldn't fit back in. I thought I had this all measured correctly, and that there'd be room enough between the bottom of the seat cushion and the radio. Nope. So I took the mounting screws out of the bracket, and let the radio sit all the way down inside the bracket. Nope again. So then I pulled the bracket completely out, trimmed the under seat carpet and padding, and let the radio sit on the floor pan directly. Nope, still about 1/4" too tall, and I really didn't want to squish the radio between the floorpan and cushion bottom.
This came after spending about two hours fishing the power, microphone, and control head cables under the carpet, and up through the rear of the console so I could run them where they needed to be at the front of the console. Oh, did I mention it took about an hour to REMOVE the console? Then I realized I'd forgotten to run the speaker leads along with the other cables! I decided to just let them hang out from under the seat for now, and get the seat back in so I can go pick up my girlfriend and her buddies from the airport next week.
That's when I found the "Interference Fit" problem between the radio and the seat cushion.
I really started to lose it, and decided to call "Game OVER" before I let it get to me any further.
Out it all came, and the console and rear seat cushion went back in. I still have the radio and GPS antennas installed, and the cables for those are readily reachable. When time comes that I *need* a radio for mobile use, I'm going to just let the radio sit on the floor behind the driver's seat. I'll connect the antenna to the main body of the radio, the GPS cable to the adapter box I made, and run the power, microphone, and control head cables up front.
Maybe at some time in the future I'll look into how much of the plastic under seat frame I'd have to cut away to make it fit nicely, but not this weekend!

Wednesday, March 18, 2009

Got My Plating Kit!

WHOO-HOO! My "Brush Plating" kit came today. If you're not familiar with it, "Brush Plating" is a process used for plating small areas with the metal of your choice. They use a "wand" made of the metal you want to plate with, a "sock" over the wand to hold the plating solution, a bottle of plating solution, and a small power supply. You connect one end of the power supply to the work piece, and the other end to the wand. You slip the wand into the sock (yeah, sounds kinky!), dip it into the plating solution, and wipe it on the work piece. If everything goes well, and the workpiece is scrupulously clean, you'll wind up with a real electroplated coating of metal on your workpiece.
Why am I doing this? Well, when R.L. Drake Company originally made my equipment, they used a copper-plated steel chassis for improved electrical conductivity. It looks really cool, too! After the chassis were plated, they were coated with a clear lacquer to protect the copper, and then silk-screened with various component designators. Over time, the lacquer would break down exposing the copper, and it would tarnish badly. If it got damaged by moisture, the steel underneath would rust, leaving unsightly globs of rust. Like most Drake's of this age, mine has some nasty spots on the chassis that I want to restore. Short of stripping it down to a bare chassis, a LOT of work, and having it "properly" replated, I started looking for ways to "spot plate" small areas. I remembered reading about Brush Plating years ago, and Google to the rescue! So now I have to get out my Dremel, remove the corroded spots, nickel "strike" plate the bare steel, and then put the layer of copper on. After that, I'll coat it with clear lacquer again, and hopefully it will look much nicer than it does now.
Heathkit used to do the same thing before aluminum chassis became popular, and on their "Big Iron" radios, they also copper-plated the cabinet before painting them. "QST" magazine had an article a couple of years ago about a Ham who restored a Heathkit DX-100 transmitter. After try to clean the chassis with everything still connected to it, he finally bit the bullet, stripped it down to the bare metal, and sent it out to be plated. It looked beautiful, but it would probably take me a year to strip this one down that far and do what he did.
No thanks!
Anywhoo....if you're interested in "Brush Plating", go to the Caswell Plating website and check it out. They can supply kits for almost any metal you might want to plate.
http://www.caswellplating.com/

And if you're interested in what my Drake gear looks like, you can go here for a virtual tour.
Look under "DRAKE 4 line" in the left column, and select the "4-B line".
http://www.dproducts.be/DRAKE_MUSEUM/

We Hit 'Em.......<i>Now What Happens?</i>

  Breaking story from Newsmax.....