Friday, December 10, 2021

Another Three Hour Tour?

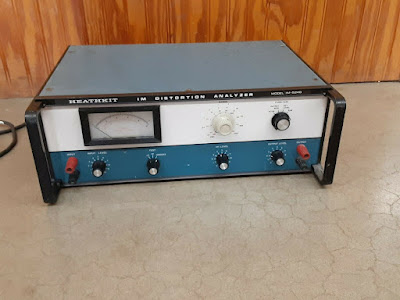
 Current project On The Bench is a Heathkit IM-5248 Intermodulation Distortion Analyzer, seen here in it's eBay listing photo:

It was listed as "Working", but with caveat "Unit may require some maintenance due to age".

All the capacitors looked and checked OK, so I began by cleaning it from top to bottom. The black bezel around the meter had a broken screw boss on the backside, and since that's how they mount the meter, the meter was shaky and wobbly. It also had a nasty scratch on the face that I polished off. I wound up pulling the front panel off to get the meter loose, so I scrubbed the bare panel. Three of the six knobs are split, and one is a mismatched knob from another Heath product. ALL the hardware on the rear panel was rusty, so it was replaced with new stainless hardware, as will be the screws holding the cabinet panels to the frame. during reassembly. All the other hardware was tightened up as most of it was loose, and the switches and controls cleaned. The AC line cord had seen better days, and was replaced.

And after doing some preliminary checks, I proceeded to begin the calibration procedure. It failed on Step 2, calibrating the AC Voltmeter. Something is messed up with voltmeter's Range switch, and when I switch to the 1 Volt range, the sensitivity disappears, and I can't get it to calibrate to match the 1 Volt RMS at 1000Hz that I'm feeding it. I've been going over the multiplier resistors soldered on the switch, and had one fall off when I wicked off the solder. That's a new one on me! Anyway, all the resistors are in the correct position, and are of the correct value. It's beginning to look like a flaky switch contact, so I'll flush the daylights out of them, and treat them again with DeoxIT.


On the bright side of things, SLW and I replaced all the grout on the kitchen counter tops and backsplash. It was really groaty looking, had chunks popping out, and was discolored everywhere. I used a 1/16" carbide tile cutting / grout removing bit in my Dremel, and a lot of patience and steady hands to grind out all the old grout that was loose and flaking away. Did several clean-up passes over all the seams, vacuumed out all the debris, and turned it over to SLW to apply the new grout. She let it cure 48 hours, and then sealed it, so we hope it will look nice for some time to come.


Tuesday, December 7, 2021

December 7th, 2021 and the Battleship Iowa is On-The-Air as NEPM


 And in commemoration of this solemn day, the US Navy has authorized the Battleship Iowa to broadcast on military frequencies using the ship's original callsign of NEPM, and listening on Amateur Radio frequencies in the 20 Meter band.

This is similar to the "Military Cross-Band Test" that gets run once a year in cooperation with the MARS people.

And because there was some spotty propagation today, I was able to finally get through and contact them for the first time since we moved here.

Kudos to the guys and gals on the Iowa for making this happen, and it marks the first time the US Navy has authorized such an operation.


Thursday, December 2, 2021

Heathkit IG-37 FM Stereo Generator and Weekly Recap

 Hope you all had a Happy Thanksgiving last week. We went to the clan's homestead way up in the canyons, did some shooting, and had a great gathering. I got to shoot a Marlin "Saddle Gun" in 45-70 Gov't, and it took a day for my shoulder to recover.  The Chevy Colorado did fine going up the "road", and I used 4WD Hi Range going up, and Lo Range coming down. Coming down you rarely exceed 20MPH, so Lo Range was fine.

So, back to the generator. This is it after I finished it. The big shiny can on the chassis is a new power supply filter I bought from Hayseed Hamfest, one of the only places you can get new manufacture "can" type electrolytic capacitors for vintage tube equipment. They're great people, and I've been buying new cans from them for quite a while.


 And the bottom view. Some new parts visible, while the rest are OEM.


 This started out as a simple capacitor replacement, checkout, and calibration. First, I tightened all the loose hardware. And I mean all of it. It was full of loose hardware, both holding things down, and providing ground returns on the tube sockets and terminal strips. Replacing the old parts showed the soldering was not up to standards. Some things had solder globbed on them, some had cold, grainy looking connections, and three connections were barely soldered. Cleaning that up took most of a day. This in NOT one of the better assembled kits I've seen, and while it may have "worked" in 1967, it would have caused problems today.

After replacing the parts, I did the initial checks, and started the calibration. Then the problems appeared. One of the waveforms was "clipping", which meant the tube wasn't operating in it's Linear Region, and it looked to me like it was biased wrong, as only one part of the waveform showed the clipping. So, I started checking the resistor values that set the bias, and found several resistors that were out of tolerance, and replaced them. No change. I replaced several coupling capacitors between stages, as if they get leaky, and pass DC voltage, they can throw the bias voltage to the following stage off. No change, again. These are pretty simple circuits, and it was starting to drive me batty., so I dropped back to the basics, and started checking the voltages. BINGO! ALL the "B+" (aka "Plate Voltage") voltages were way off. Where there was supposed to be 134 Volts, there was 119 Volts. Where there was supposed to be 120 Volts, there was 90 Volts. The problem was in the power supply section, something I normally checked, and since I had replaced the main filter capacitor, what could be the problem? Hey, Jim! Did you check the only resistor in the power supply? Uhhhhhh....no.

Turns out the 330 Ohm dropping resistor had increased in value to 560 Ohms, and was dropping excessive voltage. This was a 2 Watt resistor, and it was dissipating about 1.5 Watts, which is too close to it's ratings. Over the years, the heat took it's toll (common issue with Carbon Composition resistors), and it drifted high in value. I changed it out for a 5 Watt rated part, and all the voltages returned to normal. The alignment/calibration went per the book, but I don't like the way some of the adjustments acted when I was doing them. I put it back on the shelf, and I'll let it sit for a while, and redo the alignment. It might have another problem, or I might be doing it wrong.

Next up was another Heathkit. an IM-5238 AC Voltmeter.

 This is all solid-state, so heat aging of the filter capacitors and other parts isn't much of an issue, and all the power supply voltages were spot-on, and looking at the DC with my scope showed no discernible ripple.

But it failed step two of the calibration. I started poking around in the circuit, flushing out the adjustment pots with alcohol, and measuring them. One of them looked "funny", so I pulled both out of the circuit board to test them. They measured to specs, so I went to put them back in. I noticed the one I was having trouble with didn't properly seat on the board, and it's leads just barely came through the board, making one connection almost impossible to properly solder. I pulled it back out, cleaned the pads on the board, and ran a small drill bit in a pin vise through the mounting holes. Mounting it back on the board allowed the leads to go through the holes all the way, and I could properly solder it to the board.

PRESTO! All the adjustments worked, and the calibration went per the book. Since calibrating this instrument requires tack soldering some jumpers in place, and this unit showed no signs of it being done, this might be a "Never Worked" kit that was built and set aside. -OR- it was soldered "just good enough" to work, and never properly calibrated. Anyway....it's fully functional, and back on the shelf.

Now to get to this pile:

This is a Low Distortion Audio Signal Generator, an Harmonic Distortion Analyzer, and an Intermodulation Distortion Analyzer. When these have been gone through I should have a nice set of audio test equipment.


Still Here, Just Busy

 The "Three Hour Tour" of checking out the Heathkit FM Stereo Generator so I can use it to align the Pioneer SX-980 wound up being more of a chore than I first thought. It's finished, "calibrated", and on the shelf. I just don't like the way some of the calibration adjustments acted, so I'm going to let it sit for a few days while I go through some of the other specialized audio test equipment I've picked up over the last year or so.


I'll have a post about the Three Hour Tour tomorrow. Buying used, user-assembled test equipment can be very akin to buying a "Ran When Parked" car from Craigslist. I generally assume it will need at least some of the standard things I do, like replacing all the power supply capacitors, cleaning all the controls and switches, checking the soldering, and cleaning all the dirt and grunge off the outer case, but some items need more, and I'll tell you about that next time....

Wednesday, November 24, 2021

Happy Thanksgiving!


And in the spirit of this truly American observance, we'll be celebrating it in a typical (for some) American way.

From 2pm to 3pm we'll be using the in-laws range up at The Homestead to blast away at things, and then from 3pm to 4pm The Guys will help The Women get things ready for dinner at 4pm.

This will be the first time the Chevy Colorado has gone up there, and I'm interested to see how it compares to my beloved Jeep. Yeah, it was a Grand Cherokee, but it was well-equipped to handle the drive up there, back in the canyons, on a Private 1.5 lane "Semi-Improved" gravel road, with turn-outs every half-mile or so. Downhill traffic, what little there is, has the right-of-way, hence the turn-outs.

At least the weather should be nice, as I remember what a chore it would be to drive there in bad weather.


SO....here's wishing you all a very Happy Thanksgiving!

Thursday, November 18, 2021

ACK! Busy Week.....

 Besides attempting to work on the Pioneer this week, SLW decided to skip Thanksgiving, and go right into Christmas mode.

Which meant getting out the tree, and dressing it.

Except one whole string of lights didn't work. You know where this is going.....

She bought this preassembled, already wired, artificial tree for $10 from a yard sale when we first moved here, and the lighting on it has seen better days. Long story short, we wound up taking the tree "down to the frame", and installing two, new strands of lighting.

Spent several hours diagnosing the bad strands last night, pulled all 200 bulbs and tested them, sorted the dead ones out, and she was off this morning to get 200 replacement bulbs, enough for both strands and some spares.

NOBODY had replacement bulbs in stock, so she brought back two new strands.

We then spent all day spent all day getting our Christmas decorations up, and trimming the tree.

With TLG running around "helping" us. Kid's got more energy than two tornadoes and a hurricane!

Anywhoo.....got the Zero Point Voltage and the Idling Current adjusted on the Pioneer SX-980, and did the alignment on the AM and FM tuner sections. I still have to align the FM Multiplex (Stereo) section, which has me reading the manual for my HP signal generator, which might be able to do the Pilot Carrier and SCA Carriers. Otherwise I'll have to put the receiver on hold, and do a quick run-through of my Heathkit IG-37 FM Stereo Signal Generator. I picked it up some time ago from an estate seller I bought some other Heathkit test gear from, but just put it on the shelf.

Hope y'all have a great coming weekend!


Friday, November 12, 2021

Pioneer SX-980 Progress

 Just about finished with the cosmetic work on the receiver. Had some RUST to remove on the ventilation cover, the bottom chassis plate, and the top end bell on the power transformer.

Transformer before:

Transformer after:

Had to get really creative when I was removing the rust so I didn't blow iron oxide all over the place:

 And equally creative when I painted it:


The top ventilation cover was really crummy after I wire brushed it:

So I used my orbital sander on it, gave it a coat of self-etching primer, then sealed it, and gave it two coast of Rust-Oleum "Bed Liner" spray, and it came out quite nice:

Same with the inside of the bottom chassis plate, but I used Krylon Satin Black:


 The front panel was a mess, too. Somebody had put the old "shiny" Scotch Tape along the top the panel at some time during it's life, and it took several hours to get the tape, and glue residue, off the panel. Then it had to be further cleaned and polished. Unfortunately, it has some nicks and dings in the cast bezel, and I can't do anything about them, short of replacing the entire front panel. I'll just call it "patina", and live with it. At least it's clean and shiny again.

 Same with the knobs; they were filthy, with finger grime on the them, and some scratches. The main tuning and volume control knobs are machined aluminum, so they could be cleaned up, but the rest of them are metalized plastic, and once they're scratched, that's it.

I should have it all back together tonight, except for the wood case that I'm still working on, and then I can start going through the check-out and alignment procedures. I need the case off the unit so I can get at the adjustments, so no biggie right now.


Hope y'all had a good weekend. Weather here has been cool (40's~50's) and windy, but no snow for now. I'll probably fire up the snow blower again this weekend just to make sure I haven't forgotten how to run it.....


Thursday, November 11, 2021

Verteran's Day


 I can't say Thank You enough, and although I didn't serve, I admire and honor all who did.


Thank you all for your service, sacrifice, and patriotism.


Wednesday, November 3, 2021

Up Next On The Workbench....

 I'm slowly working my way up the "Pioneer SX Food Chain", starting with the SX-780 I bought earlier this year. I've always liked the big Pioneer receivers since I was in college, and have wanted to get one for years.

In the process of going through my SX-780, I learned a lot about the Pioneer SX series of receivers. There were basically two series of these receivers; the SX-xx50 series, and the SX-xx80 series. The consensus among the audio forums is the the "50 Series" receivers were built better than the "80 Series", one of the main differences being the output devices used for the power amplifier that drives the speakers. The 50 Series used regular transistors, while the 80 Series used "Power Hybrids", which are several transistors mounted in a much larger package. The transistors are still available from numerous sources, while the power hybrids are close to being unobtainium. Some "audiophiles" claim the 50 series sounded better, but either series is capable of very, very good audio delivered to the speakers.

The 80 Series receivers had analog meters that showed the power being delivered to the speakers, while the 50 Series lacked these meters. I like the 80 Series, so that's what I've been looking for.

This is the newest one I just obtained. 

The seller said it was "tested", but that not all the inputs were checked, so all they could verify was that it worked on AM and FM, which means the output devices are working, a nice thing to know. They also offered a 90-day warranty (you get you money back), so since the listing was "$900 or best offer", I offered them $500, and they accepted it after a few emails back-and-forth.

When I looked at the listing pix, I noticed what appeared to be some kind of crud on the top cover, along with a spot of rust, as seen in the lower middle of the first picture:


We were dickering over the price when I asked if the unit had gotten wet, or was stored in a damp area, and they said they didn't know, but that "It Might Need Servicing", and was I comfortable working on these. I assured them I didn't have any issues with it needing a bit of work, and they accepted the offer.

It arrived here on Monday, superbly packed, and I took it downstairs and began to check it out.

The spots of crud on the cover....


....turned out to be rust under the paint, and as soon as I hit the cover with a wire brush, the paint just blew off: 

This bad enough that I'll go over it with my orbital sander, and then prime it and paint it. We're expecting very nice weather through the weekend, so this will be one of the last "Garage Tasks" I'll do before Winter sets in for real.

And The Wettening did a bit more than damage the cover. The rust spot on the top cover was directly over the power transformer, and whatever leaked in did this to the power transformer:


 I've already pulled the mounting hardware so I can clean this up, but not wanting to remove all the leads coming out of the end bell (the rusty part), I'm going to clean it in place, then very carefully mask everything around it, and repaint it.

The cover and end bell on the transformer are the only places I can see any evidence of water ingress, and the rest of the chassis is dusty and dirty, but not corroded:

So it looks like I may have "lucked out" on this one. There's no way I would have paid the asking price ($900) for this, but the seller was reasonable, the packing job was excellent (foamed-in-place), and it appears to just need a good cleaning and spot of paint.


Monday, November 1, 2021

Four Years Ago Today.....

 We started moving in to this house, and turning it into our home. Had some ups and down, and dropped about $40k in here the first year, but they were Deferred Maintenance items the people we bought the house from had let go, and we knew it going in.

Went through a bit of "City-To-Country Culture Shock", even though we're not that rural, but all-in-all it's the best thing we've done.

My son moved here in August, and his stress level has dropped about 90%. He was in the retail food business, and some of the stores he was assigned to were populated by the Elite, and the others by the Entitled. They were both "Bad Customers", far too important to busy themselves like understanding that when the shelves are empty, it means we have NO STOCK available to put on them. No ma'am, we don't "have any in the back". I'm sorry, ma'am, but the trucks that bring our stock didn't come today. No, ma'am, I don't know why the truck didn't come today, and on, and on, and on.

The Entitled would either harangue him about the prices, or just outright steal things. He said their griping about the prices was really pretty stupid, as they were "buying" their items with EBT cards, and it was coming out of HIS pocket, not theirs.

Halloween was a blast, and we had at least twice as many kids as we've ever had. SLW said it was probably the lights and displays we had up for the last several days that attracted them.

TLG got to go Trick or Treating dressed as the Grim Reaper, and his Daddy wore a hockey mask and hoodie. My son went dressed as a penguin, and SLW was dressed as some kind of witch.

I dressed as The Mad Scientist, complete with flashing, buzzing lights, and my Sonic Screwdriver.

We ran out of candy just as it started to rain about 8 PM, and that ended it for the night.

It was very enjoyable to see all the costumes, especially the ones the parents were wearing.

And not ONE face diaper in evidence!

Saturday, October 30, 2021

YAY! The KLH Model Thirty Four is Out the Door..... and other things

 I finally got this thing finished, and it fought me most of the way.

"It's Taillights", as my car buddies used to say.

Here it is, happily spinning a Decca 78 RPM record of The Andrews Sisters singing "Dancing Cheek-To-Cheek".

It had an issue with the audio randomly dropping out, and it required doing a whole lot of soldering work.

This is what KLH called their "Modular Series", and consisted of half-a-dozen or models like this one. Some had FM, others had FM Stereo ("Multiplex" in dayse of olde...), and still others included AM radio. These were produced after Henry Kloss had left the company, and it was purchased by Singer Corporation. Yep, the sewing machine people made stereo equipment.

It's called "Modular", as all the individual functions plug into an "Interconnect Board", very similar to a "Motherboard" in your PC.

This is the Interconnect Board with most of the other sub-assemblies pulled from it.

And it fits in the chassis, thusly....

The Power Amplifier / Power Supply board is still plugged in in the above picture, as this was when I was doing the "Triage" phase after "The Colonel" first dropped it off.

If you look at the first pic of the ICB (InterConnect Board), you'll see some white things with what look like dark lines on them. The "dark lines" are the male pins in the ICB, which are soldered to the back of the board. There's a female mating connector which slides over the vertical pins, connecting the sub-assembly to the ICB.

This is a mated set, where the Power Amp board connects to the ICB. You can see the vertical pins protruding through their mating connector on the Power Amp board where the grey cable crosses between them.

There's a total of 75 pins, and another 75 "sockets" that mate to them. About half of the 150 total connections weren't soldered very well fifty years ago, and temperature cycling, vibration, and moisture finally got to them, causing open circuits, and intermittent circuits when the board or connector was flexed.

I removed the solder from all of these connections, cleaned the parts, put fresh flux on them, and resoldered them. ALL of the other boards had many "iffy" solder connections, so those were treated the same way.

All-in-all, I reworked around 200 connections, which helped quite a bit. The last thing driving me bonkers was the Mode Select Switch. It would not pass the left channel from the FM stereo, and I started wondering about finding a switch. Repeated cleaning didn't help, so I resorted to Extreme Measures. I submerged the board in denatured alcohol, and cycled the switches back-and-forth a few dozen times. After drying the board off and re-lubing the switches, it worked.

The Colonel was astounded at how nice it now looks, and amazed at how good an old 78RPM record sounded on it.

I found out he was just going to use it to "preview" his collection of about 1000 78RPM records so he can pick the ones he and his wife like, and load those into a huge Wurlitzer Jukebox they own. Since most of the records they own are in the "Less Than Pristine" category, and he's not concerned about tracking force, I maxed it out to 5 grams. That's a Metric TON of tracking force in the 33-1/3 LP world, and I advised him not to play any 45's or 33's on it, as with that much tracking force, AND a 78RPM stylus (bigger tip in it), it could easily damage the record.

So, happy "customer", and when he saw the parts total, he said our agreed upon price for the job was too little, and gave me an extra $50.

I might some work out of this, and I might not, but it felt good to see how happy he was, and we saved an item from the landfill.


Got the snow tires on SLW's car today with the help of my son, which cut a 2-1/2 hour job for me by myself down to about an hour. He was running the jack and moving the tires in an out, and I ran the impact, took the summer tires off, put the snows on, tightened the lugs, and let him do the final torquing down to 80 ft-lbs.

Then we finished the Halloween decorations for Sunday night's Trick-or-Treaters. Got the smoke machine set up, put in a bunch of sound-activated lights, ghosts, and cackling witches, added some black lights and a projector, and tested it.

And I'm beat.....

Hope y'all have a Blessed Sunday, Halloween notwithstanding.......


We Hit 'Em.......<i>Now What Happens?</i>

  Breaking story from Newsmax.....