And we started bringing up the heaters after I vacuumed the dust and other stuff out of them. The new heater I installed down in the basement is working fine, and now the chill in that room is gone. From some reason, I get creepy feelings down there at night, so I'll see if this makes that space more user friendly.
I pulled the vent piping out of the window and took it apart for the portable A/C unit in the guest room, collapsed the hose, and stowed it all in the room's closet. We're not expecting any visitors for a while, and we won't need the A/C in that room. And removing the vent allows us to fully close that window, making that room "winterized".
I haven't drained and coiled up the garden hoses and put the 'freeze protectors' back on the outdoor spigots yet, but that's coming Real Soon Now.
One of the things I'm planning on doing before winter really sets in is to get some sheets of the R-13 foam board from Home Depot. One sheet will go in between the storm door and original exit door in the garage, and the other sheet will get sectioned up so I can put pieces of it in the basement windows. If I cut them to fit snugly, it should cut down on the heat loss through the windows, and keep the basement warmer with less energy input. We have a quote from Renewal by Andersen to replace these windows, but it was deemed "Not Critical At This Time" by SWMBO, so they're still the aluminum framed Heat Pipes like we had topside in the rest of the house.
Same with the garage doors. Even though there's a volume of 'dead air' trapped between the two doors, there's still significant heat loss out of that portal. I'd planned on replacing the 40 year old side door in the garage (it's half glass, the glue joints are popped open, and it's sagging) this last summer, but never got one of those circular tuits from the jobjar to handle it. It's not as bad as the original aluminum framed windows we had replaced, but if you step into that corner of the garage you find yourself in a "cold spot". And I'm also thinking of putting four sheets of some thinner stuff across the garage door on the Toyota side. Even though the doors are insulated, and extra couple of inches can't hurt. It was getting down to 40 degrees in the garage last winter, and my "log" shows 10 nights at temps below 45. When it gets under 50 out there, it starts to get hard to work more than about 30~45 minutes. Even when I was huffing and puffing scrubbing out the paint last year, under 50 was sure to make my fingers stiffen up. I *might* look into some supplemental heat if I can do it inexpensively. Since there's NO natural gas piping on this cul-de-sac, hanging a big old Modine heater on the ceiling is out, thanks to Jimmuh Cahter.
Halloween preps this year (we closed on the house 31 October last year) include one of those little stick-in-the-ground "laser" light shows, a flicker bulb replacement for the porch light, some flickering plastic pumpkins on the porch, and a couple of speakers on the front porch playing spooky music. Oh, and four big bags of candy, per our neighbors.
Snow tire swap is scheduled for sometime in mid-November, as that's when most of the tribe does it, and they've lived here for quite a bit longer than we have.
I had these things on the list for October, but waking up to sub-40 degree temps, and then the drizzle, reminded me that there's no time like the present.
Oh, and I want to get a Farmer's Almanac this year, too. I haven't had one since high-school, but Mom put a lot of faith in their forecasts.
Must be a Midwestern thing.......
Friday, September 28, 2018
Monday, September 24, 2018
One Year In Colorado
Still haven't finished editing up the list of notes I've been trying to keep the last year, but as of the 22 Sept, I've been here one year. My wife arrived a day earlier on 21 Sept.
Yeah, I'm a few days off, but hey....I'm retired and don't count 'em that close any more.
My son, Pebbles, and I left the house in Long Beach about 1000 on 20 Sept, and spent that night in St. George, UT, and then spent the night of 21 Sept in Grand Junction, CO, arriving in Fort Collins the afternoon of 22 Sept.
Took us a few days to settle in, and then "House Hunt 2017" started up. We found, agreed to buy, financed, insured, ordered cable and telephone, and closed on 31 Oct.
- WHEW! -
We moved in on 1 Nov, and proceeded to begin repairing all the little things that are invariable wrong with any "new" home you move in to. And some big things, too, like having a 65' cottonwood tree removed, the roof replaced, and all new windows installed.
So how do we like it? I love it, and my wife still misses her friends, but she's adjusting.
We were here about two weeks, and I turned to her one night and said "I'm Home".
And on my errands today, I heard a radio ad for a self-service dog wash, and they included a variety of shampoos, and all the towels you needed.
I'll try and go through the notes this week and come up with something about the culture shock of moving back to Free America. We've had some amusing incidents......
Saturday, September 22, 2018
MKII Supra Foglamp Restoration - Wrap-Up -
Groan, this turned into a project in it's own right!
For those that missed our previous installments, you can find them here:
Part 1
Part 2
Part 3
and
Murphy Strikes
The particular problem that had me stalled was the length of the LED H-3 halogen bulb replacement I bought:

It's bit too long, resulting in it hitting the internal light shield inside the reflector/lens, and not seating in the housing:

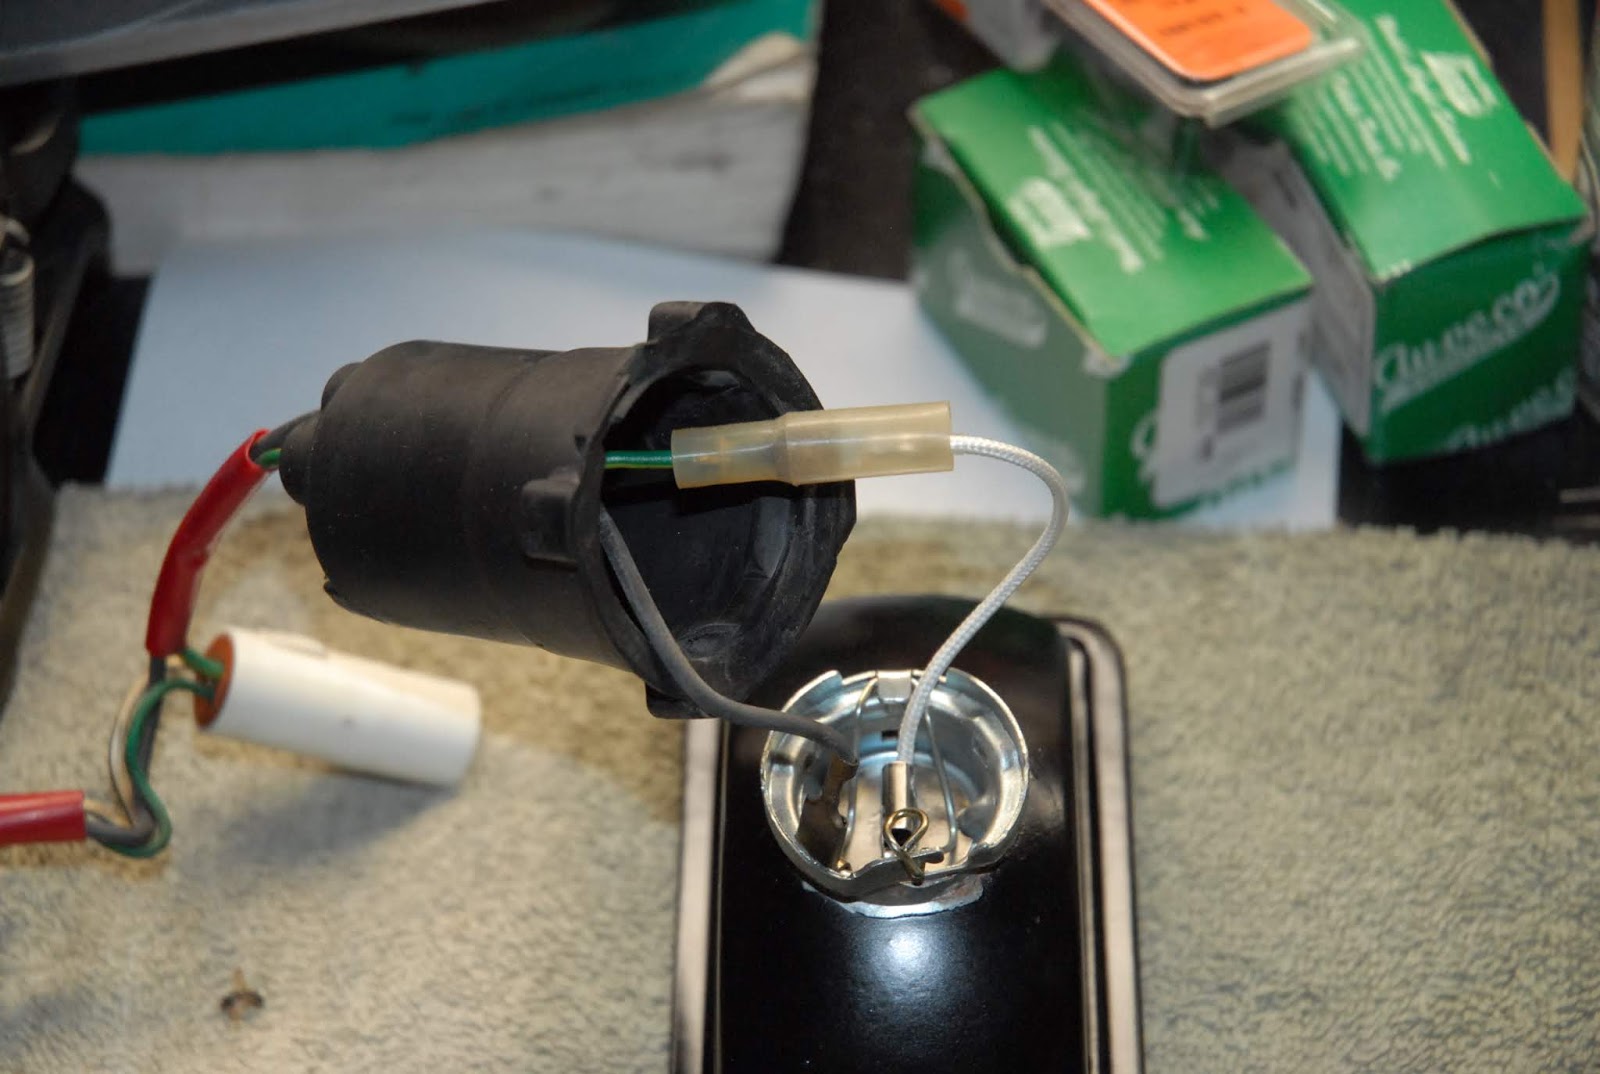
The "replacement-replacement" bulb is the black one in the opening photo, and it snuggles down just like it's supposed to, and allows the little wire bail latch to close:

Then connect up the wires:

Slide the weather boot back into position:

Slide the reflector/lens with the wiring attached into the bucket, and insert the parking lamp bulb into place:

Mate the pieces fully together, and get the bezel ready:

Then screw the bezel on with some new stainless-steel button-head cap screws so they never rust again:

And place it on the shelf next to it's mate:

And one of the other tasks that was staring me in the face was cleaning up/refurbishing the turn signal/side marker lamps. Since a large portion of these face directly forward, they get hit with all kinds of FOD, and were pitted from it. I used Novus Plastic Polish, which is about as good as you can get, provided you follow the directions!
I spent several hours on each lamp assembly, slowly cleaning the road film and pits off of it, and then polishing it. After the initial cleaning, I started with Novus #3, the most aggressive, and polished the daylights out of it. Then I went to Novus #2, almost a finishing polish, and then ended with Novus #1, a glaze and sealant.
I was stunned at how the color returned, and they took on a deep luster. Most of the pitting on the front surface is now gone, and the sides, which were just weathered a bit, look stunning. Even my wife remarked at how they "looked new".

And of course I scrubbed and restored the backsides as well, cleaning all the wiring, and replacing the incandescent bulbs with LED units:

So as my beloved Heathkit would say...."This completes the assembly of these two units.".
And now it's time to get back to this:

For those that missed our previous installments, you can find them here:
Part 1
Part 2
Part 3
and
Murphy Strikes
The particular problem that had me stalled was the length of the LED H-3 halogen bulb replacement I bought:

It's bit too long, resulting in it hitting the internal light shield inside the reflector/lens, and not seating in the housing:

The "replacement-replacement" bulb is the black one in the opening photo, and it snuggles down just like it's supposed to, and allows the little wire bail latch to close:

Then connect up the wires:
Slide the weather boot back into position:

Slide the reflector/lens with the wiring attached into the bucket, and insert the parking lamp bulb into place:

Mate the pieces fully together, and get the bezel ready:

Then screw the bezel on with some new stainless-steel button-head cap screws so they never rust again:

And place it on the shelf next to it's mate:

And one of the other tasks that was staring me in the face was cleaning up/refurbishing the turn signal/side marker lamps. Since a large portion of these face directly forward, they get hit with all kinds of FOD, and were pitted from it. I used Novus Plastic Polish, which is about as good as you can get, provided you follow the directions!
I spent several hours on each lamp assembly, slowly cleaning the road film and pits off of it, and then polishing it. After the initial cleaning, I started with Novus #3, the most aggressive, and polished the daylights out of it. Then I went to Novus #2, almost a finishing polish, and then ended with Novus #1, a glaze and sealant.
I was stunned at how the color returned, and they took on a deep luster. Most of the pitting on the front surface is now gone, and the sides, which were just weathered a bit, look stunning. Even my wife remarked at how they "looked new".

And of course I scrubbed and restored the backsides as well, cleaning all the wiring, and replacing the incandescent bulbs with LED units:

So as my beloved Heathkit would say...."This completes the assembly of these two units.".
And now it's time to get back to this:

Thursday, September 20, 2018
How a Holley Four-Barrel Carburetor is Made
Very cool article over at Hagerty.com
They take you from a pile of parts to a complete 4160 carburetor with pix of it all.

They take you from a pile of parts to a complete 4160 carburetor with pix of it all.

Tuesday, September 18, 2018
Yep, Fall Is In The Air
Just noticed that the overnight lows for the next week are expected to dip into the 40's. It's been 5 months or thereabouts since they last dipped that low.
And some of the trees in the neighborhood have started turning yellow. Even our maple tree in the front yard has started to turn, and the crab apples are dropping off the tree in the backyard. I've heard the aspen trees have already turned, possibly due to the lower than normal rainfall they received.
We bought an 8' plug-together, pre-illuminated Christmas tree, used once, at a garage sale for $20. These go for ~$180 at the Big Box stores, so we scored on that one, along with another new-in-box 'baby gate' for $5. The people who had the sale are moving from Colorado to Kalifornia for reasons unknown, and were literally selling everything down to the walls of their $650k house over on the East side of town in the Miramont area.
And on the radio scene, I've canceled the plans for the tower and antennas. I was out measuring the yard a couple of weeks ago, and started getting questions from my wife about what I was doing. I explained to her I was locating where to site the tower, and she started getting reeeal nervous and agitated. The instant she said "Well, WHY do you need a tower?" I knew it would be tough sledding, so I'm just dropping the project.
I'll pick some other hill to die on, not this one.
This renders most of my equipment impotent, so I'll be listing it on eBay over the next few months. I'll keep my cheepie Bao-Wang-Feng-Ding-Dong walkie talkie and my Elecraft K2 and Buddipole, but as the old saying went "Everything Must Go!", and the rest of the equipment, parts, spares, antennas, accessories and other detritus of my radio career are going on the block.
If you happen to be looking for anything in shortwave receiving equipment, drop me a line and I'll send you a list of what I'm selling.
It's been a fun ride......
Monday, September 17, 2018
L.A. Fleet Week 2018 Video
From my friends on the Iowa. Lots of neat stuff to do and see. If you're in L.A. next Labor Day, try and include it, but get there early. They had around 300,000 visitors this year, and it's expected to grow.
Saturday, September 15, 2018
Murphy Strikes!
But it's not serious, more like #672 of Mr. Murphy's famous laws, along with their various corollaries and sub-sections.
I started putting the foglamps back together so I could "bag 'em and tag 'em" until I get the rest of the front-end finished, and need to install them.
Cleaned up the wiring harness assemblies the other night.

And then fed them through the buckets to where they will mate with the reflector/lens assembly.

Took all the masking tape off the reflector/lens units, and cleaned the glass. They both had some kind of overspray that came right off, but the fronts of the lenses are "micro-pitted" with many, many tiny stone hits. I may or may not try and polish the lenses. They're in the grille, at knee-height, and unless you get right down there and look, you'd probably never notice it.

And that's when Mr. Murphy made an appearance. Something I hadn't considered when I shopped the LED replacements for the OEM H-3 Halogen bulbs, was what their overall length was.
This picture below shows it all. The clear glass bulb is the H-3 unit, and the depth stem of the caliper is set to the distance from the bulb flange to the internal baffle/light shield.
Yup.....the LED replacement is about 8mm TOO LONG to fit into the housing.
D'OH!

So, after spending about 30 minutes searching around, I found replacement "H-3" LED units that are only about 1mm longer than the Halogen bulbs. So, until they get here and I can wrap this small sub-sub-sub-project up, they're back to "Awaiting Parts" status.
So rather than let a nice Friday night in the garage go to waste, I put in all sixteen screws that hold the sunshade to the spoiler, and put the spoiler back on the car.
What is it with Japanese Engineers? Do they all have a "Small Fastener Fetish", or is it a cultural thing? Sheesh....sixteen screws to hold the sunshade on. Maybe some of the "downforce" these things are supposed to generate is caused by the weight of all that hardware......

So I then maneuvered it around a bunch, and plopped it on the car, where after a small amount of wiggling, all 8 mounting studs dropped through the holes in the hatch, and I started the nuts on them.
Yep...this is what the rear end of a 1985 Toyota Celica Supra "P-Type" is supposed to look like.

A bit of fettling to get the spoiler and gasket all tidy, and I torqued the nuts to 15 ftlbs, and stood back.

This assembly had been off the car for about three years now, and it's good to see it back on, as it's the only major thing that differentiates the 1985 from the earlier years of this model. The 1986 (six months only) had a third brake light added, but was otherwise identical to the 1985. With only 28,000 made, they're the lowest production run, so if you see one with a rear spoiler, either the hatch has been replaced with one from a 1985, or you're looking at one rare MKII Supra.
With the exception of mounting the antenna, the rear section is pretty much finished for now. Pulling the hatch to repair the surface rust on the leading edge and the upper jamb area can wait until Spring. This will allow me to concentrate on getting the front finished, which still needs a lot of work. The last big push will be to sand out, repair/fill the crazed areas, sand some more, and then prime and paint the front bumper cover. Then I have to clean/refurb the turn signal/side marker lamps, and put it all back together!
I can take it out while the weather is still pleasant, and then gunk the engine bay again, drain the coolant, possibly flush it, and then put her in the garage while I start taking the front of the engine and the intake manifolding apart to catch up on all that deferred, unknown status maintenance, like the hoses, timing belt, and fuel injectors.
Friday, September 14, 2018
New Background Image
Got tired of the bland background image that "came with" this Blogger theme, so I started tinkering around a bit last night. I mostly just stayed with the default image because it didn't matter to me much, and then last night I was going through a file folder, and found a bunch from the Iowa, so I picked the one on display now, which was taken down in the museum area of the shop near the Gift Shop.
Since I'm now a Retired Land Baron living in Free America after 35 years in captivity doing Real Neat Stuff behind Socialist lines, I'll probably start rotating the images on a semi regular basis, and include some of the more pleasant ones from our new AO.
And I almost can't believe that 10 days from now will mark the one year anniversary of our CALEXIT, and my arrival here in Northern Colorado.
Time to finish up that 1 year AAR, I guess!
Thursday, September 13, 2018
Well, At Least *I* Didn't Kill The Yard
Finally had a landscape guy come by to look at the yard. Hopefully this company is more reliable than that other Bozo we had for a while. I've been a little upset with myself as I thought I noticed the grass dying off not too long after I did the "Broadleaf Weed Killer" treatment to the yard. Nope, he says it's "drought stress", and we simply weren't watering enough.
If we'd watered the yard this much in Long Beach, the Water Cops would have hauled us away, and we still weren't watering enough. I was watering about 30 minutes per section a couple of times a week, and we really need more like an hour each time, at least three times a week. We still have the "Kailfornia Save The Fish and Kill The Crops" mentality as far as water use on the yard goes, and if we want a nice yard, we're going to have to change that mindset that's been hammered into us for the last 30 years.
He sad to put out some grass seed in the early Spring, and it should come back fine.
Wednesday, September 12, 2018
A Little Something for the Grandson....
Yep, it's from Harbor Freight, and was meant as a yard wagon, but when he saw it the other day, he took to it like it was his.
I can envision trips around the backyard, and through the neighborhood in the future.....

The bagged items are the rear seat backs from the Supra, and the decals came from an Amateur Radio supply house, and the "MOD" sticker is from a decent little "Pizza-On-Demand" place.
I can envision trips around the backyard, and through the neighborhood in the future.....

The bagged items are the rear seat backs from the Supra, and the decals came from an Amateur Radio supply house, and the "MOD" sticker is from a decent little "Pizza-On-Demand" place.
Tuesday, September 11, 2018
September 11th
Others have written far more eloquently than I ever could, so please go check them out.
Aesop, in particular, expresses my sentiments on this day.
Yup...I'm just another Old Man who bitterly clings.
Aesop, in particular, expresses my sentiments on this day.
Yup...I'm just another Old Man who bitterly clings.
Saturday, September 8, 2018
Mundane Automotive Tasks
Mundane, but necessary, like a lot of grunt work.
Doing some clean-up work on a few items so I can paint them tomorrow. I took my Cooling Plate and buzzed it off with my orbital sander and some 140 grit. It put a nice, smooth, flat finish on it, and also gave the surface some "tooth" so the paint will stick better. This will get painted wrinkle-finish black.
Then I prepped two pieces of headlight trim that screw down to the hood. They fill the gap between the leading edge of the hood, and the back edge of the headlight pods. These are stamped steel, and the paint was weathered but solid, so I cleaned them, and then scuffed them up with some 220 grit. These will get painted satin black.
I'm going over the grille right now. I scrubbed the living daylights out of it in the sink with hot, soapy water (Dawn works very well), and several different brushes to get in all the nooks and crannies, and then went over it again with some of that semi-lame "No Scratch" blue Scotch-Brite I have. Even though it feels "squeaky clean", it still has splotches of road film on it that don't want to easily come off. I went through this with the two big pieces of black plastic headlight trim that go on the front and sides of the headlight pod and hide all the mechanical bits. I finally gave up on trying to get them clean, and went over them with the green Scotch-Brite I have, and a ton of my "Sanding Juice". It gave them a very clean, "brushed" look, and after treating them with Mother's "Back-To-Black", they look ready for their close-up, Mr. DeMille!
BUT....the grille has TWO-HUNDRED AND SIXTY-EIGHT of these little hex-shaped holes in it, and I don't want to spend the next six months cleaning each and every one of them by hand! So since it's really clean right now, it's getting painted satin black tomorrow when I do the headlight trim.
I took my little "spare" laptop, and set it up in the garage. I patched the audio into the receiver, and now I can stream YouTube audio, or play CDs and DVDs in the garage.
Tonight's music to work on your car is by the Allman Brothers Band and is their "At Fillmore East" live album, one of their best.
The wife hit the rack really early, as she's bit depleted from a week of relatives, and watching the little guy from the afternoon they left until early this evening.
And just in case you think I spend all my "spare time" in the garage, I don't. We're going out tomorrow afternoon after I finish the painting, and just going to stroll around Old Town for a while, and then go out to dinner.
Thursday, September 6, 2018
Supra Headlights, Cooling Plate, and "Whisker" Install
Besides hanging out with my wife's sister-in-law, and her sister-in-law, and my sweet little wife, I've also been beavering away out in "Gandpa's Garage". The fog lamps are all cleaned up, bagged, and awaiting final cleaning and painting. It's been a little too cool and humid to have bare-naked metal out in the shop for my taste, so I've done a few other things, like the headlights, and starting the prep work to refinish the bumper cover.
I wet sanded all the mostly horizontal surfaces on it were the worst, and then blended those areas in to where the paint was still fairly intact. This took about 45 minutes with some 220 grit in a rubber sanding block, and lots of my "Sanding Juice" out of a spray bottle. This will be a project of it's own, but getting started like this lets me examine the underlying urethane for damage. It's got some scuffs on the outer corners, and the black band running horizontally across the front has a lot of gravel dings, so there's a lot more sanding and reapiar work to do.

And the new headlights are in after about two hours of fettling. The OEM sealed beam lamps used protrusions molded into the glass to provide a mounting surface where the glass rested against the bucket. The bezel then held the lamp tight in the bucket, and once you aligned the headlights, they stayed put. The new ones are a stamped reflector housing adhesive bonded to the glass lens. To position the lamp in the bucket, it relies on small metal tabs on the back of the reflector. Small metal tabs that can be bent to adjust, but weren't. I couldn't even get the bezel to fit close enough to get a screw started. I compared the backside of the old sealed beam to the new one, and then used my caliper to measure the distance from the front of the lens to the mounting surface. Sure enough, the new ones were 1/8" out-of-tolerance. I bent them with some needle nose pliers to get the correct dimension, and they fit right in. I also cleaned and polished out the stainless steel bezel that holds the headlamp in the bucket, and replaced the screws with new hex drive stainless steel button-head screws. Then I popped out what was left of the plastic headlight trim (aka "Whiskers") with a trim tool, cleaned the paint under the area, and snapped the new whiskers in place. The round black plastic plugs turned out to be the same size as the one I used to plug the hole for the rear window wiper, and they snapped right in, replacing the headlamp washer nozzles quite nicely.

This one just had a "ring" of rust ground into it from the round rubber bumper. It cleaned up in just a few minutes.

Oh, boy....this one. For some reason, water pooled here, and even got under the seam sealer and lifted it. Those two little black spots? Yep, rust holes. They started out as pinholes, and since that's as far as they easily opened up, they fortunately never got much bigger. That's solid metal all around them, and I was able to get at the backside of the metal through the convenient drain hole Toyota provided. I poked around in there and couldn't get any loose scale or rust to come out, so I'm crossing my fingers that I caught it in time. I shot some Eastwood Rust Encapsulator in there, and that should seal it off. But rust never sleeps, and like some of the old "B" movies, it might get released later to ravage the hood. The correct, "purist" way to fix this would to weld or braze up the holes, or perhaps even lead them. Lacking a welder, and not wanting to repaint a larger part of the hood than absolutely necessary, I'll be using a different method. Yes, I'm going to "Bubba" it, and use a couple of dabs of JB Weld, then sand smooth, use some spot putty, prime and paint. Before you laugh too hard, I know people who have put their cast-iron axle center sections back together with the stuff, and drove out of the middle-of-nowhere. It;s strong, and if the metal is clean, it holds.

This one took maybe 15~20 minutes to clean up. Just a ring of rust, and some rust coloration on the seam sealer, and what looked like a hole in the sealer. Turned out to be a bit of rust that quickly cleaned up.

This one was another piece of cake. 5, maybe 10 minutes.

So while the primer and rust encapsulators are curing, I measured, located, and drilled the other two mounting holes in my "Cooling Plate".
The cooling plate is to ensure that most of the air coming in the front of the car goes through the radiator, and not over it. There's a rubber seal on the bottom of the leading edge of the hood, and one on the cowl that seals to the bottom of the trailing edge of the hood. If the front seal gets out of shape, or is missing, a lot of the air coming in will scoot over the top of the radiator, rather than going through it.
And it makes a nifty place to hold things!

Holes drilled, reamed, and chamfered.

New holes in core support for plate. After I finished the holes in the plate, I clamped it in place as a template, and used transfer punches the locate the centers of the new mounting holes.

The reason I was stalled on installing this thing was what to use for fasteners? I need it removable, as there's stuff down there can fail, so that means something like a nut and a bolt, right?
Nope. I stumbled across these "Bumper Cover Retainers" while looking for something else. Most of these push-pin type fasteners are meant to be single-use, like a plastic rivet. These have threaded pins that can be backed out with a good old #2 Phillips screwdriver, and then you pull the fastener out. Elegant, light, simple, and reusable! The nylon washers will go between the plate and the sheet metal to isolate it a bit.

Washers over the holes.

Plate and fasteners installed!

It doesn't rattle when I tap it, so it should be quiet on the road. It's coming back off to get cleaned, and then I'm painting it with wrinkle-finish black paint, something I've loved on machinery and vintage radio gear since I first saw it probably fifty years ago. On my never-ending list of projects is to refinish a pair of cam covers I have. They'll get the same wrinkle-finish black like from the factory, with the fins and lettering polished. Then I'll go over the "TOYOTA" block lettering with a bright red, and the "DOHC" block lettering with either a bright blue like it was, or a matching yellow to the "DOHC" on the cam drive belt cover (see below). Then a couple of coats of clear, and hopefully they'll be good for a few years.

I wet sanded all the mostly horizontal surfaces on it were the worst, and then blended those areas in to where the paint was still fairly intact. This took about 45 minutes with some 220 grit in a rubber sanding block, and lots of my "Sanding Juice" out of a spray bottle. This will be a project of it's own, but getting started like this lets me examine the underlying urethane for damage. It's got some scuffs on the outer corners, and the black band running horizontally across the front has a lot of gravel dings, so there's a lot more sanding and reapiar work to do.

And the new headlights are in after about two hours of fettling. The OEM sealed beam lamps used protrusions molded into the glass to provide a mounting surface where the glass rested against the bucket. The bezel then held the lamp tight in the bucket, and once you aligned the headlights, they stayed put. The new ones are a stamped reflector housing adhesive bonded to the glass lens. To position the lamp in the bucket, it relies on small metal tabs on the back of the reflector. Small metal tabs that can be bent to adjust, but weren't. I couldn't even get the bezel to fit close enough to get a screw started. I compared the backside of the old sealed beam to the new one, and then used my caliper to measure the distance from the front of the lens to the mounting surface. Sure enough, the new ones were 1/8" out-of-tolerance. I bent them with some needle nose pliers to get the correct dimension, and they fit right in. I also cleaned and polished out the stainless steel bezel that holds the headlamp in the bucket, and replaced the screws with new hex drive stainless steel button-head screws. Then I popped out what was left of the plastic headlight trim (aka "Whiskers") with a trim tool, cleaned the paint under the area, and snapped the new whiskers in place. The round black plastic plugs turned out to be the same size as the one I used to plug the hole for the rear window wiper, and they snapped right in, replacing the headlamp washer nozzles quite nicely.

Then I moved on to repairing the surface rust on the four spots on the hood that contact the rubber hood bumpers when the hood is closed. Since this car was never cleaned under the hood, dirt and oil vapors built up on the contact surfaces of the rubber bumpers, and ground through the paint. So I used the flap wheel in the Dremel to take all the rust down to clean, shiny metal, and then treated it with Evapo-Rust Gel, and primed it. It will get smoothed out and painted later.
This one just had a "ring" of rust ground into it from the round rubber bumper. It cleaned up in just a few minutes.

Oh, boy....this one. For some reason, water pooled here, and even got under the seam sealer and lifted it. Those two little black spots? Yep, rust holes. They started out as pinholes, and since that's as far as they easily opened up, they fortunately never got much bigger. That's solid metal all around them, and I was able to get at the backside of the metal through the convenient drain hole Toyota provided. I poked around in there and couldn't get any loose scale or rust to come out, so I'm crossing my fingers that I caught it in time. I shot some Eastwood Rust Encapsulator in there, and that should seal it off. But rust never sleeps, and like some of the old "B" movies, it might get released later to ravage the hood. The correct, "purist" way to fix this would to weld or braze up the holes, or perhaps even lead them. Lacking a welder, and not wanting to repaint a larger part of the hood than absolutely necessary, I'll be using a different method. Yes, I'm going to "Bubba" it, and use a couple of dabs of JB Weld, then sand smooth, use some spot putty, prime and paint. Before you laugh too hard, I know people who have put their cast-iron axle center sections back together with the stuff, and drove out of the middle-of-nowhere. It;s strong, and if the metal is clean, it holds.

This one took maybe 15~20 minutes to clean up. Just a ring of rust, and some rust coloration on the seam sealer, and what looked like a hole in the sealer. Turned out to be a bit of rust that quickly cleaned up.

This one was another piece of cake. 5, maybe 10 minutes.

So while the primer and rust encapsulators are curing, I measured, located, and drilled the other two mounting holes in my "Cooling Plate".
The cooling plate is to ensure that most of the air coming in the front of the car goes through the radiator, and not over it. There's a rubber seal on the bottom of the leading edge of the hood, and one on the cowl that seals to the bottom of the trailing edge of the hood. If the front seal gets out of shape, or is missing, a lot of the air coming in will scoot over the top of the radiator, rather than going through it.
And it makes a nifty place to hold things!

Holes drilled, reamed, and chamfered.

New holes in core support for plate. After I finished the holes in the plate, I clamped it in place as a template, and used transfer punches the locate the centers of the new mounting holes.

The reason I was stalled on installing this thing was what to use for fasteners? I need it removable, as there's stuff down there can fail, so that means something like a nut and a bolt, right?
Nope. I stumbled across these "Bumper Cover Retainers" while looking for something else. Most of these push-pin type fasteners are meant to be single-use, like a plastic rivet. These have threaded pins that can be backed out with a good old #2 Phillips screwdriver, and then you pull the fastener out. Elegant, light, simple, and reusable! The nylon washers will go between the plate and the sheet metal to isolate it a bit.

Washers over the holes.

Plate and fasteners installed!

It doesn't rattle when I tap it, so it should be quiet on the road. It's coming back off to get cleaned, and then I'm painting it with wrinkle-finish black paint, something I've loved on machinery and vintage radio gear since I first saw it probably fifty years ago. On my never-ending list of projects is to refinish a pair of cam covers I have. They'll get the same wrinkle-finish black like from the factory, with the fins and lettering polished. Then I'll go over the "TOYOTA" block lettering with a bright red, and the "DOHC" block lettering with either a bright blue like it was, or a matching yellow to the "DOHC" on the cam drive belt cover (see below). Then a couple of coats of clear, and hopefully they'll be good for a few years.

Monday, September 3, 2018
Labor Day - End Of Summer -
So put away the white patent leather loafers, the white patent leather belt, and your lemon yellow leisure suit.
You can keep the diamond pinkie ring out until Thanksgiving.
Just kidding. The only people I knew who dressed like that were car dealership owners. Some of them thought they were really STYLIN' back in the day. One had a yellow Cadillac Coupe DeVille with a white leather interior that matched his outfit perfectly. I was very good friends with his oldest son, and we'd both crack up when Dad went out on the prowl. Al's Steak House was the most popular spot for Gentlemen Of A Certain Age to hang out and conduct business, and those of us in the Automotive Tribe could tell who was there by the cars in the lot. They conducted their business over Martinis and polished wood, and we conducted ours over blacktop County roads, 1320 feet at a time, or on the Center Street on-ramp to Westbound I-80. First one to Rte 7, Larkin Ave, wins!
So anyway........I'm headed out to the end-of-summer BBQ bash at The Kid's Place, aka The Country House. Hopefully the DIL's brother is there so I can find out if the CB radio in his truck works any better than it did.
Menu today is burgers, dogs, chips, potato and macaroni salad, sodas, and a pony keg for those so inclined. It's 80*, partly sunny, 20% chance of rain, and looks like a fine day for an end-of-summer BBQ!
Subscribe to:
Posts (Atom)
PAINT!
Got a bee in my bonnet and shot some paint yesterday. Two medium coats of Eastwood :Safety White" Rust Encapsulator, and I'm happ...

-
Yawn....just more Kabuki Theater, but interesting reading, nonetheless. Read All About It Here.....
-
%20American%20Airlines%20Flight%20Tracking%20and%20History%2004-Aug-2024%20(KDFW-KEGE)%20-%20FlightAware.png) Every so often when I'm checking my PiAware ADSB receiver/display I'll notice an aircraft with a flight path that catches my eye. I...
Every so often when I'm checking my PiAware ADSB receiver/display I'll notice an aircraft with a flight path that catches my eye. I...