I'll be the first to admit I haven't been running at 100% the last week or so. My right hip has flared up, and it hasn't been much "fun".
So, I went to the Doctor's office last Tuesday and she checked things out, asked a bunch of questions, did the rotation/extension/flexion stuff, and sent me down to the walk-in clinic for X-Rays of the hip and lumbar region. The results indicate some arthritis in the hip (no surprise there), and some minor "Bone Spurs" in the lumbar region.
As usual, the X-Rays were just to check that the basic structure is OK, and I'm going in for an MRI on Friday afternoon. And of course, they're going to run me through the Physical Therapy routine, although every time I've had PT it hasn't done much.
In the meantime, it's 400mg of Ibuprofen every 4~6 hours, along with half a Tramadol tablet. The Ibuprofen helps knock down any inflamation, and Tramadol relieves most of the pain. A full Tramadol knocks the pain to zero, but also knocks me into an alternative reality for a couple of hours.
No thanks, I'm wacky enough as is!
And what happened to the spell check function on Blogger? Mine's gone AWOL.
Sunday, February 9, 2020
Tuesday, February 4, 2020
SOTU
We didn't watch it tonight because we were busy watching something else.

Cold, clear night, so we made a fire, had macaroni and cheese along with some lentil soup, and played with "Kinetic Sand" and one of my favorites, Play-Doh, seen here In Action! Yes, Pebbles was down in the den with us, just slightly out-of-frame to the right, always watching TLG, and in Condition Yellow. Woe betide somebody who makes a threatening move while she's On Duty. I'm sure she'd go full berserker mode to defend us.
Anyway, from what I've read, "Madame" Speaker displayed some interesting behavior that would have gotten her dragged out back and disappeared in a lot of places. I'm sure I'll get to see replays, but for Real Time viewing, this was far more important.
Sunday, February 2, 2020
The Warm Before The Storm.....
Yow....it's Seventy-Two Degrees here today! Strong winds from the SW, averaging 10MPH with gusts to around 30MPH. It's a beautiful day, and even with the wind, it feels warm. Pebbles did her first session of roll-around-in-the-yard for the year, coming back in the house pretty well covered in dead grass and leaves! Took a few minutes to brush her off, but it was fun watching her enjoy this little bit of "Spring Preview". And she even ignored all the squirrels running along the top of the fence between their tree, and the front of our house where the maple tree still has a bountiful crop of seeds. Guess the squirrels are stocking up for the next few days.
BUT.....the temps are going to start dropping tonight, and rain turning to snow is expected on Monday with a high of 24*. Snow accumulation of 1"~3" is expected during the day, with another 2"~4" predicted overnight.
Monday night will drop into the single-digits, and Tuesday night is expected to get down to about -2*.
TLG will be staying here Tuesday/Wednesday, so I forecast lots of game-playing, R/C Car Action down in the den, and a nice fire going later in the day. I have a bunch of crab apple wood that came from some large branches that broke off the tree last year, and they dried out very nicely over the summer before I cut them up and stacked them. I don't know if crab apple wood burns well, but I'll try some small pieces to see how it works.
Been kind of off-line the last few days. Having some problems with my right hip acting up, and I'm not getting much sleep at night. So, I'll call my Doctor's office tomorrow and see if she has time to see me. Otherwise, I'll be headed down to the urgent care clinic. Something's not quite right, and I need to tend to it.
Enjoy the rest of your weekend, and no, I'm not watching the Stupid Bowl.....
Monday, January 27, 2020
Valco Supro Rebuild Completed
And it was a nice little side project that I've been meaning to get completed since I found it in the garage in Long Beach.
On the bench making the final voltage measurements.

The first thing I did was to bring it up on my Variac with the tubes pulled, measuring the input voltage and current draw. Since this had been stored for many years under less than ideal conditions, I had some concerns that the power transformer might be bad. It came up fine, and the filament voltage and high voltage measurements went as expected.
One interesting observation I made was that this was designed for 110VAC voltage. The nominal filament voltage for the rectifier tube is 5 Volts, provided by a separate secondary winding, and it measured 5 Volts with 110VAC applied to the primary. At today's nominal 120VAC, the filament voltage measured 5.65 Volts. The other filament winding for the 6 Volt tubes measured 6.7 Volts. The increased filament voltage will definitely have a negative effect on the life of the tubes, but there's not much you can easily do about it, so you just have to accept it. I've read about this in "Electric Radio" magazine, a magazine devoted to "Boat Anchor" (tube type) Amateur Radio gear, and read about it on other equipment restoration websites, so I was well aware of it.
Top of the chassis after testing completed. I didn't check to see what size tape I had in my "P-Touch" label printer so the tube type labels are a bit bigger than I would prefer.

And back in the cabinet.

So how does it sound? About what I expected from an amplifier of this design and construction. Has a bit of hum when the volume is wide open, and it's not as loud as I expected, but overall it has a nice "warm" mellow sound. All I had to plug into it was an Audio-Technica ATR30 500 Ohm dynamic microphone, which is probably not optimum for this amp, but ya' gotta' work with what ya' got sometimes.
I have no idea what I'm going to do with this little amp. I don't play, and I don't think any of The Clan does, either. Oh, well, back of the closet, I guess.
Next up will be the Arcuino-based lightning detector, something I need to get finished before Spring.
Saturday, January 25, 2020
Some Giggles For You.....
Don't know if I've ever done a strictly humor post, although sometimes my writing's a bad joke.
Anyway......Enjoy!


That's All, Folks!
Anyway......Enjoy!


That's All, Folks!
Friday, January 24, 2020
Valco Supro Update
And yes, the bread is just as good the "next day" as it was out of the oven, but alas.....the crust loses it's crispy crunchiness within 12 hours, even when bagged. If I left it unbagged it would become construction material within a few days.
It's DRY here!
So I've also been tinkering at least 30~45 minutes a day on the Valco. I had a 20uF/450V cap for the first filter, but didn't have any 10uF/450V caps for the second and third filters, so I put off rebuilding the power supply section until I had the capacitors "in stock", and they arrived yesterday.
Here's the power supply filter section rebuilt with all new parts.

And the complete chassis.

I'll bench test it before I put it back in the cabinet, as I want to record all the voltages. I'll bring it up slow on my big Variac, and monitor the input voltage and current without the tubes in it This will let me record the No Load voltages that the transformer puts out, and measure the excitation current, telling me the "health" of the Power Transformer.
I cleaned the case as well as I could, which really isn't very well, and glued down as much of the loose covering material as I could. The "Tolex" vinyl covering is pretty shot on the top, with much evidence of the amp being used as a small table. I guess the ring-shaped watermarks and "cigarette" burns are just part of this little amp's history.
It does look much better with the cleaned, reversed piece of grill cloth in there!

The hardware on the new leather handle is almost too shiny. I would have just changed the handle part, but the OEM hardware was riveted in. There was no way I could have removed it without damaging something, so I took my Dremel and used a cut-off wheel to slice off the rivet heads. You have to remove the handle to replace the strap because there's little pins coming down from the hardware, through the slots in the strap, and then down into the wood, to prevent the strap from pulling out.

And the replacement speaker dropped right in, as hoped.

Now I'm scratching my head trying to decide if I should rebuild the missing back plate that looks like this.

I can easily get and cut a nice piece of wood to fit there, but I don't have a router to do the nice edge. I wouldn't cover it, just stain it dark, and maybe "age" it a bit and bang it around a bit so it looks like the rest of the amp.....
On the model car front, I had an "Epiphany" the other day regarding the motive system. Turns they use a "Six Step Inverter" to power the little brushless motors with. In finding and reading the datasheets from the manufacturers who produce the controller chips, I went over the waveforms fed to the motor, and son-of-a-gun, they're identical to the waveforms of the equipment I used to design for McGraw-Edison back in Illinois.
..........grok..........
So now I'm sketching up some diagrams and drawings for a small dynamometer to test and measure these things with. I've done it before, but the smallest motors we worked with were around 50HP, going on up to 450HP, which was the largest off-the-shelf 480V three-phase motor you could buy at the time.
And it looks like a lot of the specs on this "Hobby Grade" stuff are inflated enough to send my bogosity meter towards the top end. Reminds me of the Wild West days of home audio when outrageous claims for the output power of home stereos were the norm.......
Wednesday, January 22, 2020
Bread.....Epilogue
Was gonna start this earlier today, but TLG was here, and we were reading "Pop-Up" books, much to his delight. He certainly enjoys books, and that's a behavior we definitely encourage. He knows all his colors, most of the ABC's, and can count forwards (and backwards!) from zero to ten.
Yeah, I'm the guilty party for insisting he include zero in his counting. And he learned them backwards hanging around with me doing simulated countdowns. It was a real treat watching his Lightbulb Of Comprehension go on when he realized the numbers were the same, but they meant different things going up and coming down.
Anyway....back to the bread.....
I used my Standard Reference Recipe for this batch, proofed the yeast (a fascinating subject all it's own) while I fluffed and measure out the flour, and just to throw another variable into the mix, I dissolved the salt and sugar into the warm water before I added it to the flour. It just seemed the right thing to do to ensure complete mixing.
The major difference this time is that I baked the loaves in the glass bread "pans" we have. Probably just me, but I always associate the word "pan" with something made of metal, hence the quotes. Guess I should just call them baking dishes....
I won't bore you with the construction details of the latest "Bread Build" since you've seen them all except to say I ran the mixer one notch higher this time. It cut the laboring of the motor down, it really mixed the dough well, and when I carefully looked at the slider control, I realized this was the speed I was supposed to be using per the mixer's manufacturer. Le Sigh.....
And I did NOT "gently slash" the tops of the loaves this time, and they did not deflate on me. I just brushed them with warm water, and popped 'em into the preheated 450* oven for 22 minutes.
And the results?
I stone-cold nailed it.
The front loaf is shiny because SLW slathered it with butter before I could grab my camera.


And FINALLY.......bread with some structure!

It cuts easily and stays together, it's light and airy, a little chewy in a good way, and the crust came out great, but a little thin. So the next time I'll bump the time up to 25 minutes to compensate for it being in a glass dish, which will develop the crust a bit more.
So I'm officially announcing I can bake bread! This bread. With this recipe. At this location. YMMV!
Stay tuned for cinnamon rolls. The flour company website has some "Baker's Tricks" to keep them from getting rock-hard in a day or two, and I'm itchin' for some cinnamon rolls.....
Yeah, I'm the guilty party for insisting he include zero in his counting. And he learned them backwards hanging around with me doing simulated countdowns. It was a real treat watching his Lightbulb Of Comprehension go on when he realized the numbers were the same, but they meant different things going up and coming down.
Anyway....back to the bread.....
I used my Standard Reference Recipe for this batch, proofed the yeast (a fascinating subject all it's own) while I fluffed and measure out the flour, and just to throw another variable into the mix, I dissolved the salt and sugar into the warm water before I added it to the flour. It just seemed the right thing to do to ensure complete mixing.
The major difference this time is that I baked the loaves in the glass bread "pans" we have. Probably just me, but I always associate the word "pan" with something made of metal, hence the quotes. Guess I should just call them baking dishes....
I won't bore you with the construction details of the latest "Bread Build" since you've seen them all except to say I ran the mixer one notch higher this time. It cut the laboring of the motor down, it really mixed the dough well, and when I carefully looked at the slider control, I realized this was the speed I was supposed to be using per the mixer's manufacturer. Le Sigh.....
And I did NOT "gently slash" the tops of the loaves this time, and they did not deflate on me. I just brushed them with warm water, and popped 'em into the preheated 450* oven for 22 minutes.
And the results?
I stone-cold nailed it.
The front loaf is shiny because SLW slathered it with butter before I could grab my camera.

Out of the baking dish the loaves held their shape.

And FINALLY.......bread with some structure!

It cuts easily and stays together, it's light and airy, a little chewy in a good way, and the crust came out great, but a little thin. So the next time I'll bump the time up to 25 minutes to compensate for it being in a glass dish, which will develop the crust a bit more.
So I'm officially announcing I can bake bread! This bread. With this recipe. At this location. YMMV!
Stay tuned for cinnamon rolls. The flour company website has some "Baker's Tricks" to keep them from getting rock-hard in a day or two, and I'm itchin' for some cinnamon rolls.....
Sunday, January 19, 2020
Project Updates
Been keeping busy with all the little projects going on here.
Mounted a terminal strip in the Supro amp so I have some tie points for the new capacitors.

Next time you see the chassis I'll have it finished. I put the refurbished grill cloth back in the case, along with the new speaker and carrying handle, but didn't take any pix.....D'OH!
And I brought all the fiddly bits for my little "Senton" 4x4 truck down to the basement, put them all back where they belonged, and tested it for steering and throttle response while it was sitting on the test stand.

Next up for this little guy is to fit the GoPro mount, and wait for the geese to show up. Should be a real Hoot and a Holler!
I also gathered up the parts I had "in stock" for the "Limitless" Speed Run car. Here's the steering servo installed, and the radio being fitted-up.

And not wanting to spend $300 on a motor and Electronic Speed Controller ("ESC"), I found a new pull from another Arrma car on eBay, and picked it up for $100. I'm trying to keep the costs on this down, and this motor/ESC pair is plenty good enough for learning how to drive this thing. My fellow Arrm Forum members tell me this "beginner's setup" should be good for 80~85MPH with the stock gearing, and possibly good for ~100MPH with different gearing and some other tuning tweaks.
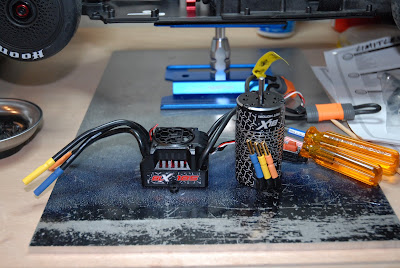
Electronics package mounted, along with the motor.

After I power the car up the first time and do the initial setup, I'll connect the servo arm, and do the final steering trim. 100MPH = 147 ft/sec, so you really have to have the steering dialed-in, and make some adjustments on the radio to calm it down some. At that speed, a slight twitch on the steering wheel can send you flying off course.

After I'm comfortable driving it in this configuration, I'll upgrade the ESC. The ESC I'm looking at is capable of passing much more current, while running cooler (less loss), and allows more adjustments, one of which is "Braking Strength". You should be able to lock up all four wheels at maximum braking effort (the little truck does this easily), and this ESC can't do that when the vehicle it's in is using the gearing required for high-speed running.
One of the things I have to learn more about are the speed controllers and motors. Way back when, in a different life, I used to design large "Variable Frequency" AC, three-phase motor controls, so I know three-phase power systems fairly well, but that was 40 years ago. One of the differences is that these little brushless DC motors use a permanent magnet rotor, whereas the big motors I used before are your typical three-phase "Squirrel Cage" motors that have aluminum or copper bars making up the rotor. The spinning magnetic field in the stator coils induces currents into the bars, and the rotor gets "dragged" around trying to follow the magnetic field. This causes the rotor to "slip", spinning at a lower speed than the magnetic field rotates at. The permanent magnet rotors don't do this, being pretty much locked into the same rotational speed as the magnetic field.
I've seen schematics of these ESC's on the web, so now I have to go round them up and study them. Time to brush-up on "4 Quadrant Control" again!
Thursday, January 16, 2020

Wednesday, January 15, 2020
I Feel The Need....The Need For SPEED!
Oh, boy.....
The local Hobby Town is closing their store, and as a result, they're doing an "Everything Must GO!" sale, with prices cut by as much as 75% on some items, 50% on others, and 25% (for now) on everything else. I've wanted to get The Little Guy his own entry-level "Monster Truck", and had priced them before at $100~$150.
Got this little guy for half-price:

It's amazing that they can have a complete toy like this, including the radio and batteries, for $99.99 retail price.
For $50 I couldn't pass it up, so I bought it for his birthday in March.
And I also picked up some CA glue, paint, thinner, brass and copper sheet, small brushes, a bunch of other building supplies, a big bag of battery/power/balance leads stuff, and plastic model kit of a MKIV Toyota Supra. These list at about $30, and I got it for $12.

It's sad when a small "specialty business" like a hobby shop closes. They're more than just a store to buy things, as they had a full-service R/C shop for cars, boats, airplanes, drones, and helicopters, and you could hang out and talk about things with the store employees.
The family that owned the franchise for this store decided not to renew the lease, and retire instead. So I got a couple of gifts for TLG, and whole bunch of suppplies.
But what really caught my eye was this, an Arrma "Limitless" Speed Run (think Bonneville Salt Flats) rolling chassis.

"Rolling Chassis" means no powertrain, electronics, or battery; you have basically "limitless" options available to finish the car. Since I have most of the required parts needed to complete this, and it was 50% off, one followed me home.

Yeah, I know......it's kind of a "Phil Type" thing, I guess.....just can't pass up a "good deal". I came home with the truck for TLG, and my Big Bag 'O Stuff, and told my Sweet Little Wife about the Limitless, and she promptly told me to go back and buy it or I'd be kicking myself later this year. Depending on the motor, batteries, speed controller, and gearing, these little cars are capable of doing over 140MPH, so finding a place to really let it rip might be a problem. I talked to the guys at the Hobbyplex where I run my little VTA car, and they told me that they "kinda" tried doing some speed run events, but didn't seem to get much interest from the local R/C racers. They have a couple of radar guns, so maybe once I get this built out I can take it up there to use the taxiways around the old FoCo airport.
Monday, January 13, 2020
Valco Supro Rebuild Progress
Besides bread making and playing Grandpa, I've actually been doing some other stuff, like continue the work on getting the little Supro amplifier back in working condition.
The input section has been completely rebuilt with all new parts. The resistors had all drifted high in value, well out of their loose 10% tolerance, and the tubular "paper" capacitors were all leaky. I also wicked all the old solder off the 1953-era connections, cleaned them, and resoldered them with a bit of rosin flux.

And the output section has been similarly rebuilt, adding (replacing, actually) a new fuse holder, new AC Line bypass capacitor, and a new three-wire grounded power cord, seen exiting the chassis out-of-focus.

Now I have to rebuild the power supply filter section. The big aluminum "Can" capacitor is leaky, and as usual, the resistors have drifted high and outside of their tolerance. I ordered a replacement filter capacitor for it, but, uh......I ordered the wrong one. I generally increase the capacitance a bit when I replace the filter since it gives better filtering, and the value I picked was based on a schematic for a slightly different amplifier. In short, this replacement is too big physically, and has too high a capacitance value to use. The original value(s) in the three sections of the can were 20 microfarads, 10 micofarads, and 10 microfarads. and I wanted to go to 40, 20, and 20.
The correct schematic (and the original can itself) shows all three sections being 10 microfarads, resulting in a smaller can.
The "too high a value" problem just appeared tonight when I was reading the "RCA Receiving Tube Manual", and found that for the 5Y3 rectifier tube used in this amp, the maximum recommended capacitance for a capacitor-input filter is 20 microfarads.
OOOPS.....
What I'm going to do is leave the old can capacitor on the chassis "for looks", disconnect it electrically, and use three new separate electrolytics under the chassis for the actual filters.
BTDT, and it works fine. So this is the next area of the chassis to be rebuilt.

I'll add a terminal strip under the chassis for the new tie-points I need.
And the new speaker grill material came in, and it's a joke. It looks like it was cut from a cheap suit, and would look totally out-of-place.
Hmmmmm.....this is what I had to start with. Very dirty, faded, and discolored. The "starburst" pattern around the dirty part was up against the inside of the amp, and you're seeing the imprint of where the amp's covering material was follded through the speaker opening, and glued to the inside of the amp.

But I have a plan.....I ran my shop vac over it with the bristle brush on it to get the crud off, and both sides got much cleaner. Then I realized if I just flipped it over, it would be reusable.
This is the side that was inside the amp, and had the speaker clamped down over it.

Looks presentable to me! And it fits in with "kinda keep it stock-appearing" theme, vs having a piece of cloth in there that looks like it came from a $20 suit.
I cleaned off the outside of the cabinet, and it's a mess. I don't want to recover this thing, so I'm just going to trim off any dangling pieces that are too far gone to reglue, and reglue any loose covering.
More to come.....
Subscribe to:
Posts (Atom)
-
 FOURTH time I've written this post. MY Muse has apparently vacated the premises, leaving me too busy doing other things to keep both m...
 -
With apologies to The Control Voice.... Yup.....got The Busies the last few weeks. Lots of stuff happening this week, including my Nuclea...