First, to all of you who are Vets, Retired, or currently serving, I thank you from the bottom of my heart for your service, and all the sacrifices you've made.
Thank you ALL!
I was able to contact NI6BB yesterday, and again today, using my "temporary" vertical. Yesterday the contact was later in the afternoon, and propagation wasn't very good, but we did make the contact. Today's contact was earlier in the day, and propagation was much better.
I'm blessed with a MUCH lower background noise level here compared to Long Beach. All the utility wires are buried here, and since there aren't any exposed 4300 Volt (the two wires all by themselves at the very top of your power pole) lines and insulators being bathed with salt air and causing coronal discharges, there's very little "static", or powerline buzz, cracking and popping. Where my signal meter hovered around S-5 to S-6 in Long Beach, about half-scale on the meter, here it's S-1 or S-2, only lighting up the first or second bar on the meter. I still hear "birdies" and other spurious noises caused by the zillions of little "wall wart" switching power supplies, home networking routers, Plasma TV's, and other consumer devices, but it's not a solid "Wall Of Noise" like it was back in SoCal.
In fact, the background is so quiet here that I notice my radio could use an alignment. Things that were covered up in background noise before are now noticeable, and I'm making plans to do a complete re-alignment of my little K2 transceiver. I built it back around 2001~2002, so I've had it quite a while, and it's been dragged hither, tither, and yon since the initial and follow-up alignments were done. I don't let it get banged or bashed around, and keep it securely packed, but still, components drift and change values slightly with age, and I have much better test equipment now than when I first built it.
I think it'll be a nice Winter Workbench Wonder to tinker with on those nights it's too cold to hang out in the garage.
Monday, November 12, 2018
Saturday, November 10, 2018
Veteran's Day Radio Ops
So, in anticipation of my buddies at NI6BB onboard the Iowa manning the station all day, I went ahead and set up my BuddiPole in the vertical configuration, and got everything else connected and powered up.
The green stuff wrapped around the feedpoint is stretch wrap, a good way to get some rather temporary but effective weather protection.
The antenna consists of a 15-1/2' vertical radiator, and two 25' radials. The length the radials was determined by a length of 16 ga speaker wire I had laying around. I split it down the center of the two conductors, crimped a lug on each piece, and presto! I had two radials. Technically, they should be a bit shorter (about 1/3 longer than the radiator, per an old rule-of-thumb), but it's not super critical.
The feedpoint is about 6' above ground, and the two radials are also about 6' above ground, so this qualifies as an "Elevated feedpoint with elevated radials", and greatly reduces the "Ground Losses" of radials laying on, or buried in, the ground. To be effective with radials on the ground, you really need quite a large number of them (64 is a good starting point!), which is the main reason why my 33' vertical didn't work so hot with only 4 radials when I had it up.

And while I was out playing with the BuddiPole, my wife and grandson were out doing some stuff. He gets quite a kick out of playing with the dog, and you can hear him laughing the whole time.

Grandchildren are truly wonderful. Hard to believe he was 10 weeks early, and his Daddy could hold him in his hands.
Here he is 18 months later, running around like you'd expect him to.

Thursday, November 8, 2018
It's Official!
Just received notice from the Friendly Candy Company that my vanity callsign has been assigned.
All I did was change the numerical designator from "6" for Kommiefornia to "0" for Colorado.
Hmmm...with the recent "Blue Wave" of insanity that swept my new home state yesterday, maybe I should start spelling it as "Kolorado"?
Nah....just doesn't have the right ring to it.
Anyway, I printed out a reference copy, and now I can send that to the DMV in Denver to get my Amateur Radio plates for the Jeep.
Flat On My Back
For the last 36 hours.
Plugged sinuses, coughing fits every 15 minutes when I lay down, etc, etc, you know the drill.
If I'm not feeling better tomorrow, I'll head over the Urgent Care Clinic my medical provider runs.
Plugged sinuses, coughing fits every 15 minutes when I lay down, etc, etc, you know the drill.
If I'm not feeling better tomorrow, I'll head over the Urgent Care Clinic my medical provider runs.
Tuesday, November 6, 2018
Election Day
And I won't waste too much ink, too many pixels, or an excessive number of electrons writing about it.
We mailed in our ballots last week, and I don't have a clue about any "Blue Waves", "Red Waves", backlash, or anything else.
We have a critical (to us) Governor's race, and a "Must Not Pass" proposition on the ballot.
The (R) candidate for Governor has been the state treasurer, has a solid record, and has campaigned throughout the state.
The (D) candidate is a rich guy with some questionable business dealings, and has basically only campaigned along the Front Range (Fort Collins to Pueblo), completely ignoring half the state's population.
And we have a proposition that would require a 2500' setback (buffer zone) for oil and gas operations. I haven't read the entire bill, but the gist of it is that it would kill oil and gas production in Colorado.
SO....time to make some popcorn, fire up the tube, and sit back and watch.
Saturday, November 3, 2018
The Gate
WELL....let's start at the beginning. When we bought the house, the entire fence run on the South side of the house was disintegrating, and needed replacement FAST.

Since the tree guys needed access to the backyard, we scheduled the fence guy to come out on the same day so he could remove the single gate and posts, opening up the entire short run of fence between the South run and the house.
Unfortunately, I didn't take any pictures of the short run with the original single gate. Still kicking myself over that one.
Here's a pic of the tree service truck that was hauling the chipper. The one panel to the immediate left of the truck is an original one. The section running to the left an out of the frame belongs to our neighbor Sara, and she had it replaced while our fence was being rebuilt. You can see how weathered the wood is, and it was cracking and splitting on the pickets and the posts.

SO....during the week or so after we moved in, all the old fence posts had been replaced, new panels installed, and a custom double-wide (14' total; two 7' gates) gate was built and installed.
This is it before the gates were installed. In a reply to Beans in my previous post, I said he used two 4x4 posts at the gates. I goofed; He used a single 4x4 post. I've had my level on the two 4x4 posts you see in the photo below. They're still dead plumb on all four sides, so they've held up.

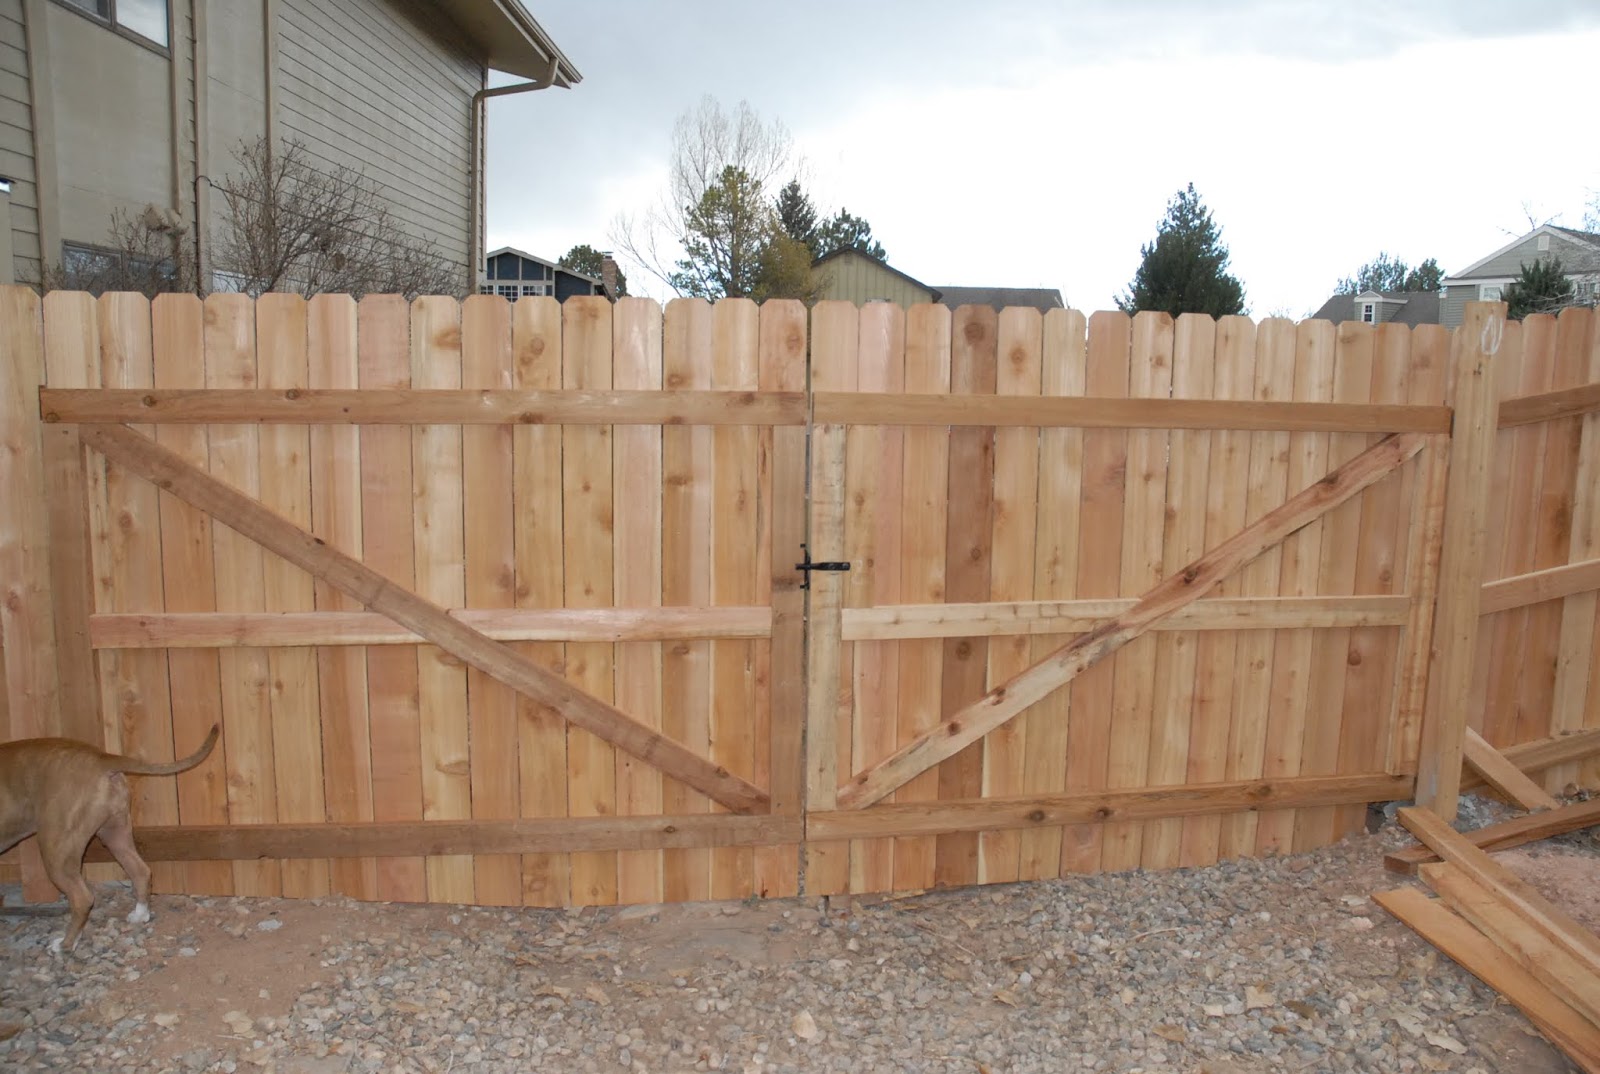
And when the gate panels were finished and hung, it looked quite nice. Nice and square, and the gates opened easily.

And looking at the back shows it has "good gaps", a car term meaning everything is in alignment, evenly spaced, and square.

One thing you'll notice, is that there's a significant gap at the bottom of the gates. The area seen above had a gravel bed with a cast-in-place concrete border, which runs around the entire yard at the fence line. Sort of like having flower beds along the fence line, but a LOT lower maintenance. Well...the fence guy said "It's a landscaping thing", and the fly-by-night Bozo landscape guy said "Oh, no, it's a GRADING issue, and I don't do that". The gates lead out to a common "drainage area" for our yard and the yard next door. Bozo Landscaping, LLC called it a "swale", and all of the houses I saw growing up in Illinois had them.
Wikipedia has a nice picture of one:

Bringing in two BIG trucks for the tree removal really beat that area up, busting up the nice concrete border and some large pieces of slate that were there, as well as depressing the ground permanently, as seen below.

Fast forward from last November from when the gates were built to the first howling snowstorm we had. Sorry, no pix available as the news crew couldn't get to the site, but it wasn't much snow. It was the 45MPH sustained winds with gusts to 50 that clobbered it.
The latch failed, causing the left side gate as seen above to tear the drop rod out of the ground, and swing full open. Then the wind would shift, and it would slam shut. Why did the latch fail? The buffeting caused by the wind shook the lag bolts loose, and they soon pulled completely out.
I used some 1/2" wide, 48" long cable ties to secure the gates shut, no small feat in a 40MPH wind.
OK...I'll admit it. Right here, at this point, I should have called the original builder and screamed "HELP", and I didn't. My error. BIG mistake. I remember having something else on my mind we were dealing with at the time, but I admit I should have at least called him. I screwed the latch back in, and left it cable-tied shut until we needed it opened again in Spring, at which the young handyman guy straightened it out some, and installed some longer lag bolts.
Then we got clobbered with some Big Spring Winds, sustained 45+MPH with gusts of 65+, and it blew open again. Out came the cable ties until I could figure out what to do.
Yep....should've called the builder again, but I didn't. About this time, the Windbag Bozo Landscape Company offered to fix it, and my wife said to go ahead. He put in a much better latch, and two additional drop rods to anchor the bottom edge better when the gates were closed.
And it worked quite well until I noticed the gate was getting harder and harder to open. I loosened the lag bolts on the hinges while pulling the gate square with a ratchet strap, and the gate leveled out OK, at which point I ran the lags back in. As soon as I released the ratchet, the gate sagged, leading me to believe the holes the lags originally made are now oversize from the battering these 7' gates received from the wind. It was better, but over the summer it's sagged really bad, as seen in the pix below.
We no longer have "Good Gaps" on this side.


While the other side is fine.

And this is where the two gates meet.

OOOPS! Kinda hard to put my "Katie Bar The Door" (KBTD) kit on here.
From the outside.


So the first order of business is to get the gate leveled again by pulling it straight (I'm going to jack the lower end this time, too, for some stability) as I loosen the lags holding the hinges to the post, then drill through holes for the new hardware, then install same. Then I can put the KBTD kit on it, and hang the "Closed Until Spring" sign on it.
Hardware measurements are completed for this phase, as well as for installing the KBTD kit, and hardware will be purchased tomorrow.
BTW...this is a temporary patch that I made to the gate latch. It's also an example of why you don't use lag screws for something like this. If you look closely, you can see the original mounting holes for the fixed part of the latch just down and to the left of the bolt heads. These are the holes the fixed part was in the last time the latch blew. I moved the fixed part "up and over" a bit, and added flat and split washers to it. It hasn't loosened since I did that last Spring, so it looks like the lock washer helped. Properly installed through hardware should fix the "Moving Hinge; Sagging Gate" issue, and the KBTD kit should mitigate the wind buffeting issue.
And we still have to resolve the landscaping/grading issue.

Since the tree guys needed access to the backyard, we scheduled the fence guy to come out on the same day so he could remove the single gate and posts, opening up the entire short run of fence between the South run and the house.
Unfortunately, I didn't take any pictures of the short run with the original single gate. Still kicking myself over that one.
Here's a pic of the tree service truck that was hauling the chipper. The one panel to the immediate left of the truck is an original one. The section running to the left an out of the frame belongs to our neighbor Sara, and she had it replaced while our fence was being rebuilt. You can see how weathered the wood is, and it was cracking and splitting on the pickets and the posts.

SO....during the week or so after we moved in, all the old fence posts had been replaced, new panels installed, and a custom double-wide (14' total; two 7' gates) gate was built and installed.
This is it before the gates were installed. In a reply to Beans in my previous post, I said he used two 4x4 posts at the gates. I goofed; He used a single 4x4 post. I've had my level on the two 4x4 posts you see in the photo below. They're still dead plumb on all four sides, so they've held up.

And when the gate panels were finished and hung, it looked quite nice. Nice and square, and the gates opened easily.

And looking at the back shows it has "good gaps", a car term meaning everything is in alignment, evenly spaced, and square.
One thing you'll notice, is that there's a significant gap at the bottom of the gates. The area seen above had a gravel bed with a cast-in-place concrete border, which runs around the entire yard at the fence line. Sort of like having flower beds along the fence line, but a LOT lower maintenance. Well...the fence guy said "It's a landscaping thing", and the fly-by-night Bozo landscape guy said "Oh, no, it's a GRADING issue, and I don't do that". The gates lead out to a common "drainage area" for our yard and the yard next door. Bozo Landscaping, LLC called it a "swale", and all of the houses I saw growing up in Illinois had them.
Wikipedia has a nice picture of one:

Bringing in two BIG trucks for the tree removal really beat that area up, busting up the nice concrete border and some large pieces of slate that were there, as well as depressing the ground permanently, as seen below.

Fast forward from last November from when the gates were built to the first howling snowstorm we had. Sorry, no pix available as the news crew couldn't get to the site, but it wasn't much snow. It was the 45MPH sustained winds with gusts to 50 that clobbered it.
The latch failed, causing the left side gate as seen above to tear the drop rod out of the ground, and swing full open. Then the wind would shift, and it would slam shut. Why did the latch fail? The buffeting caused by the wind shook the lag bolts loose, and they soon pulled completely out.
I used some 1/2" wide, 48" long cable ties to secure the gates shut, no small feat in a 40MPH wind.
OK...I'll admit it. Right here, at this point, I should have called the original builder and screamed "HELP", and I didn't. My error. BIG mistake. I remember having something else on my mind we were dealing with at the time, but I admit I should have at least called him. I screwed the latch back in, and left it cable-tied shut until we needed it opened again in Spring, at which the young handyman guy straightened it out some, and installed some longer lag bolts.
Then we got clobbered with some Big Spring Winds, sustained 45+MPH with gusts of 65+, and it blew open again. Out came the cable ties until I could figure out what to do.
Yep....should've called the builder again, but I didn't. About this time, the Windbag Bozo Landscape Company offered to fix it, and my wife said to go ahead. He put in a much better latch, and two additional drop rods to anchor the bottom edge better when the gates were closed.
And it worked quite well until I noticed the gate was getting harder and harder to open. I loosened the lag bolts on the hinges while pulling the gate square with a ratchet strap, and the gate leveled out OK, at which point I ran the lags back in. As soon as I released the ratchet, the gate sagged, leading me to believe the holes the lags originally made are now oversize from the battering these 7' gates received from the wind. It was better, but over the summer it's sagged really bad, as seen in the pix below.
We no longer have "Good Gaps" on this side.


While the other side is fine.

And this is where the two gates meet.

OOOPS! Kinda hard to put my "Katie Bar The Door" (KBTD) kit on here.
From the outside.


So the first order of business is to get the gate leveled again by pulling it straight (I'm going to jack the lower end this time, too, for some stability) as I loosen the lags holding the hinges to the post, then drill through holes for the new hardware, then install same. Then I can put the KBTD kit on it, and hang the "Closed Until Spring" sign on it.
Hardware measurements are completed for this phase, as well as for installing the KBTD kit, and hardware will be purchased tomorrow.
BTW...this is a temporary patch that I made to the gate latch. It's also an example of why you don't use lag screws for something like this. If you look closely, you can see the original mounting holes for the fixed part of the latch just down and to the left of the bolt heads. These are the holes the fixed part was in the last time the latch blew. I moved the fixed part "up and over" a bit, and added flat and split washers to it. It hasn't loosened since I did that last Spring, so it looks like the lock washer helped. Properly installed through hardware should fix the "Moving Hinge; Sagging Gate" issue, and the KBTD kit should mitigate the wind buffeting issue.
And we still have to resolve the landscaping/grading issue.
Friday, November 2, 2018
Oh, Lordy It's WINDY!
And I just hope the gate holds together.
The NWS just issued a Severe Thunderstorm Alert for this area, warning of possible winds in excess of 60MPH. We're just on the far Northern edge of the warning, but the folks in Loveland and Greely look like they might get hit with it.
"The Gate" has been a continuous PITA ever since we had it installed. The builder and I have different definitions of what "Heavy Duty" means, and he didn't take it to heart when I told him I wanted it built "commercial strength, like a corral gate", and he got hinges and a latch that weren't up to the task.
One big boo-boo he did was to mount the hardware using the included lag bolts. The buffeting by the wind loosens the lag bolts, allowing more slop in the gates, meaning the wind batters them even harder, loosening the hardware further and faster, right up until the latch blows apart, and the gates start swinging and banging, requiring some emergency repairs.
You have to use through bolts, preferably galvanized, with flat washers under the bolt head and the nut, along with a lock washer under the nut. That's going to get done in the Spring when I replace the gate hardware.
So for now, thanks to Extexanwannabe, I now have a viable solution.
It's called a "Stake Holder", and is basically a big bracket that you put on either side of a door, and when it's "Katie, Bar The Door!" time you slide a 2x4 through it, and the door is rendered in-op.
Or so it goes in the movies.....

I bought four of them today, and now that I've made a sketch of what I want to do, I can measure the thickness of wood on the fence I'll have to drill through, and know how long of through bolts I'll have to buy.
I have to cleverly position these things to take advantage of the structure that holds the pickets, as the pickets have about as much strength as cardboard, and I don't want to start adding "structure" to the gates. I eyeballed it today for a good 20 minutes and then made a sketch, so tomorrow I'll take a bracket and tape out there, measure how thick the wood is I have to go through, add a fudge factor to that, and I'll go buy the bolts, nuts, flats and split locks, and a couple of good 2x4's, in cedar, if they have them.
Then I'll measure, drill, bolt, and slide in the 2x4's and put a "Closed Until Spring" sign on it.
Just hope the gate holds together tonight.....
Wednesday, October 31, 2018
BOOOOOooooooo!!!
Well, the candy is out in the big Halloween dish, and the sound-activated flickery lights that emit snapping, buzzing, and other "electrical" noises are all set up.
I didn't do the speakers and light projectors as the front yard is really soggy, and even with a GFI on the circuit, the wifely unit was uncomfortable with me running power across the yard.
And The Kids are bringing over the Little Guy so he can Trick-or-Treat in the neighborhood for the first time.
As fast as he is now, I wonder what a couple of candy bars will do to him....
They had an All Hands meeting yesterday informing them that the yogurt factory they both work at has been sold, and things will continue as normal for the foreseeable future. Their health insurance premiums will be going up (duh....) under the new owners, but the coverage will supposedly be better.
Have a safe and Happy Halloween!
Monday, October 29, 2018
Oddz 'N Endz
After the "monumental" (for us) amount of work we did cleaning out the back yard, the rest of the leaves fell, covering the yard again.


SO.......my wife used her new BFF APP, Nextdoor.com, and found a couple who are cleaning the back yard, AND the front yard, for us.
They raked and blew the leaves into piles, bagged them, hauled the bags out, and even mowed for us.
Front AND back yards, very nicely cleaned, mowed, and raked, and about twenty five bags hauled away.
All for $100.
Probably would have been more, but his mower mulches as it mows, so the volume of stuff collected is less than I expected.
Considering the trash service we use charges $3.50 per bag, we would have paid $87.50 for just the 25 bags, so $100 for the whole enchilada is money quite well-spent.

They're "100 x 22", which means they have 100mm (~4") objective lenses, and they have a magnification of 22 times.


Even little Pebbles was wondering where the h3ll all this stuff came from. "But Dad....didn't you and Mom have this all cleaned up?".....

They raked and blew the leaves into piles, bagged them, hauled the bags out, and even mowed for us.
Front AND back yards, very nicely cleaned, mowed, and raked, and about twenty five bags hauled away.
All for $100.
Probably would have been more, but his mower mulches as it mows, so the volume of stuff collected is less than I expected.
Considering the trash service we use charges $3.50 per bag, we would have paid $87.50 for just the 25 bags, so $100 for the whole enchilada is money quite well-spent.
"Big Eyes"
I've had these large binoculars for about 8 years, and finally got around to setting them up and using them.

They're "100 x 22", which means they have 100mm (~4") objective lenses, and they have a magnification of 22 times.


I bought these from Big Binoculars, which is now Oberwerk, the name brand of these. This particular model is no longer listed, being replaced with a 100 x 25 model.
They're made in China (duh....), supposedly in the same factory that makes the military optics for the ChiCom military.
They're of "good" optical quality, but not particularly user-friendly. I set them up to look at the Moon, and even with my tripod legs fully extended, and the center post of the tripod fully raised, I still had to bend down to look into the eye pieces, which made getting them adjusted properly a chore.
With this tripod, they'd be great for terrestrial use, but I'd need to shorten the tripod and use a chair for astronomical use.
So, they went back in their box for future use.
Friday, October 26, 2018
Snow Blower Adventures, Part III and "-30-"
"Jeremy" (the "J" in "JW Logistics"?) called me again this morning about 1045 and said they had my item, it was on a truck, out for delivery, and I should have it "in a couple of hours".
yuk-yuk
At 1811 tonight a large truck pulled up, and two big, burly guys unloaded it, carted it up the driveway, and plunked it down in the garage for me. They took a picture of it on their cellphone, and typed in a bunch of info. I asked one of them if they knew where it came from, and got "ummmm...Home Depot. The warehouse". So either HD sent another one out, this one made it's way back to the HD warehouse and was sent, or I guess it doesn't really matter. Kind of a First World problem, and nothing to blow a fuse over.


No missing hardware or parts, no tools flung through the air, and I had it together in about 30 minutes.
I charged the batteries when I was assembling it, and after about 4 hours they were charged, so I took it for a test drive around the garage.
There's not too much difference between speed #1 and #2, but I think #3 would be too fast to plow with. The controls work smoothly, and when you engage the drive, it has a "soft start", so it doesn't just jump to the speed it's set at.
It seems to be balanced nicely, too, as it's fairly easy to lift the auger portion of it up to glide over a bump, or move it some distance without the little outrigger skis dragging.
The only thing I'll have to get used to is that this thing is direct-drive, with a solid axle; no differential. That means both wheels are driven at the same speed, which makes turning a tight corner difficult.
So, we'll see how it goes the first time we get enough snow to need it. The operating manual claims 40 minutes of run time, and that should be enough for slow-poke me to clear the small amount we have.
Thursday, October 25, 2018
Snow Blower Adventures, Part II
WELL......"Jeremy" from the shipping company called this morning about 1045 to set up a pick-up time for the other person's tabletops. He knew not much else, like where's my snow blower, or if the other customer had called to complain. He said he had a truck "close by" (down in Longmont, about 25 miles South of here), and that the driver would "be there in a couple of hours".
So since it was another very pleasant Fall day, I decided to polish out the headlights on my Jeep while I waited.
They needed more than just polishing.
They laughed at Novus #3 polish, about the most aggressive thing I'll use with power tools. Buffing plastic to restore a smooth, flat, scratch-free, optically clear surface is as much art as science. And if you use power tools and aggressive abrasives on plastic, you can easily overheat it, and either "smear" the surface, or melt the surface, both of which might destroy the item you're polishing.
I wound up having to wet sand the living snot out of them, first with 600 grit paper, and then finishing up with 1500 grit paper. It was like deep cleaning the Supra paint all over again. Copious amounts of yellow sludge were produced as I kept the area soaked as I sanded. It's WET sanding, and on something like this you keep it flooded to wash away the grit and crud you're cutting off the surface. Otherwise the stuff you just removed could scratch the surface you're trying to clean.
After about 45 minutes per headlight, I felt they were smooth enough that I could resume machine polishing, starting with the #3 Novus, and then moving to the #2.
Another 45 minutes per lamp, and they were looking remarkably better than the hazy, yellowish lamps that were there before.
Then I replaced both the Low and the High beam bulbs with new ones. The ones in the car are the ones it was made with back in 2006, and 12 years for a set of OEM bulbs is pretty good. I put in some Sylvania "Silver Star" replacements. Not the crazy expensive ones, but the ones two steps up from what was in it. Took about 30 minutes to do the four bulbs, and I put on gloves and wiped the new bulbs down with denatured Alcohol. A dab of silicone grease on the terminals, and I was done.
Firing up the engine and turning on the new headlights was dazzling. What I saw on the garage door before were big, yellowish splotches of light. Now I see the clearly defined pattern of the low beams, and turning on the high beams really makes a light show.
The low beams are 55 Watts, and the highs are 65 Watts, so I shouldn't have to worry about overheating the plastic lamp assembly.
Then I added three quarts of coolant (how'd that happen?), a half-gallon of windshield washer fluid, checked the power steering and brake fluid levels, and checked the oil.
Hmm....it's now 1630 and no truck? Wonder when they guy will get here?
Anyway....peeled off all the heavy masking tape I had on the edges of the metal so I wouldn't burn the paint, cleaned all the sludge and crud off the front of the car, scrubbed the fog lamp lenses clean of years of road crud and bug splats, and did a final hand polish and sealant application on my "90% clean/100% better" headlamps. Cleaned up the tools and garage, and low and behold, at 1810 here comes a truck. It's not from "JW Logistics", but from some other place. No, the guy doesn't know anything other than he's to pick up two pieces, and haul them somewhere. Nice enough guy, but a drone to the electronic tablet he was carrying around, and constantly checking and inputting to.
Oh, well. I guess I wait for either the snow blower to show up, or to hear from the shipping company again.
These guys are making Home Depot look really bad........but I've got nice clean headlights!
Subscribe to:
Posts (Atom)
-
 FOURTH time I've written this post. MY Muse has apparently vacated the premises, leaving me too busy doing other things to keep both m...
 -
With apologies to The Control Voice.... Yup.....got The Busies the last few weeks. Lots of stuff happening this week, including my Nuclea...