Monday, November 25, 2019

Gird Your Grid For A Big One, Doc...

We're just getting started into a Major Winter Storm (ZOMG!! SNOWMAGEDDON!!!) this afternoon, where it's currently 2300UTC, 29*, and snowing.

Expected accumulation is 1"~3" this afternoon, 12"~18" overnight, and another 3"~5" Tuesday, for a storm total of sixteen to twenty-six inches of snow. And on top of that, it's forecast to be "blustery", with sustained winds of ~15MPH gusting to near 30MPH.

Low tonight is forecast to be 20*, and low tomorrow night should be around 2*.

The NWS has forecast travel conditions along the I-25 Urban Corridor to be "impossible" at times. That means I-80 will most likely be shutdown, so travel in and out of here is pretty much a NOGO until Tuesday afternoon, maybe.


Out the front door at 1600 local:


And the backyard:


So it'll be a good night to stay in, follow the weather, and just kick back. I've had to work outdoors in weather like this, and it's not pleasant. Downright brutal, in fact. So a tip of the hat to all those who do work out there, and please keep warm.

UPDATE

Backyard at 2000 local time. Compare the patio table for an estimate. Looks like at least 6", and it's just getting cranked up.....


UPDATE

2200 local. Looks like the chairs and tabled will blend together by morning.
And now the forecast is for an addition 13"~19" overnight, with 3"~5" more before noon......I don't think anybody is going anywhere Tuesday morning!

Midnight Update


Still no wind, which is a good thing, as this much powder will drift like crazy. It's right about 26*, with an expected low of 20*, and a high Tuesday of 26*, so it's gonna stay pretty frozen, dry, and driftable.

Wonder what it'll be like in the morning.

Sunday, November 24, 2019

Let There Be.....BREAD!

Ok, so I finally got off-the-dime, went and bought nice set of mixing bowls and a few other kitchen items we'd either lost or tossed during our CALEXIT, and got down to making some bread.

I looked around on the Interwebz, asked some questions, and got a basic heading to go. Thank you all who helped get me started!

And me being me (damn Engineers) I had to learn the "Science" of bread. One thing I learned was about flour. To me, "Flour" always came out of a white "Gold Medal" bag like Mom used when she baked. I kinda-sorta knew there were different types of "Flour", but never knew what the critical differences were, and their intended uses. Turns out to make good bread, you should use "Bread Flour" vs "All Purpose" or "Self Rising" flour. The key is in the protein/gluten content, with "Bread Flour" having the highest concentration, making it most suitable for bread.

And since I loves me some rye bread, I learned about rye bread. Rye flour doesn't have the high gluten content, making for a denser bread that doesn't rise as much. So we don't use 100% rye flour, but rather a mix of white Bread Flour and Rye Flour, which rises better and gives a more "bread like" texture tha using stright rye flour.

Or so I've read. Let's kick this off and get started. I first made a "Rye Sponge" with the rye flour, yeast, sugar (I used raw, unfiltered 'local hive' honey), and some water. Mix well and then let sit for about 20 minutes.


Further mixing in the other ingredients, the rest of the flour, and kneading/mixing the whole shebang together gives us this nice, buttered ball of dough.


Letting the dough rise ~2 hours while we trimmed the tree:


Good Job, Little Guy!


Here she is, all ready to be smacked down, and divided.


It actually got bigger than that. I took this shot at approx 75 minutes BRET (Bread Rising Elapsed Time), and we wound up at approx 150 minutes BRET.


I divided the loaves, and put them into bread pans that were well buttered up.


At 90 minutes PPIT (Post Pan Insertion Time), they were slathered with fresh butter from a local place, and popped into a oven preheated to 370*F.


Forty minutes later we were rewarded with these:


Two nicely browned loaves, and a house permeated with the lovely aroma of FRESH BREAD!


So how'd it turn out?  Let's try some.....


My Sweet Little Wife snagged the first piece, and her eyes opened wide when she took a bite. Uh-Oh....I must have screwed up the recipe......


NO! She pronounced it as "Excellent!". It's a bit denser than I would have liked, but holy smokes, it tastes GREAT. I'm amazed at how well it came out for my solo bread making experiment.

I did a bit of adjusting for altitude, and then next batch I make will be adjusted a bit more to lighten the consistency, but I think I nailed it on flavor. It's rich, filling, has a delightful crust, and an excellent flavor.

Hmm....wonder how much a bread making machine goes for.....

Thursday, November 21, 2019

Anybody Want To Buy A Slightly Used Payload Fairing?

Well....they're starting to scrap out stuff at Sea Launch Homeport. The entire "Payload Accommodation" (Fairing, Spacecraft Support, Interstage Assembly, Ordnance, and Avionics) was supplied by Boeing. We had one complete set of flight hardware in-house and 80~90% complete when Energia pulled the plug and suspended operations.

Now that all the ITAR controlled equipment has been removed from the the Launch Platform and the Command Ship and accounted for, they can start really winding down the operation in preparation for the ships to depart.

This is fairing part of the set we had in the Payload Processing Facility.

Wonder what carbon fiber scrap goes for these days.....


Wednesday, November 20, 2019

Car and Driver

Looks like I forgot the all important head-on picture the other day, so here's a couple.


I also scrutinized the PROTOform body I have, and it's much more realistically done. Where this body has flat surfaces that you apply the "grille" decals to, the other body has the grille openings recessed, along with the headlights and turn signals/brake ducts being much more detailed. I'll probably do the Dodge Challenger next, as it's another straight white paint job, and easy to do.

One of the "legal" requirements to race in the Vintage Trans Am series is that you have to run a driver figure. There's a ton of them out there, and people have even put dolls in the car, but I'm going with something simple.


Yes, it needs masking, painting, and trimming, but at least it's not polycarbonate ("Lexan") plastic, so I can paint it like a "regular" model, on the outside, and use "regular" model paint that doesn't smell like a WMD experiment gone wrong.


It's a single-seat figure, like for a formula car, so I'll have to come up with some mounting arrangement to fit this two-seat-wide body. I bought a driver figure/cockpit from the people that made the body, but it's way too big to use. Even if I hacked it down to fit, the driver is out-of-scale by a significant amount. He'd look bigger than Andre The Giant inside the car, so scratch that. I'll have to see what else is out there, but for now, this will be fine once I paint it and glue it in.

I'd use pop-rivets or Dzus fasteners to hold it in, but I can't find any small enough.......


Anywhoo.....Currently 29* and lightly snowing. Looks like a little over an inch on the grass, and the streets and sidewalks are just wet. Expected to be like this through Friday, and then sunny again.

The wife and I are headed out tomorrow to see "Ford v Ferrari" at the local super deluxe cineplex with a wall-to-wall screen, reclining chairs, and food service to your seat, as long as they can deliver it before the movie starts. I lived through this time, and followed auto racing much more closely than I do these days. I was on top of the whole Ford/Ferrari thing at LeMans and other places, so I know the story. From what I've read on auto sites and movie sites, it's a pretty good movie. There haven't been very many Really Good auto racing movies made ("Grand Prix" is Really Good), and I hope this is one of them.

Tuesday, November 19, 2019

Time To Kick The Tires, And Light The Fires....

Which in my case translates to: Let's charge the batteries and head to the track!

The 1/10th scale Vintage Trans Am car is over 95% finished, and now needs a trip to track for inspection, transponder installation, and a few laps.


I still have to build-out the interior insert, or just add a driver figure, but since I'll be running in "Touring Stock" for a while (wonder if I'll have rookie stripes?) it might not be needed.

The lap times on this track for the VTA (Vintage Trans Am) class seem to run around 10~11 seconds per lap, and I have no doubt my first dozen or so laps will be about twice that. I set up a bunch of 6" tall traffic cones in the garage the other day, and "practiced" with my teeny-tiny Kyosho "Mini-Z", which is a little smaller than a 1/24th scale model car.

I have a long way to go to get to be smooth around a circuit.......

Sunday, November 17, 2019

Out Of The Paint Shop

WELL.....since I had some pretty light spots in a few places on the body, I quickly masked off the windows and shot some more white paint on it. Turns out the paint on the body was pretty thin all over, and you could see the consequences of my quick-and-dirty masking job from the outside.

--sigh--

Mask the windows off again, head to the hobby shop for some more paint, and come home and spray the inside again.

And since this paint will drive you out of a building, I opened up the garage doors and side door, put my big exhaust fan in the side door, and painted the body in front of the fan, drawing away the nasty vapors.

It's still not up to my quality standards, but considering it's the first one I've done in 30 years, I'm pronouncing it "Plenty Good Enough", and moving on. I know the next bodies I do up for this chassis will look much better, and it's gonna get banged up on the track, and I wanna take it to the track and drive it!

This thing is really SHINY when you peel off the protective film.


I've got a bunch of questions concerning ride height and a few other things, so that's why I'm anxious to get to the track.

Now I have to carefully trim and apply the decals/stickers. These are the sticky-backed, printed-on-clear-film type, so you have to trim them from the sheet, leaving only a small clear border around them. At least they go on from the outside!

I have numerous photos of the original car in competition, and one of the "tribute" cars on the track, so at least I know where all the little stickers go.


And since I was in a painting kind of mood, I took my prepped set of rims and sprayed them silver, and mounted the tires on them. I still have to glue them to the rims, and I'll do that tomorrow.


You can only buy the current spec series legal rim from one supplier, and they come in either black or white. White makes it look like a toy, and I'm so over the black wheel thing, so you can either find some "vintage" NOS wheels in "Matte Chrome" (looks like brushed aluminum, goes for big $$), or paint your own. A $6 can of paint beats a $60 spend on eBay hands down on this build, so I painted them. Hey, it's not going to Pebble Beach or The Quail, you know?

So I should have this thing finished enough by Monday night to take it to the track Tuesday afternoon (cue the Moodies...) for the Tech Inspection, and to buy a transponder and get it registered. Maybe I'll even have time for a few laps.....

Friday, November 15, 2019

Off To The Rack With You!

The alignment rack, that is.

Or in my case, a set of graduated fixtures and holders so I can measure and adjust the camber, caster, and toe of the little R/C car.


The fixtures bolt to the stub axles in place of the wheels, and you place the fixtured car on a flat, level surface, and read the scales.

This poorly lit shot shows the toe-out to be 1*, per spec to start with. Toe-in/out is adjusted turning a little turnbuckle on each side's steering linkage, just like a full-size car.


This shows the left rear to be at -3* (negative) camber, and the spec is -2*. It's also easily adjustable with a turnbuckle.


And the left front shows -1*, also out-of-spec, but also easily adjustable.


So now I have the suspension dialed-in to the recommended settings to start with. Might need a toe adjustment, or perhaps run a different camber setting on the front and/or rear. I've done this before with full-size cars, and the principles are identical, so I understand what the settings do. What I don't understand, yet, is how they relate to a 1/10th scale model, this particular one, and the track I'll be running on. Still have a lot to learn, and I expect to be at the track in a week or two.

The window masks for the body have been cut and trimmed to fit:


And after cleaning the inside of the body again, they've been applied to the window areas inside the body:


Since it's forecast to be in the mid-60's tomorrow, it's going to get painted!

One of the electronics projects I had simmering away is now finished and in-service, my "vintage" Heathkit IM-103 AC Line Voltage Monitor.


I replaced the electrolytic capacitor, upgraded the rectifier to a 1N4007, and replaced two resistors. One of them was a 100 Ohm, 2 Watt resistor that was dissipating 1.8 Watts by design. More accurately, by design error, as running a part at 90% of it's maximum ratings is not a Real Good Thing to do. So I changed it to a 5 Watt rated resistor to keep things cooler inside the case. I also added an in-line "pigtail" fuse inside as a CYA protection. Using my calibrated Fluke meter and a big Variac transformer, I followed the calibration steps in the manual, and it's very accurate (better than 2%!) over the range of the meter. These were "Must Have" accessories for the well-equipped Ham Shack or repair shop in the 1960's, and I've always wanted one. Yes, the line voltage varies during the day. It's nominally 120 VAC, but I've seen it go as low as 117 VAC, and up to 121 VAC, so it's an interesting little doo-dad to hang on the wall.

And this unit has provenance!

It was owned by an Engineer who worked for Lockheed at Vandenberg Air Force Base. He was also a Ham, and I bought a few of his estate items from his Granddaughter via Big Internet Auction Site. I don't know if he used this at work, or snuck it through the Calibration Lab, but I was very careful not to disturb the stickers on the case:


The case was off when I calibrated it, and the two potentiometers were the type that can be adjusted from the back, so the stickers got through untouched.

Adds a nice touch to the workshop wall, I think.

Hope y'all have a good weekend. I'll be attempting to bake bread on Sunday. If you see smoke, I didn't do very well.....

Wednesday, November 13, 2019

Re-Earning My Stripes....

So what's a Radio Guy to do when propagation is crummy during the current Solar Minimum?

Work on his little model car, that's what. It's too cold to work on my "big" model car in the garage, a.k.k my "1-to-1 Scale" car.

The chassis is now basically complete, with the exception of the Timing and Scoring Transponder, which I have to buy from the track.


I've run it around in the basement a bit (it's FAST!), so now it's on to the body.

Since these little cars run bodies made of clear, vacuum-formed Lexan sheet, you have to paint them. And you paint them on the inside, with special paint. The plastic is only .040" thick, so it's quite flexible, and bends easily under impact, popping back to shape after you've hit something. To keep the paint looking good, and to preserve a high-gloss finish, you paint them on the inside, doing the darkest colors first, which is completely bass-ackwards from what I'm used to doing in both real cars, and other static display models I've built.

Took three hours and half a roll of masking tape before I got it "close enough" to paint. The last time I did this was 30some years ago, and it takes a while to get the skills back.


I went in the downstairs bathroom, turned the ventilator to "High", and sprayed the inside of the body with several light coats of paint, just enough to get uniform coverage in the stripe area.

And Holy Smokes, I'd forgotten how potent that type of paint is! It's very aromatic, and even the small amount I sprayed for the stripe was enough to really stink up the area. I wasn't planning on doing the white main color coat inside, and painting the stripe confirmed it! I'll have to wait until Friday when it's supposed to be 65* so I can finish the paint job out in the garage. The local "Marker's Space" is next door to the RC car track, but I don't think they have a spray booth or fume hood, so I'll have to come up with some way or place to do paint work during the winter months.

I made the mounting holes in the body before I did the masking and painting, and almost got them 100% correct. They're spot-on side-to-side, but I got them slightly off in the fore-to-aft direction, and had to oval them out a bit with my Dremel.


I'm not sure how much this will allow the body to shift fore-and-aft during use, or if it matters. I can block the back side of the hole with some adhesive-backed thin aluminum tape I have, or figure something else out if the body has too much movement. And I'm going to either have to get some different body mounting posts (the thing coming with holes in it coming through the body) or cut these down a LOT more!

So here it is loosely stuck on the car.


I'll clean any masking tape residue off the inside of the body tonight, and apply the window masks that came with the body, and wait until Friday when it should be warm enough to paint the body out in the garage. After that, I have to trim the excess plastic from the body, and then put my decals on.

Getting closer and closer to something like this.


And KRFC, one of two local stations, just played the "Peorgie Tirebiter" song.

I suspect the DJ is "Of A Certain Age".....

Gotta love Fort Collins!

Sunday, November 10, 2019

Monday, November 4, 2019

Small Wonders.....

And Fall Wonders, too!

I was able to snap a few pix of the trees here before all the leaves got blasted off by the cold and snow, and since Sarge and The Guys over at The Chant have been posting pretty pix, I thought I'd spring these on you.

Our Amur Maple tree in the front yard:


This variety of Maple doesn't get much bigger than ~25', but does extremely well here. It's a "Recommended" tree per The City of Fort Collins, and per the Wikipedia entry, "Produces copious amounts of seeds", which it does. When I was a wee lad growing up in Illinois we had maple trees. And so did the neighbors, of different varieties. The trees cross-pollinated, producing tons of seeds, and I grew several nice trees from seed. I've saved some of this years crop of seeds from this maple, and I'm going to try and get some started. We have precisely *one* place in the yard where a tree like this would be most welcome, so if I can get a seed to sprout, we'll plant it there. I doubt if I'll be around to see it get very big, but it'll be a tiny legacy left by me. A look at Google Maps of the house I grew up in shows a tree growing exactly where I planted one, so it might still be there, 60 years after I planted it.

And a tree that one of our neighbors has:


I'm no tree expert, but it looks an awful lot like the Birch tree we had back in Illinois. Seeing as we're in Colorado, it might be an Aspen, but the city strongly discourages Aspens as they propagate by runners, and can take over a large area very quickly. Reading about them brings to mind the problems I had with bamboo in the yard back in Kalifornia. Spent quite a bit of time, effort, and expense to terminate that stand with extreme prejudice!

Fall was quite pretty this year, and I even managed to get the front yard to come back, complete with about 30 sq ft of new seed that came up and took off like weeds. Half the back yard looks like the Mohave, minus the sand, and I'll have to bang away on that right early in the Spring.

I finished the new coax runs from the antennas to the entrance boxes I made, and got my FT-1000D back together again. Still has some problems, the most glaring being that it won't transmit on 40 Meters. I'm pretty sure the problem is in the Low Pass Filter Assembly, and fortunately that module is quite easy to service.

The Radio Controlled 4x4 truck is waiting for the yard to dry up so TLG and I can go out bashing with it again. I took it partially apart to check on some of the common wear points, and it's holding up quite well.

Since all we're going to do with the truck is bash it around the front and back yards, I don't want to spend money upgrading the little truck. I'm not racing it, but if/when something does break, I'll upgrade it with a better part, but that's it.

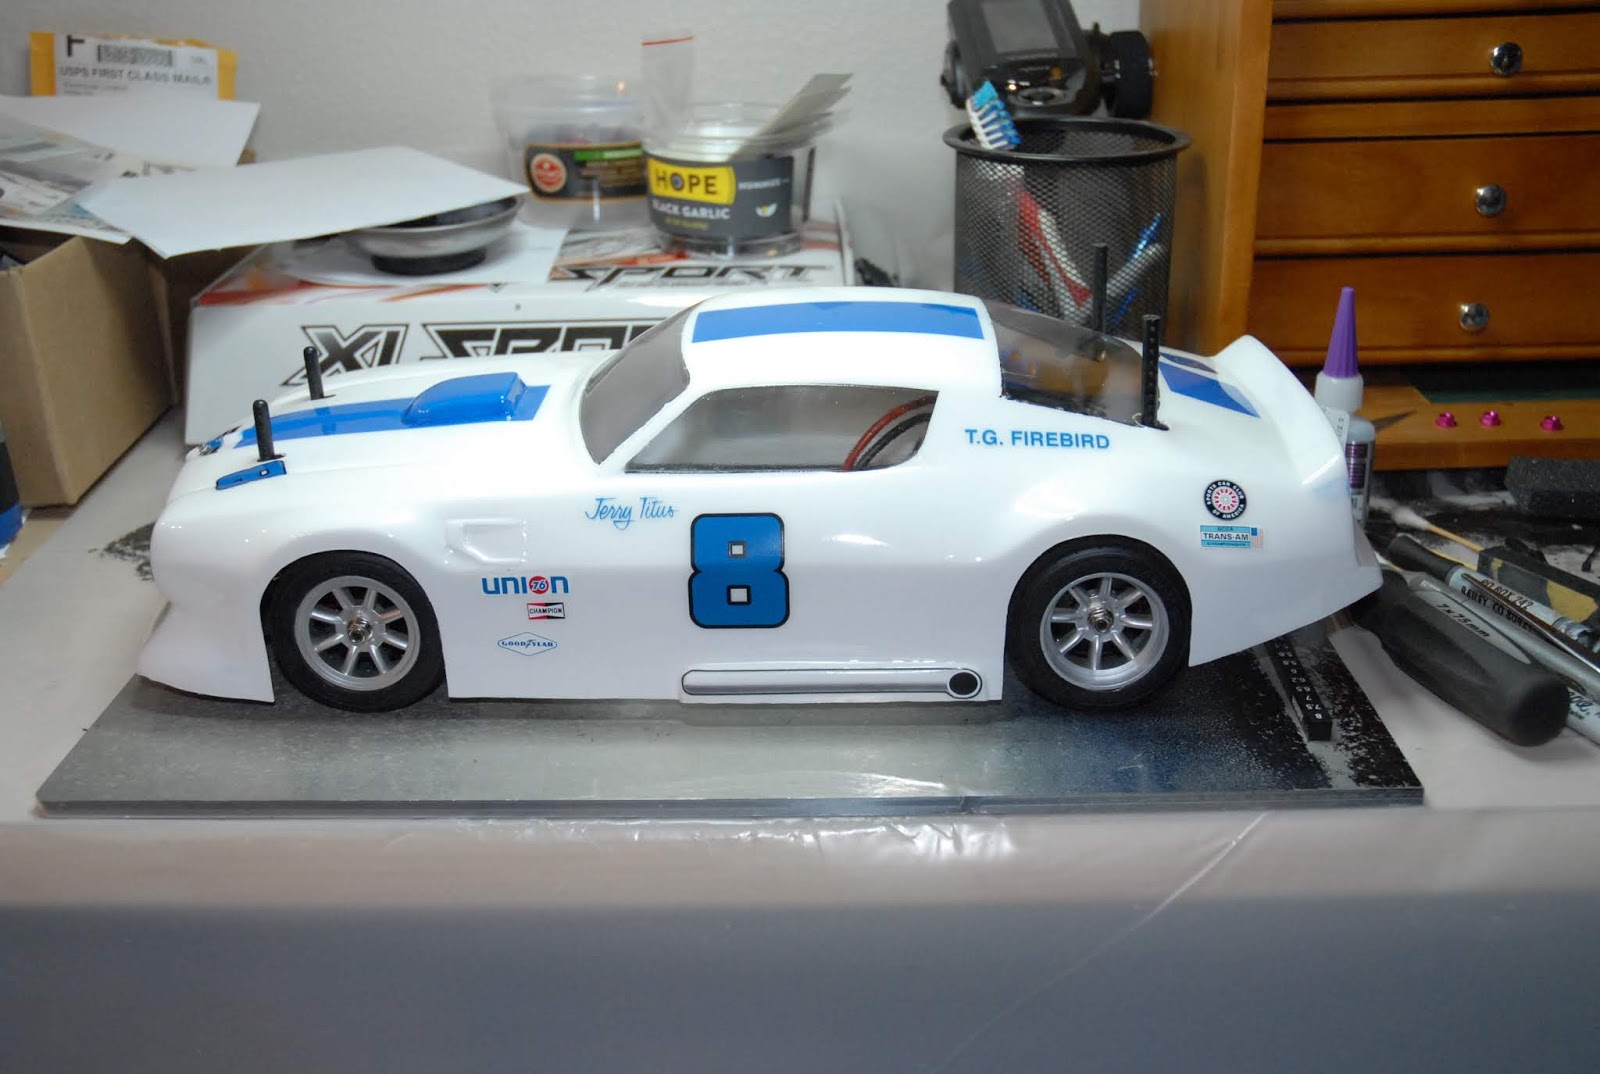
For the latent racer in me, I bought this:


It's a "3Racing Sakura Sport XI", four-wheel drive, 1/10th scale electric "Touring Car", and I'm building it to run in a "Spec Series". A "Spec Series" is where every racer is strictly limited on what equipment they can run, and it all has to be from an approved list. The chassis is pretty open, but the motor, speed controller, battery, and wheels/tires must be specific part numbers from specific manufacturers. The purpose of this series is to encourage slower speeds with older hardware, and make it more of a driver's match since the cars are so equal.

Since it's called the "Vintage Trans Am Series", all the bodies on the cars have to be 1960's/1970's pony cars, just like what raced Back In The Day.

I'm building a replica of the #8 Jerry Titus car, a 1970 Pontiac Trans Am:


There two bodies available, on from ProtoFORM:

Here's a nicely finished one:


And one from McAllister Racing:


I have one each of the bodies, and I'll probably go with the McAllister body for track-days, and do a very pretty job on the ProtoFORM body to be a display body.

See, I told you I wasn't going to modify the 4x4 truck!

Thursday, October 31, 2019

Spooky Song.....

Don't know why, but I've always associated this song with Halloween. Maybe it's because I was in high-school, growing up fast, when all the things in the video were happening around me.

Spooky times, I guess.....


We Hit 'Em.......<i>Now What Happens?</i>

  Breaking story from Newsmax.....