I'm beat.
We went all the way up to the "O-8" level, which involved going up a lot of narrow, steep ladders.
Got to see the plot room, the CEC (Combat Engagement Center), some rooms with radar gear in them, "CONN2", and the ship's whistle.
Finally finished recapping the "A5A1" card from the URR-74 receiver that's been giving us fits.
I'll post the pix I took today after I get back from a radio event we're doing tomorrow in rememberence of the cease fire that "ended" our involvement in Viet Nam.
'Night all!
Tuesday, January 27, 2015
Monday, January 19, 2015
Superstructure Tour Tomorrow on the Iowa, and Continuing Antenna Work
And yes, I'll be taking my trusty old Nikon D200.
Not sure what this tour encompasses, as I don't know anybody who's taken it, but I'll find out, and my little audience here will find out, too.
I've been busy making some jumper cables to connect the receiver coupler banks together, and replacing all the tantalum capacitors on the "A5" card for the URR-74 receiver.
We have two banks of antenna couplers of the CU-1799/CU-1801/SRA series. Each bank is split into two sections, giving us four inputs to use. Each of the couplers acts like an amplified, tunable preselector, and gives isolation to the receivers they feed.
 (Photo courtesy of http://www.virhistory.com/navy/ships/bb61.htm one of our friends and mentors)
The patch panel at the top allows various couplers to be patched to various receivers.
Since we're missing one of the "Trussed Monopole" (12~30MHz) antennas, as well as the "Twin Fan" (100kHz~12Mhz, approx) antenna, we're going to daisy-chain the coupler groups together.
Each group has "Input 1", "Output 1", and "Input 2", "Output 2" jacks on the top of the rack. Typically, the "Input" jacks connected to an antenna, and the "Output" jack went to a dummy load.
What we'll be doing with the jumpers is to connect "Output 1" to "Input 2", and then "Output 2" of the first group will go to "Input 1" of the second group, and so on.
"Output 2" of the last group will go to the dummy load.
The bummer about this is that the coaxial cable jacks on the top of the rack are "Type-C" connectors, about the same size as a "Type-N", but with a bayonet mechanism, kinda-sorta like a giant sized BNC connector. When I went connector shopping I found that the connectors are readily available, but cost about anywhere from $45 to $85 EACH, depending on who you get them from.
After I picked myself up off the floor, I was able to find some Type-C to Type-N adapters for about $8, so I'll be using Type-N connectors on the cables I'm making along with the adapters that arrived Saturday morning.
This should (hopefully) allow us to feed all the 1051 receivers, and run a "trunk line patch" over the the URR-74 receivers, and connect them up to one of the antennas we have available to use.
We also have several other HF antennas we could use for receiving, but we need to find where the coax connected to the antenna(s) goes to.
We have the "Twin Whip" antennas on the front of the bridge:

A vertical antenna on the starboard side, just aft of the bridge:

And a pair of antennas that we call the "Goal Post Antenna", just aft of the forward stack:

The Goal Post antenna has a large Heliax coax running from the coupler box to somewhere:

BUT, the whips aren't connected to the coupler box:

So, one of us (probably me) will have to get a ladder out on deck and climb up to see what the cable tag on the Heliax cable has stamped on it.
Considering the size of the coax going to the coupler box, it's plausible to think this was a transmitting antenna, but it would work equally well for receiving.
Our friends over at the U.S. Navy Radio Communications website have been a tremendous help getting the antennas identified, and sending us documentation on them, but it's up to us to play "Follow That Coax!", and figure out where the cables wind up. We're pretty sure they go to either the Radio Room where most of our activities take place, or to the Transmitter Room, three decks down off Broadway.
Not sure what this tour encompasses, as I don't know anybody who's taken it, but I'll find out, and my little audience here will find out, too.
I've been busy making some jumper cables to connect the receiver coupler banks together, and replacing all the tantalum capacitors on the "A5" card for the URR-74 receiver.
We have two banks of antenna couplers of the CU-1799/CU-1801/SRA series. Each bank is split into two sections, giving us four inputs to use. Each of the couplers acts like an amplified, tunable preselector, and gives isolation to the receivers they feed.
The patch panel at the top allows various couplers to be patched to various receivers.
Since we're missing one of the "Trussed Monopole" (12~30MHz) antennas, as well as the "Twin Fan" (100kHz~12Mhz, approx) antenna, we're going to daisy-chain the coupler groups together.
Each group has "Input 1", "Output 1", and "Input 2", "Output 2" jacks on the top of the rack. Typically, the "Input" jacks connected to an antenna, and the "Output" jack went to a dummy load.
What we'll be doing with the jumpers is to connect "Output 1" to "Input 2", and then "Output 2" of the first group will go to "Input 1" of the second group, and so on.
"Output 2" of the last group will go to the dummy load.
The bummer about this is that the coaxial cable jacks on the top of the rack are "Type-C" connectors, about the same size as a "Type-N", but with a bayonet mechanism, kinda-sorta like a giant sized BNC connector. When I went connector shopping I found that the connectors are readily available, but cost about anywhere from $45 to $85 EACH, depending on who you get them from.
After I picked myself up off the floor, I was able to find some Type-C to Type-N adapters for about $8, so I'll be using Type-N connectors on the cables I'm making along with the adapters that arrived Saturday morning.
This should (hopefully) allow us to feed all the 1051 receivers, and run a "trunk line patch" over the the URR-74 receivers, and connect them up to one of the antennas we have available to use.
We also have several other HF antennas we could use for receiving, but we need to find where the coax connected to the antenna(s) goes to.
We have the "Twin Whip" antennas on the front of the bridge:
A vertical antenna on the starboard side, just aft of the bridge:
And a pair of antennas that we call the "Goal Post Antenna", just aft of the forward stack:
The Goal Post antenna has a large Heliax coax running from the coupler box to somewhere:
BUT, the whips aren't connected to the coupler box:
So, one of us (probably me) will have to get a ladder out on deck and climb up to see what the cable tag on the Heliax cable has stamped on it.
Considering the size of the coax going to the coupler box, it's plausible to think this was a transmitting antenna, but it would work equally well for receiving.
Our friends over at the U.S. Navy Radio Communications website have been a tremendous help getting the antennas identified, and sending us documentation on them, but it's up to us to play "Follow That Coax!", and figure out where the cables wind up. We're pretty sure they go to either the Radio Room where most of our activities take place, or to the Transmitter Room, three decks down off Broadway.
Wednesday, January 14, 2015
For All My Frozen Friends in Other Parts of the Country
Just a little something to warm you up......
Sunday, January 11, 2015
Portside Aft Steering Gear Compartment on the Battleship Iowa
Some of the tour today covered things I'd already seen and wrote about, like the Barbershop, Brig, and Laundry areas, so I won't go over them again.
We started in the Crew's Mess, as the passageway we would take was off the Museum Store.
While the steering gear compartment is armored, it's outside of the "Armored Citadel", which runs from just forward of the #1 turret, to just aft of the #3 turret.
The blue painted area shown below is the top of the aft end of the armor.
As you can see, it's really thick:

After we went down one deck, below this first armored deck, we passed by a hatch leading down to the 4th deck. The stainless steel door to the right leads in to one of the "reefer" areas where refrigerated foods were stored. If you look carefuly at the ladder going down, you'll see some "flaps" mounted on the sides of it. When these were moved to cover the steps, it made them into a ramp so boxes could be easily slid up and down the ladder.
Pretty clever:

Here's another ladder going down to the refer area, and still another hatch under that, with grating on the bottom:

Now, the good stuff!
Getting closer:

One more armored hatch to go through, and we're there:

This is the control panel for running all the pumps and servos, and a place-of-last-resort to steer the ship from.
Notice the two bronze mounts in the picture. There are where the handwheels were located to manually (with hydraulic assist, of course) steer the ship.
The closer of the two got cut off in the picture, but in the one further away, at the bottom of the bronze mount, you can see a stub shaft with a white tag hanging on it. These were the stubs the wheels attached to.
The wheels were removed for some reason, and are "MIA" for the time being:

How do you know you're on the Port side? Well, besides the yellow painted designator with the frame number, there's a red stripe painted on the wall, red just like the Port navigation lights on the ship.
And notice the rows of rivets overhead. This was the top of the localized armored box the steering gear is in:

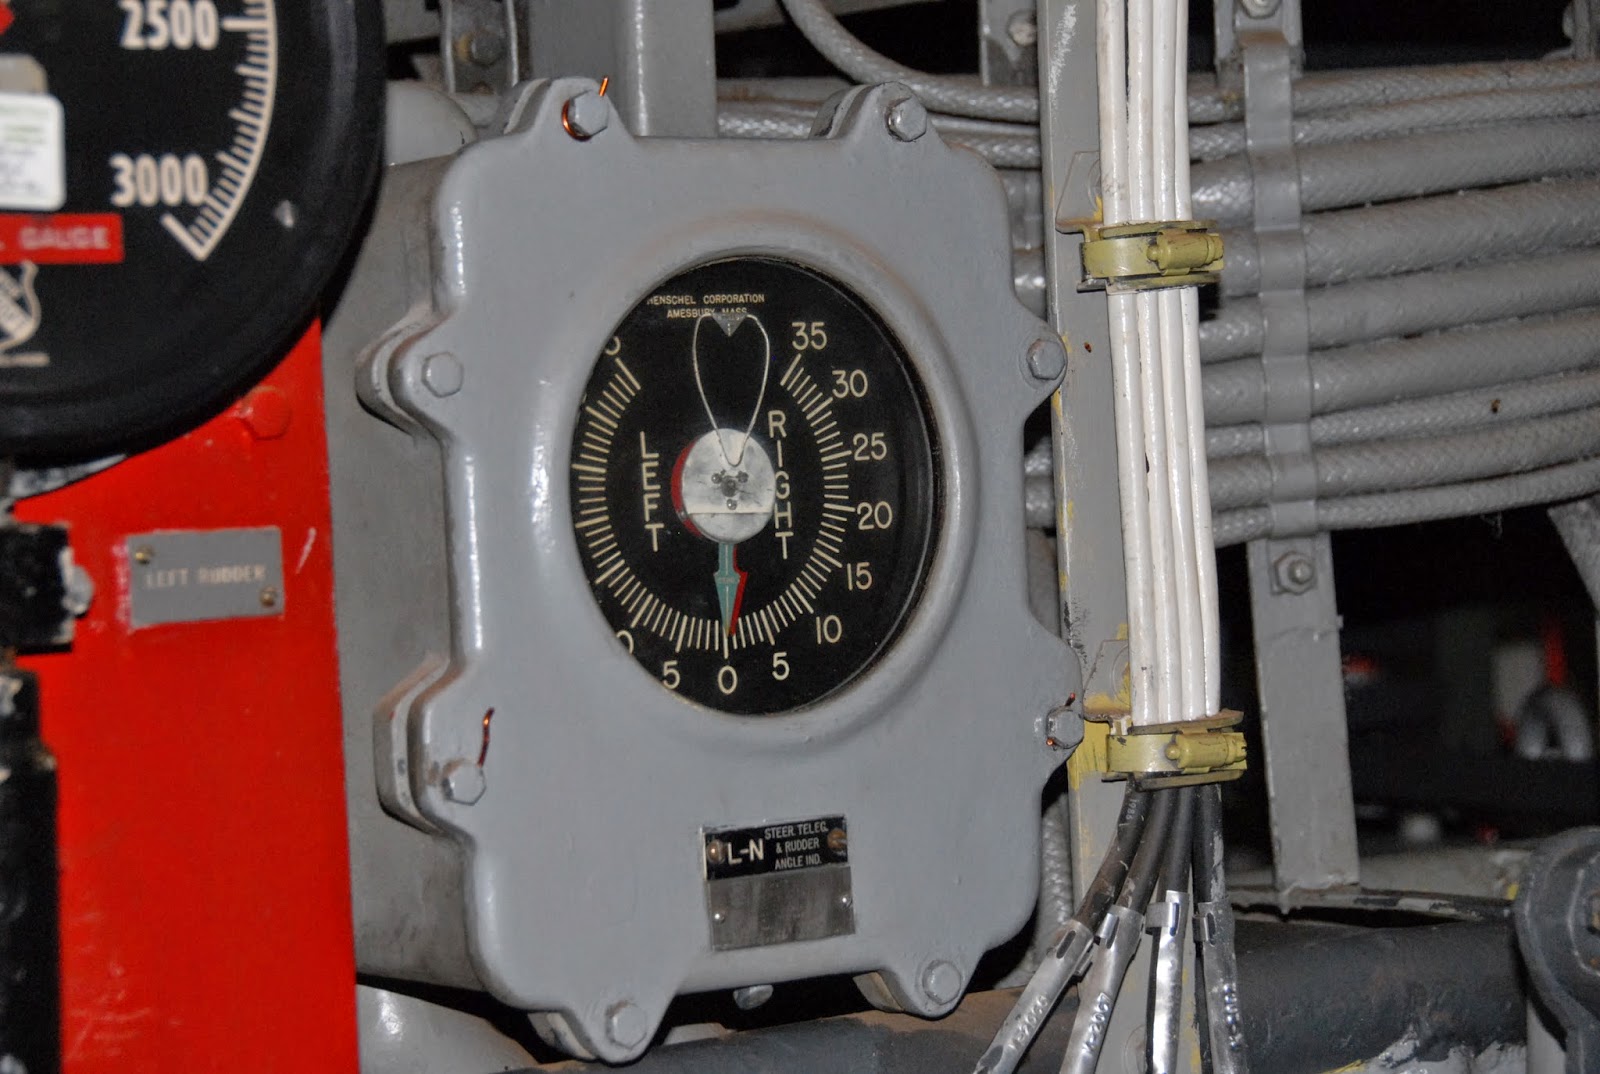
Rudder position indicator:
Aft end of the hydraulic rams that move the rudder. The large round plate in the left foreground is the top post of the actual rudder, and the "dogbones" on either side connect to the rams:

Close up of the brass tag on the dogbone:

Another view looking forward:

The hydraulic diagram of the system. Sorry for the flash hot-spot:

And a drawing listing all the lube points, and what type of grease/lube to use:

So, that was today's behind-the-scenes tour. While we were sitting in the barbershop, the question of "Turret Tours" was brought up. Turret #2, where the accident occurred, is absolutely OFF LIMITS, as it's a memorial to those who died in it. Current plans are being discussed for turret #3, and include putting in a plexiglas "bubble", where people could at least climb partly in to the turret, and look around, and a Virtual Tour" of the turret, being put together by one of our volunteers who's extremely good at taking panoramic photos, and stitching them together, giving views similar to what The Smithsonian does for some of it's aircraft interiors.
I've seen his panoramas of the radio room, and some of the superstructure areas, and their amazing.
Actual tours of the turret, and it's inclusion on the tour route, will require getting all the HAZMAT items out of the turret, and cleaning it up and painting the inside.
Hang on, it's on the "TODO" list for this year!
We started in the Crew's Mess, as the passageway we would take was off the Museum Store.
While the steering gear compartment is armored, it's outside of the "Armored Citadel", which runs from just forward of the #1 turret, to just aft of the #3 turret.
The blue painted area shown below is the top of the aft end of the armor.
As you can see, it's really thick:
After we went down one deck, below this first armored deck, we passed by a hatch leading down to the 4th deck. The stainless steel door to the right leads in to one of the "reefer" areas where refrigerated foods were stored. If you look carefuly at the ladder going down, you'll see some "flaps" mounted on the sides of it. When these were moved to cover the steps, it made them into a ramp so boxes could be easily slid up and down the ladder.
Pretty clever:
Here's another ladder going down to the refer area, and still another hatch under that, with grating on the bottom:
Now, the good stuff!
Getting closer:
One more armored hatch to go through, and we're there:
This is the control panel for running all the pumps and servos, and a place-of-last-resort to steer the ship from.
Notice the two bronze mounts in the picture. There are where the handwheels were located to manually (with hydraulic assist, of course) steer the ship.
The closer of the two got cut off in the picture, but in the one further away, at the bottom of the bronze mount, you can see a stub shaft with a white tag hanging on it. These were the stubs the wheels attached to.
The wheels were removed for some reason, and are "MIA" for the time being:
How do you know you're on the Port side? Well, besides the yellow painted designator with the frame number, there's a red stripe painted on the wall, red just like the Port navigation lights on the ship.
And notice the rows of rivets overhead. This was the top of the localized armored box the steering gear is in:
Rudder position indicator:
Aft end of the hydraulic rams that move the rudder. The large round plate in the left foreground is the top post of the actual rudder, and the "dogbones" on either side connect to the rams:
Close up of the brass tag on the dogbone:
Another view looking forward:
The hydraulic diagram of the system. Sorry for the flash hot-spot:
And a drawing listing all the lube points, and what type of grease/lube to use:
So, that was today's behind-the-scenes tour. While we were sitting in the barbershop, the question of "Turret Tours" was brought up. Turret #2, where the accident occurred, is absolutely OFF LIMITS, as it's a memorial to those who died in it. Current plans are being discussed for turret #3, and include putting in a plexiglas "bubble", where people could at least climb partly in to the turret, and look around, and a Virtual Tour" of the turret, being put together by one of our volunteers who's extremely good at taking panoramic photos, and stitching them together, giving views similar to what The Smithsonian does for some of it's aircraft interiors.
I've seen his panoramas of the radio room, and some of the superstructure areas, and their amazing.
Actual tours of the turret, and it's inclusion on the tour route, will require getting all the HAZMAT items out of the turret, and cleaning it up and painting the inside.
Hang on, it's on the "TODO" list for this year!
Saturday, January 10, 2015
Engineering Spaces Tour on the Battleship Iowa on Sunday
For the crew only, and I'm taking my camera!
Some of it I've seen before, but we're going to see the steerage area where the rudders are controlled, and some other things on the 3rd deck.
Pix to come Sunday evening......
And then on the 27th, I'll be taking a crew only tour of the superstructure.
Pictures will, of course, be posted following that tour......
Friday, January 9, 2015
Tuesday, January 6, 2015
Those Who Cannot Remember The Past.......
Got this from a friend's email.
I think it says it all.....

I think it says it all.....
Saturday, January 3, 2015
"Unbroken" - A Movie of Courage and Valor
We went to see "Unbroken" tonight, and I recommend it to all.
It's the story of Louis "Louie" Zamperini from Torrance, CA, and is based on the book "Unbroken: A World War II Story of Survival, Resilience, and Redemption" by Laura Hillenbrand.
My wife bought the book several months ago, and was waiting for the film to come out.
I haven't read the book yet, but I'll get started on it in the next few days.
It's a stirring movie, and doesn't pull any punches concerning the treatment of Allied POW's in Japan.
Highly recommended, and take a box of Kleenex with you.
Wednesday, December 31, 2014
Loud Music, A Laser Light Show, and Fireworks Going Off
At 2245 local time, that's the extent of New Year's Eve madness in La-La Land.
I suppose things night get a little more nuts, but I'm going to bed.
Hope you all had a safe and sane New Year's Eve, and wishing you all the best for 2015!
I suppose things night get a little more nuts, but I'm going to bed.
Hope you all had a safe and sane New Year's Eve, and wishing you all the best for 2015!
Saturday, December 27, 2014
Wonderful "Christmas Present" for Us Radio Guys on the Iowa
God bless the guys at PCS Associates!
During the process of troubleshooting the URR-74(v)2 receivers in the radio room, we've been terribly hampered by a lack of usable documentation.
The WJ 8718 receiver is very close to the URR-74, and we were able to find manuals for that receiver, BUT all the freely downloadable manuals were poor copies made into pdf's.
The worst part was that the schematics were copied with the copier magnification improperly set, resulting in a 1"~2" "gap" in the schematic between the two pages it was spread over!
You couldn't get them to overlap so you could tape them together and get a complete schematic, and in some cases it was cut so badly that complete components and/or circuit blocks were missing.
This makes it rather difficult to follow signals on the schematic, as you're never really sure where they're going between the two pages.
I finally found a place that still supports the Watkins Johnson receivers we have aboard the Iowa, and sent an email asking how much it would cost us to BUY a real, correct copy, stating that we weren't looking for a freebie, and would gladly PAY to get the manuals.
Well, this morning I received an email from a very nice gentleman containing the details of the ftp account he set up for me so I could download the manuals they have available!
I grabbed the manuals, and have been looking at them part of the day.
They manuals are crystal clear, and all the schematics are complete, and not butchered up.
I notified our Grey Radio Gang, and we're going to be working up a nice, official "Certificate of Appreciation" for this gentleman and his company.
Wednesday, December 24, 2014
Merry Christmas, and God Bless Us, Every One!
Hope you all have a very Merry Christmas!

And here's one of my favorite stories from years ago.
"The Star" by Arthur C. Clarke
Forgot to add that we had a Christmas card signing project aboard the Battleship Iowa this year.
We signed and delivered 3051 personalized cards to our troops serving overseas.
And here's one of my favorite stories from years ago.
"The Star" by Arthur C. Clarke
Forgot to add that we had a Christmas card signing project aboard the Battleship Iowa this year.
We signed and delivered 3051 personalized cards to our troops serving overseas.
Subscribe to:
Posts (Atom)
-
 FOURTH time I've written this post. MY Muse has apparently vacated the premises, leaving me too busy doing other things to keep both m...
 -
With apologies to The Control Voice.... Yup.....got The Busies the last few weeks. Lots of stuff happening this week, including my Nuclea...