Interesting article here at One America News.
My son's not a big fan of OAN, calling it "Fox Lite", but the articles seem well-written. BUT, as Eaton Rapids Joe points out, beware of "Garbage-In-Garbage-Out".
Interesting article here at One America News.
My son's not a big fan of OAN, calling it "Fox Lite", but the articles seem well-written. BUT, as Eaton Rapids Joe points out, beware of "Garbage-In-Garbage-Out".
Many of you have a Shortwave receiver, but how often do you use it? Or, have you ever used it? Well, this would be a good time to get it out, read the manual, and get some practice. Believe me, when TSHTF is no time to learn how, and you should get comfortable with it before then.
First, let's cover some storage aspects.
If it uses batteries, NEVER store it for any length of time with the batteries in it! Same with any battery powered GPS units, or walkie-talkies you may have. If you're worried about The Dreaded EMP, keep the radio, charger/"wall wart" if it has one, and a pack of batteries in a steel ammo can. If you're really paranoid, then tape the seams closed with some adhesive backed, aluminum foil tape, like that used for HVAC ducting. You do not want generic "Duct Tape", as it has a fabric backing. You need something like this, readily available at home improvement stores. You don't a $1000 Mu Metal "EMP Case" like some places are selling. A galvanized steel garbage can, with the lid sealed down as above, is adequate, and has a lot of room in it. Oh, one other thing about the whip antennas commonly used on small, portable SWL sets. NEVER push it down to close it from the top! You'll bend the whip 90% of the time, which at least, is maddening. Telescope it back down using the largest sections, and then carefully push the top section in.
Next, how to use it?
Well, as the computer guys say, RTFM. You have to know how to turn it on, select the Shortwave frequency bands, and tune it. It may or may not have some additional functions, like an attenuator, usually a switch marked "Local/DX", a "Mode Select" to listen to to Single Sideband, AM, or FM. The better ones will have a "Wide/Narrow" selectivity setting, and possibly a Noise Blanker, or some kind of "Noise Reduction" function. Get to know how to use them, and try and get a rough understanding of what they do. Print out the chart of frequency bands from the above Wiki link, and keep a copy or two with the radio. A very good reference book to have is the World Radio TV Handbook, which has all you need to know about specific frequencies. HIGHLY recommended!
In case of TL;DR, here's the chart:
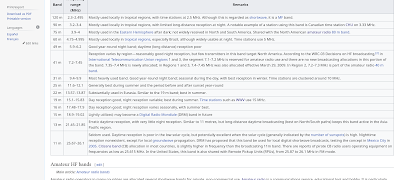
The chart also gives time of day and time of year for "best" reception on the listed bands. A good way to start, is to tune in the signals from WWV, on 2.5, 5.0, 10.0, 15.0 and 20.0MHz. If you can't hear WWV in the CONUS, 24 hours a day, frequency dependent, then you have some problems beyond this brief post.
So what else is out there besides The Tick?
Well, things have changed quite a bit since I started listening waaay back in 1961 when my Dad bought me my first Shortwave Receiver! I didn't have a Hallicrafters radio then, but I sure remember this:

Yes, Radio Havana is still active, along with the BBC World Service, China Radio, and quite a few Religious broadcasts with everything from Fire and Brimstone, to Bible Study and Discussion programs.
For other references, the Wikkipedia has good general knowledge sections, and there's a wealth of SWL, and HF Comms info on the Web.
Radio Reference is a site I belong to, and is highly recommended. I'll add it to the side bar for easy look up.
So get those radios out, and learn how to use them!
Just heard old Vlad has sent forces in to the Ukraine, and they're shelling Kiev. He's also told their military to lay down their arms....

In celebration of the date, the radio guys were up and operating, and I talked to two of my friends, one on 20 Meters (14MHz), and 17 Meters (18MHz), and we had good signals both ways.
Happy Birthday, USS Iowa!

No superchargers or turbochargers; This is pure, Naturally Aspirated, RPM-driven, Horsepower.
Read all about it here in Don Sherman's great article.
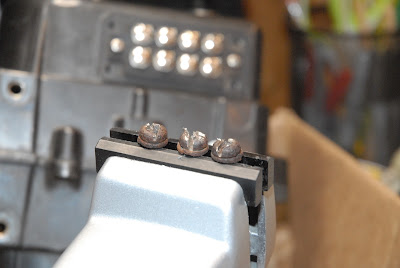
Well, after slotting the screw heads, using my Horror Freight "Electric Flamethrower", and slugging away for 30 minutes, I got the three remaining screws holding the case halves together out.
Some "persuasion" was required...

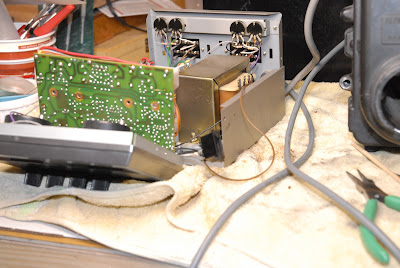
Since I want to set the position to zero degrees elevation, I connected the rotor to one of the control boxes I have with some short jumpers, and tried to turn on the control box.
RATS! The power switch was jammed, so that's getting fixed. The housing for the switch is the black rectangular object.
SO....since I'm now "Waiting On Parts" (again!), I put these aside and opened the case for the azimuth rotor, which I've repaired many of. One thing I've learned (DAMHIK!) is to split and separate the case in a big pan or box to keep the bearings from scattering to the four winds.

Having 80 grease covered bearing balls rolling around loose is not fun. These bearings were packed with a dark gray grease most likely containing Molybdenum Disulfide, an Extreme Pressure additive to the grease.
The gear train in the azimuth unit looks fine, and there's no sign of water ingress, so this unit will get cleaned up, regreased, reassembled, and tested.

So, back to waiting for FedEx/UPS/USPS to get the parts to me so I can finish this up, and ship it out to our blogger friend BillB.
One of my readers had asked me if I wanted to sell one of the sets of Yaesu Az/El rotators I had, and I said I'd clean a set up and let him know when it was ready to ship. Note the Tools of Violence to the right. Impact screwdriver, large ball-peen hammer, and a 10mm deep socket, in a 1/2" drive ratchet. Getting the screws out of these things can be a real chore!

In the process of cleaning it up and getting it ready to run on the bench, I popped off the terminal strip on the Elevation rotator, and the blank-off plate on the other half of the housing so I could look at the bearings inside and see how bad the grease was.
Annnnd...no surprise here, it had dried out, congealed, and was falling out in chunks. Soooo....time to split the case halves, and at a minimum, repack the bearings.
Yup....the grease has expired.....


See the red stuff? Rust from the bearing cages mixing with the grease. The bearing cages are notorious in the Yaesu elevation rotators for crumbling into rust. And considering how the external hardware looked:

I'm not surprised that the retainers are close to giving up the spirit. They're relatively inexpensive, or were, and come two to a package, along with the 40 bearing balls that should get replaced if you're doing a deep dive into the rotor:

I was able to get the screws on the azimuth rotor loose with just a couple of whacks with the impact screwdriver:

But I still have a couple of stuck screws on the elevation rotor after slugging away for a good hour:

And the screw heads are getting chewed up enough that the impact screwdriver can no longer find purchase on them. I'm going to slot them with a Dremel Tool, and then use the flat-blade bit in the impact screwdriver.
All this rusted out hardware will get replaced with stainless, and the Philips-drive heads replaced with socket heads.
This started out to be a "Clean Up and Check Out" project, but it's turning into a rebuild project. I'll use Mobil1 red, tacky, synthetic grease to repack the bearings, as it doesn't ooze oil everywhere in the Summer, and doesn't freeze solid in the Winter.
Have to call Yaesu Friday morning and get the parts ordered.....
All is not High Technology and Electronic Wizardry. Sometimes more mundane projects go under the knife to be revived.
First up was SLW's Dirt Devil "Stick-Vac". It had stopped working due to the little cloth filter being completely clogged, and the roller brush being jammed with "stuff". Cleaned all the bits and pieces, put it back together, and it works as intended.

This one can have the roller brush and long handle removed, and used as a "Dust Buster". It's great to use on the stairs.
#2 and #3 items are some very solid, all hardwood bar stools she bought at the local "arc Thrift Store". The first one she brought home was made so well I had her go back and get it's mate. Some goober had used wallboard screws to try and reattach the legs to the top. Needless to say, they sure held well, but weren't put in properly, so the top and legs weren't square, and they wobbled horribly. Took me two hours to get the drywall screws out (one had the head break off, GRRRR!) so I could clean up all the mating surfaces and put it back together. A few squirts of good wood glue, and some clamping time, and they were back in fine shape, with no wobbles when on the floor.

I always leave things clamped overnight to let the glue really set up.
Not bad for $25 and some "free" labor/materials.

Cheap chinesium stools like this are $40~$50 each, and are made from softwood, or particle board. These are American Made, solid hardwood (looks like a baseball bat, so maybe ash?), and are now good for another 25 years or so.
Been lightly snowing sine around noon, and there's maybe 1/2" on the "snow table" in the backyard, but 6~8" is expected overnight. I fueled the snowblower, and gave the maw another coating of Ariens "Sno-Jet" so the snow won't stick, and I'm ready for tomorrow.
And since I've got the bench clear now, I brought a Yaesu G-5500 Azimuth/Elevation antenna rotator in from the garage so I can (finally!) get it all checked out and packed up for BillB, if he still wants it.....
Rest In Peace, Bob. You did a lot for the Amateur Radio community.
I got back on the Heathkit IM-5258 which was on the back burner for over a week while waiting for parts. The parts arrived while I was doing the Timebase Project, so they sat for a while.
After replacing "The Lone Photocell" and adjusting it, I was staggered to see it within the tolerance range, and almost at the target value when I turned the analyzer back on. I spent about 15 minutes adjusting it, then put a dab of sealer on the wire leads so they wouldn't bounce around, and put the cap on it. I did the same with the four photocells in the other housing, and it took a couple of hours. If you bumped one while adjusting it's neighbor, you had to go back and at least check that it didn't get moved off of it's target value. Tedious, but required.
Final tally is all of them are within the allowable range, and they're all within 5% of the target value. Getting them any closer would be an exercise in futility, so I'm going with what they are. Once the photocells were adjusted properly, the rest of the alignment/calibration went by the book.
Here it is measuring the residual distortion of my little Heathkit SG-1272 audio generator:

It's reading about .04%, within the published specs for the generator, but others have reported this generator as being better than that. Suspecting a Ground Loop, I disconnected the oscilloscope from the "Output" jack, which lets me measure any phase shift between input and output, which I don't care about.
And here it is with the 'scope disconnected:

It's reading about .015%, a definite improvement.
And yes, with NO input, and the input jack terminated, it reads "0.0%", meaning the needle doesn't move off zero.
Are these readings believable? Well, it's on it's most sensitive range, and the meter is barely off the zero. The rated accuracy is listed as "5% of Full Scale", so that number of ".015%" is open to some interpretation. It's literally at the limits of this instrument, but it does show *something* is there. It also shows how careful you have to be making these measurements. Everything has to be shielded, you should be running on an isolation transformer, and a little experience and luck don't hurt, either.
SO.......was it worth it? In terms of Educational Value, absolutely. Repairing this piece of test equipment and the companion Intermodulation Analyzer has helped me understand the measurements they make by understanding how the measurements are made. Understanding how a measurement is made leads to insights about what the measurement represents.
In terms of "Bang for the Buck" and usability of this instrument? A big "MEH"....There are far better instruments to use in this day and age to make these measurements with. This one is a 1970's hobbyist-grade device, made with decent quality parts from a proven design, but it sure ain't no HP instrument! Things like the knobs, switches, and controls are consumer-grade and are a bit sloppy.
This thing fought me tooth-and-nail. The chassis was bent, a rack handle was bent, the plastic coupling for the tuning shaft was broken, one of the power supply regulators had failed, The Lone Photocell had gone out-of-tolerance, and it was (and is) a beat-up, filthy mess...
Sometimes I feel like this when I finish one of these:

BUT........ it keeps me out of bars at night.
Looks like I can finally get back to my Pioneer SX-980, which started this trip down the rabbit hole......
Gee, now that I've got the HP Z3801A "SmartClock" up and running nicely, why don't I go ahead and use it as the 10MHz Master Oscillator for all my test equipment?
So I spent this afternoon doing that. Had to move some things and string a cable from the receiver over to the antenna sitting in the window, and then plug it all together.
Here's the antenna, doing a very nice rendition of "Poor, Poor, Pitiful Me" as it's at least 20" below ground, in an East facing window, with a metal window well. I'm picking up satellites from the other side of the house when their elevation is high enough. I'm guessing it's reflections it's picking up. "It Works", but will work as-intended once I get the antenna outside and up in the air.

This is the software I'm using. It's "Lady Heather's Disciplined Oscillator Control Program", emphasis mine. The program icon is a Dominatrix with a whip, as seen in the extreme lower left corner. It does everything I wanted to do, and more, and it's a free download compared to the other paid (and crappy) software I'd been using.


"Old" Technology can be very useful when properly applied.....
And speaking of Old Technology, the photocells for the Heathkit THD Analyzer have finally arrived, so that turkey can go back on the bench.....
And the weather has been gorgeous since my last post. Cool breezes, puffy clouds, blue skies kind of weather. Had a few little spritzes of ...

