As I mentioned yesterday, the first electrical issue I ran across in rebuilding this deck is that it kept dropping out of Play. A bit of sleuthing around revealed that the Reel Motor was the most likely culprit, so in I went.
These pictures aren't mine. I borrowed them from the HiFi Haven website, where member Pustelniakr was kind enough to document the entire procedure.
It's a small DC motor, with a couple of centrifugal switches on it to control the speed. In "Play", it runs at a reduced voltage, regulated speed, and in "Fast Forward" and "Rewind" it gets full voltage and really spins.
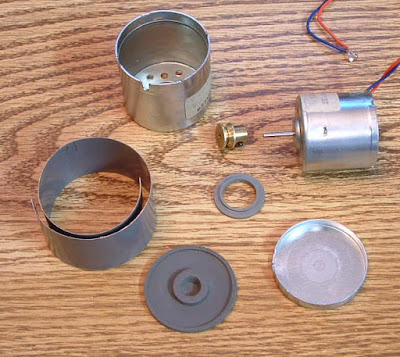
And it's a "can motor" inside another can!
The coiled strip of metal on the right is a strip of Mu-Metal for magnetic shielding. Even though the permanent magnet inside the motor can on the right is pretty well shielded, Pioneer used to the "belt and suspenders" approach to really keep the magnetic flux bottled up inside the cans so it couldn't degauss the tape as it was in the deck.
The two round grey things are silicone rubber shock mounts that suspend the motor can inside the shield can. It mechanically isolates the motor from the chassis, so vibrations from one don't upset the other.
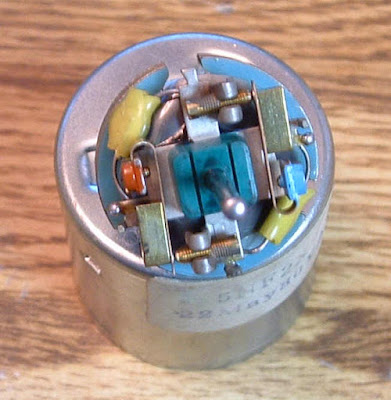
The armature assembly out of the case after prying open some crimps:
The small toroid inductor is in series with the DC Voltgae coming in. There's a capacitor to ground on the other brush, and they form a filter to keep the electrical noise from the brushes on the commutator from getting into the other electronics.
Brushes:
My brush plate wasn't this dirty, but I cleaned it very well anyway. The brushes themselves appear to be a carbon/copper composition, they're brazed to the little arms that hold them, and showed practically ZERO wear when examined under 20X magnification.
This is the entire armature for the motor. The centrifugal switches are on the left, and the commutator on the right:
Yep, the commutator is filthy, grooved, and not as "flat" as it should be. This is the same as on a starter motor for a car. That operation is called "cutting the comm", "turning the comm", or other phases I forget. For a starter motor you chuck the armature into an "Armature Lathe", and use a cutter to refinish the surface.
Before:
This is a whole bunch more delicate, so I chucked the motor shaft into my cordless Dremel tool, ran it at the lowest speed possible, and used a strip of 2000 grit sanding film to clean it up.
Again, these aren't my pictures, but this is essentially what I did:
After, but mine has a more uniform nice, bright copper look on all the surfaces:
These are the contacts for the two centrifugal switches. Just clean them gently with a strip of paper, and DO NOT adjust them, or you'll turn the motor into a paperweight:
SO....after spending a week diagnosing this, then taking the transport apart again to pull the motor, rebuilding the motor and reinstalling it, and finally putting the entire transport back together The Verdict Is.....Problem Resolved!
It now stays in play, the voltages across the motor are by-the-book, and Fast Forward/Rewind blast along MUCH faster than they did before.
Tomorrow's installment will be "Those Pesky Pinch Rollers, and What to Do About Them".


Very interesting - congrats on the problem resolution.
ReplyDeleteThis is the type of information exchange that Vannevar Bush had in mind when he first proposed his "Memex", which pretty much laid the foundational concepts for the Internet. He envisioned it using microfilm in automatic readers, but the concepts of hypertext and linking were clearly there.
DeleteJust did the "Head Azimuth Alignment" procedure, and it went by-the-book. ALL the wow and flutter are gone.....!
Following and enjoying!! Thanks!
ReplyDeleteYou're welcome!
DeleteGood repair and knowing when not to do something is a huge plus.
ReplyDeleteI've found a good rule of thumb is to stop when I think just one more adjustment will make it perfect.
My wife loves the Ryobi battery powered dustbuster, and when they quit working I open up the motor can and usually find the carbons are worn off, and the copper carbon arms then contact the commutator and still allow the motor to run until the arms are work down to the point where they stop making contact.
Yeah, some things I will not adjust unless I have a complete description of how to do it, and the equipment to do it with.
DeleteWell done, and amazed that you can make it work again!
ReplyDeleteWe're gettin' there! I'll be starting the electrical adjustments today.
Delete