Great commentary from Bill and the guys on the Progressive's latest gun grab, and their reasoning (if you can call it that) behind it.
Great quote from the show..."When you pry the AR-15 from my cold dead hands, please don't grab it by the barrel as it's HOT.....", to which I'll add "And don't trip on the huge pile of smoking brass surrounding my body".
Enjoy.....
Thursday, May 31, 2018
Wednesday, May 30, 2018
Getting Back In The Saddle
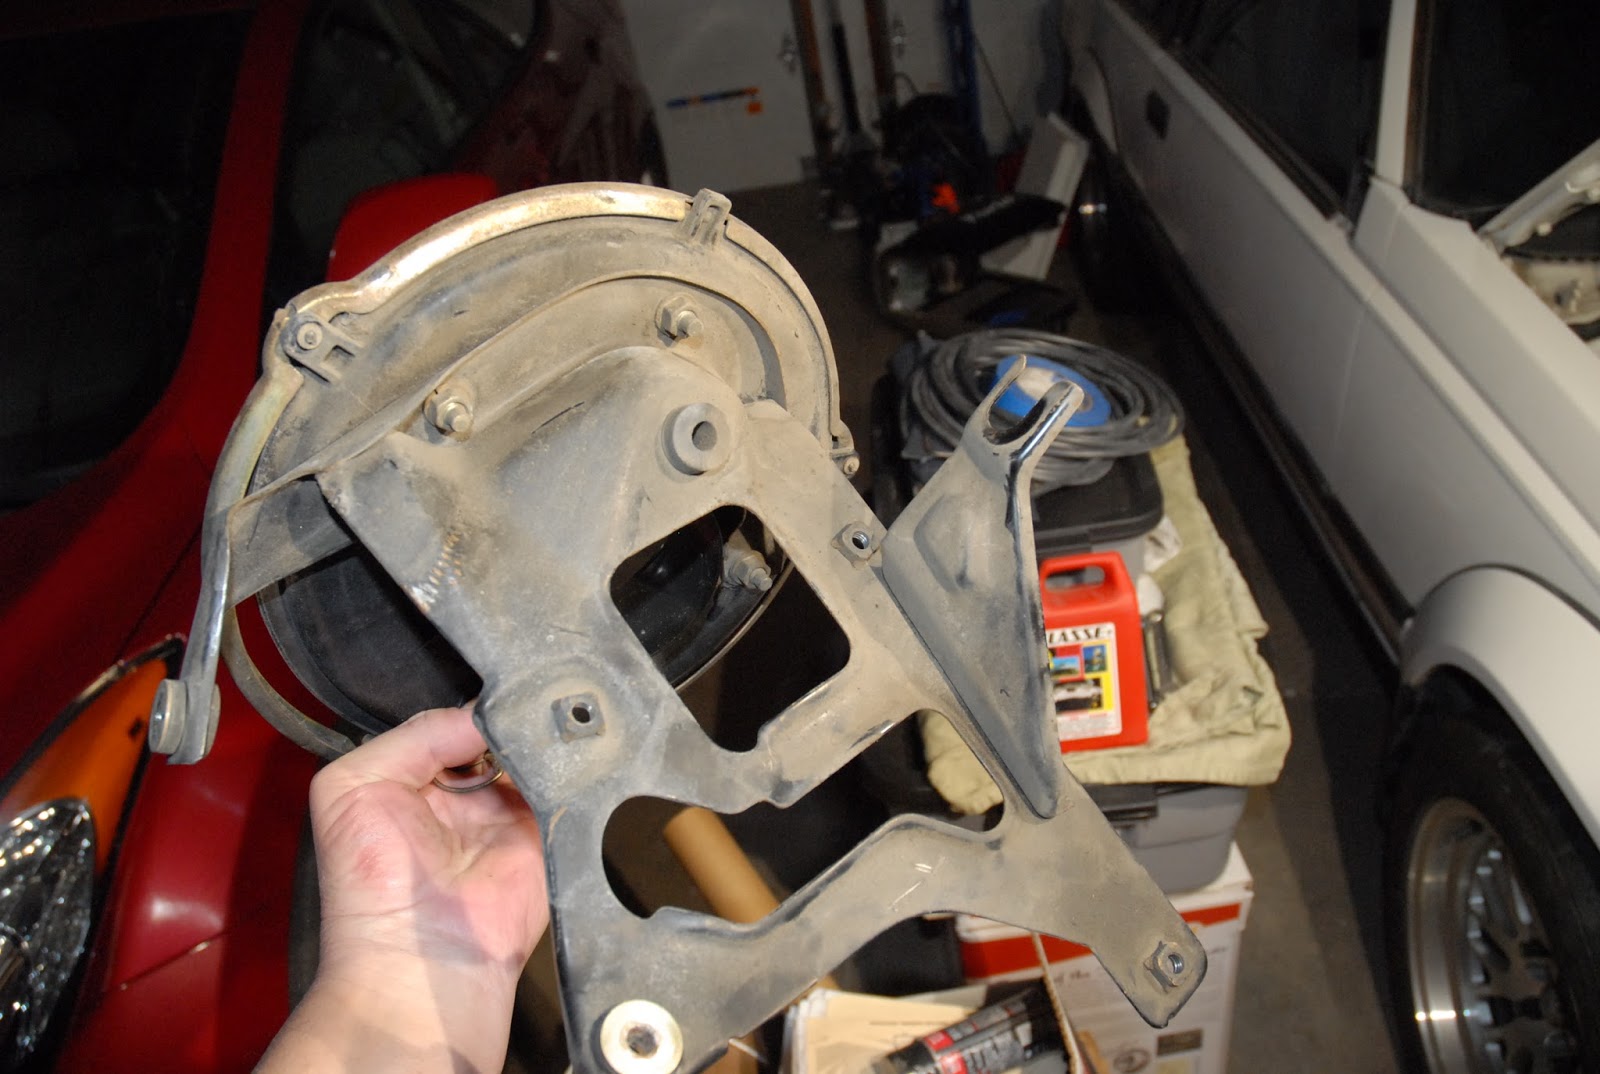
Now that I've got the garage to some semblance of 'usable functionality', I broke out some of the smaller subassemblies for the Supra that need work. I have all of the passenger side mirror, minus the M5x.8 screws that hold the mirror to the car (new ones on the way), so I started scrubbing away on the 'rubberized' mounting bracket that holds the plastic mirror housing to the door.
Hot, soapy water, a toothbrush, and some Scotch-Brite for that "really ground-in!" dirt. Then after it was completely dry, I scrubbed a heavy coat of Mother's "Back to Black" trim cleaner and reconditioner into it with a new "99cent Store" toothbrush. Several hours later, the complete mirror mounting assembly looks great, and the rubber is nice and supple again. And it's a beautifully clean matte-black finish, too.
At one time, several years ago, the mirror housing was ready for paint, and then Field Day or something came along, and here we are again. I scrub the mirror down with some denatured alcohol, and then a cycle of prime/sand/prime on it until the surface finish is "good enough", and paint it a nice epoxy satin black. I'm no good at painting gloss black surfaces with a spray can, even on something as small as these mirror housings. I've seen other people rattle-can them with amazing results, and I can do it with a spray gun, but me, gloss-black, and spray cans just can't quite get our act together. So satin black it is.
And then I can do it all over again on the driver's side mirror......
Lots and lots and lots of time gets spent just sitting at the bench cleaning and refurbishing small parts and assemblies like these. It's time consuming, sometimes boring work, but it has to be done.
And people wonder why it costs $50k, $75k, or much, much more to properly restore a car.
Wednesday, May 23, 2018
RYRYRYRYRYRYRYRYRY
Which stands for....nothing. It's the "Idle Channel" sound of radioteletype meaning there's no traffic being sent.
And that's what I've been doing the last several days....sitting here "idling", and taking care of my wife who tweaked her back somehow while dogsitting at The Kid's Place, a.k.a The Country House up in Bellvue.
Now this is a BIG freakin' house, almost 3600 sqft including the basement, and it's spread out over four levels. It's an open floor plan downstairs, and sound echoes around in here like crazy. So, how do we keep in touch here? Simple, with RADIO! The other day when I was on a(nother) Home Depot run, I found these little Cobra "MicroTalk" GMRS/FRS radios on sale for $30.
 GMRS stands for General Mobile Radio Service, and requires a license. FRS is the Family Radio Service, and is license free, like a UHF version of CB, but with FM used instead of AM or SSB, resulting in much clearer communications.
Ironically, the original Citizen's Radio Service (ALL FCC licensed radio bands are considered "Services") was in the UHF band.
So why on Heaven's Earth did I buy two more hand-held radios when I have four of them, and my wife has two of her own? Convenience, Benjamin, convenience.
With these little guys you just pick up the radio and talk. When you're done, you put the radio down. Using our Amateur Radio Service radios would entail using our callsigns, following the regulations, and finding a clear simplex frequency. That's a bit of overkill for "Honey, bring me some more Ovaltine" comms.
Both cars, which were in the driveway yesterday, got through the hail without any damage that I could find today. They're both plastered with the leaves that got blasted off the trees and blown around, but no hail dents. The backyard is a mess, with lots of leaves and branches from the neighbor's cottonwood tree, but no damage. And while the 33' vertical antenna was whipping back and forth about 45*, it, too, got through unscathed.
Pardon me while I go back to my Idle Channel Mode......
And that's what I've been doing the last several days....sitting here "idling", and taking care of my wife who tweaked her back somehow while dogsitting at The Kid's Place, a.k.a The Country House up in Bellvue.
Now this is a BIG freakin' house, almost 3600 sqft including the basement, and it's spread out over four levels. It's an open floor plan downstairs, and sound echoes around in here like crazy. So, how do we keep in touch here? Simple, with RADIO! The other day when I was on a(nother) Home Depot run, I found these little Cobra "MicroTalk" GMRS/FRS radios on sale for $30.

Ironically, the original Citizen's Radio Service (ALL FCC licensed radio bands are considered "Services") was in the UHF band.
So why on Heaven's Earth did I buy two more hand-held radios when I have four of them, and my wife has two of her own? Convenience, Benjamin, convenience.
With these little guys you just pick up the radio and talk. When you're done, you put the radio down. Using our Amateur Radio Service radios would entail using our callsigns, following the regulations, and finding a clear simplex frequency. That's a bit of overkill for "Honey, bring me some more Ovaltine" comms.
Both cars, which were in the driveway yesterday, got through the hail without any damage that I could find today. They're both plastered with the leaves that got blasted off the trees and blown around, but no hail dents. The backyard is a mess, with lots of leaves and branches from the neighbor's cottonwood tree, but no damage. And while the 33' vertical antenna was whipping back and forth about 45*, it, too, got through unscathed.
Pardon me while I go back to my Idle Channel Mode......
Tuesday, May 22, 2018
First Big Spring Storm
Well, pretty big compared to what I've been living in for the last 35 years.
This is not snow. It's hail, a whole bunch of it.


We had a pretty good size storm cell roll through here from about 1800 to 1830, and we got dumped on. The mix of rain and hail formed little islands of hail in the street, and the rain water swept clear channels on it's way to the gutter.
And the backyard had quite a bit of hail in it, forming one 'deposit' that's stained by all the dirt it stirred up in one of the several large bare spots in the yard.

Knocked the petals off the tulips in front, too, and beat the snot out of my little maple tree.

The iris' made it, probably sheltered by the house. These also bloomed about two weeks ago, like the tulips, so the blooms were getting a bit 'tired' anyway before Mother Nature decided things needed a little pruning.

My wife was dog-sitting last week at the Country House in Bellvue while the kids were visiting their maternal Grandmother so Great-Grandma could meet the three new little ones.
The house is the one that got battered last year about this time by a big hailstorm.
The roof got through that storm, but the siding looked like somebody opened up on it with an M-60. Anyway....the siding has been replaced, and the roof, while it was still "OK", also got replaced, but this time with a steel roof. My said it was pretty loud when it was raining there last week, so I can imagine what it was like getting hailed on.
This wasn't a particularly big storm, but it developed very fast, and came roaring up the I-25 corridor. This morning we were at a "10% chance" of thunderstorms, and by early afternoon it was a 40% chance. I'm not sure what time they posted the Severe Weather advisory, but by 1730 it was up.
I grew up with fast developing, fast hitting storms like this, and when I got out of the car from a grocery run, I looked South, saw how dark it had gotten in about 20 minutes, and chuckled about the "40% chance".
I'm waiting for Summer, when the Super Boomers come up out of nowhere......
Saturday, May 19, 2018
A Little Music For A Rainy Night....
Well, it was supposed to be rainy tonight. More of a drizzly, 45* night. Looks like we should be drying out Saturday, and then more drizzle is expected Sunday night.
So, with the garage getting pretty much finished, I'll be getting back to scrubbing the color back into the right side of the car. AND.....when I did the hood I used the blue "no scratch" Scotch-Brite, which took the stuff that was stuck to the paint off the paint, but did nothing to remove the top layer of dead paint, which is still there in all it's stained glory, and really jumps out at you when you close the hood and see it next to the clean fender and nose panel. So I'll have to spend a couple or three hours recleaning the hood. I was hoping to be able to live with it, but geesh...the hood on this car is freakin' YUGE compared to the other panels, and it really looks bad.
So, with the garage getting pretty much finished, I'll be getting back to scrubbing the color back into the right side of the car. AND.....when I did the hood I used the blue "no scratch" Scotch-Brite, which took the stuff that was stuck to the paint off the paint, but did nothing to remove the top layer of dead paint, which is still there in all it's stained glory, and really jumps out at you when you close the hood and see it next to the clean fender and nose panel. So I'll have to spend a couple or three hours recleaning the hood. I was hoping to be able to live with it, but geesh...the hood on this car is freakin' YUGE compared to the other panels, and it really looks bad.
Wednesday, May 16, 2018
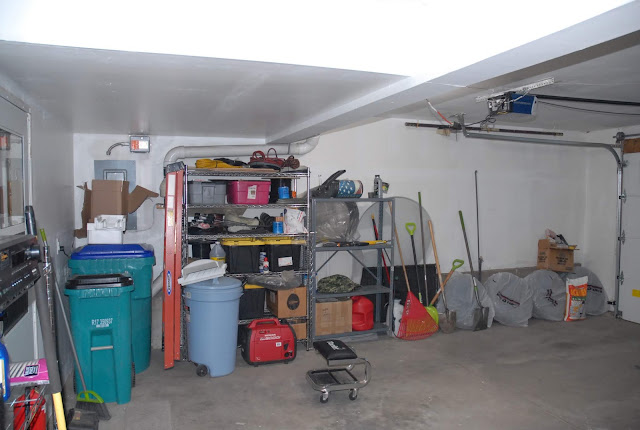
The Dark Side of the Garage
a.k.a., "Her Side".
I pretty much finished cleaning up and organizing the far side of the garage, killing several birds with one shot.
The Honda generator is out because.....Field Day! It had old gas in it, and the oil hadn't been changed in several years because I didn't use it. I'd still pull it over by hand every other month, but today was the first time it got any time on the meter in at least three years. I let it run in NON "Eco Mode", which is akin to running it at a fast idle. It responds much better to big load swings this way, as it doesn't have to accelerate very far to get up to full power. My Field Day load requirements are pretty minimal, so I always ran it in "Eco Mode", and I'd use about 1.5 tanks of gas from Friday morning until Sunday noon. It didn't run that whole time on that much fuel, but that's how much fuel I used at Field Day every year. ANYWAY....ran it out of fuel, changed the oil, put fresh gas in it, and she started right up on the second pull. I just loves me my little Honda generator!
So here's the rebuilt "1950's Era" steel shelf unit, all snugged down tight to the wire rack next to it.

Came out nice and square after spending an hour replacing bent and tweaked parts with stuff from the 'donor unit', and screwing it all together tightly, correcting a few errors in the original assembly of it along the way.
I've had these two shelves 'left over' from when I built all the wire rack units over on my side of the place. One I left out deliberately, and one got left out accidentally. They're nice quality, and I just couldn't toss them, but seems like every way I tried to store them, they were in the way.
Hmmmm...maybe they just need to earn their keep. I stood them up, turned them sideways, and attached them to the wire rack on their side. This not only gets them out of the way, but they act like side walls on three levels of the rack.

Yep, cable ties, three per side, holding them on. They're pretty much unstressed, and the breaking strength of six 1/4" cable ties is nothing to sneeze at, so I don't think they'll come clattering off to the floor.
My wife came out just as I was sweeping up the space, and stopped dead in her tracks. She looked at me and said "Is this what a real garage is supposed to look like?". My reply was something like "Yep, a real, functional, working garage looks a lot like this.".
I know she understands how much I was looking towards having a dedicated shop, and seeing what I've done here so far, she understands it's something I'm willing to work fairly hard at building, or at making what space I have as functional as possible. She was delighted she now has her "own" area of the garage, and she has plenty of shelf space to keep her tools organized.
I have to make a(nother) Home Depot trek tomorrow to get the hardware to hang the bigger tools, like the shovels, up on the wall. That'll open up some more foot space to ease access to the passenger side of her car, which was pretty good as it was. And I'm going to pick up another 48" LED fixture, and some electrical supplies to neatly wire them in.
GAD....I'll be happy when this workspace is "finished". Then I can get back to working on the car, and get started on building up a bench/work surface on the "Maintenance & Repair" side of the Radio Room.
Oh, and Field Day is next month. I'll be running "1E, CO" on the satellites this year.
I pretty much finished cleaning up and organizing the far side of the garage, killing several birds with one shot.

The Honda generator is out because.....Field Day! It had old gas in it, and the oil hadn't been changed in several years because I didn't use it. I'd still pull it over by hand every other month, but today was the first time it got any time on the meter in at least three years. I let it run in NON "Eco Mode", which is akin to running it at a fast idle. It responds much better to big load swings this way, as it doesn't have to accelerate very far to get up to full power. My Field Day load requirements are pretty minimal, so I always ran it in "Eco Mode", and I'd use about 1.5 tanks of gas from Friday morning until Sunday noon. It didn't run that whole time on that much fuel, but that's how much fuel I used at Field Day every year. ANYWAY....ran it out of fuel, changed the oil, put fresh gas in it, and she started right up on the second pull. I just loves me my little Honda generator!
So here's the rebuilt "1950's Era" steel shelf unit, all snugged down tight to the wire rack next to it.

Came out nice and square after spending an hour replacing bent and tweaked parts with stuff from the 'donor unit', and screwing it all together tightly, correcting a few errors in the original assembly of it along the way.
I've had these two shelves 'left over' from when I built all the wire rack units over on my side of the place. One I left out deliberately, and one got left out accidentally. They're nice quality, and I just couldn't toss them, but seems like every way I tried to store them, they were in the way.
Hmmmm...maybe they just need to earn their keep. I stood them up, turned them sideways, and attached them to the wire rack on their side. This not only gets them out of the way, but they act like side walls on three levels of the rack.

Yep, cable ties, three per side, holding them on. They're pretty much unstressed, and the breaking strength of six 1/4" cable ties is nothing to sneeze at, so I don't think they'll come clattering off to the floor.
My wife came out just as I was sweeping up the space, and stopped dead in her tracks. She looked at me and said "Is this what a real garage is supposed to look like?". My reply was something like "Yep, a real, functional, working garage looks a lot like this.".
I know she understands how much I was looking towards having a dedicated shop, and seeing what I've done here so far, she understands it's something I'm willing to work fairly hard at building, or at making what space I have as functional as possible. She was delighted she now has her "own" area of the garage, and she has plenty of shelf space to keep her tools organized.
I have to make a(nother) Home Depot trek tomorrow to get the hardware to hang the bigger tools, like the shovels, up on the wall. That'll open up some more foot space to ease access to the passenger side of her car, which was pretty good as it was. And I'm going to pick up another 48" LED fixture, and some electrical supplies to neatly wire them in.
GAD....I'll be happy when this workspace is "finished". Then I can get back to working on the car, and get started on building up a bench/work surface on the "Maintenance & Repair" side of the Radio Room.
Oh, and Field Day is next month. I'll be running "1E, CO" on the satellites this year.
Tuesday, May 15, 2018
Tom Wolfe Passes Away At 88, and So Much For "Free" Shelving Units.....
Bummer.
One of my favorite authors, and writer of the amazing work "The Right Stuff". The first work of his I read was "The Kandy-Kolored Tangerine-Flake Streamline Baby", which my sister bought for me when I was a Senior in high-school, and I found it fascinating, as I was just "getting into" cars at the time. And in College I read "The Electric Kool-Aid Acid Test" for one of my English courses.
He was quite a guy, and a terrific writer.
R.I.P., Mr Wolfe. Your kind doesn't come along often, and I'm glad I got to see you "live on TV" a few times.
As far as the "Free Shelving" goes.....well.....at least I tried.
Here they are right after I finished the Harbor Fright workbench and got it in place.

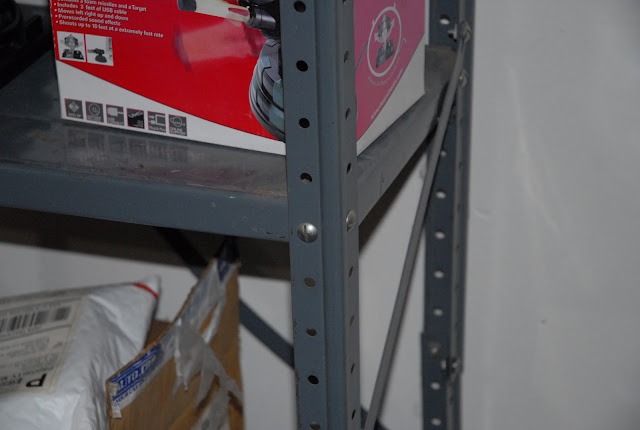
I got busy last night trying to square up and straighten out the right-hand steel shelving unit in the picture. The legs were two sections each, overlapped by one screw hole and bolted together. In the process of loosening things up, it got really flippy-floppy, so I took the 'top' section off, and then squared up the bottom half of the legs and two of the four shelves.
The fun began when I tried to get fully assembled, but with all the nuts and bolts loose, top section onto the bottom section. Every which way I tried, the thing would NOT go together in anything approaching a straight, 'square' configuration. I used a long tapered punch to ensure the holes were lined up before I tried to insert a bolt, but while I could get one hole to line up, the other was so far off that even driving the punch in with a soft hammer wouldn't line it up.
Huh....wtf?
Realizing I had another shelf unit about 5 feet away, I scooted my little rolling stool over there and looked at it.
OOOPS!! Big error, Jim. The legs are meant to be butted together, and then bolted with a clip that this shelf unit didn't have. If you look carefully in the first picture at the shelving unit on the left, you can just barely make out the clip about half way up the left front leg, where the diagonal brace comes down.
And if you look at the out-of-focus rear leg towards the bottom in this picture, you can see how the assembler overlapped the legs and pounded in a bolt. The tilt of the leg is caused by it being forced into a position it doesn't want to be in.

A trip to Home Depot was negative with regard to replacement hardware, so instead I came back with another HDX "cake rack" wire shelving unit. It looked so nice I went back today and bought another one for the other side of the workbench.
Here's the finished result:

And we have tunes!!

That's my very first, official, "Home Theater A/V Receiver" that I held on to for quite a few years. 100 Watts per channel @ .08% THD to the left, center, and right front speakers, and 100 Watts to the left, center, and right surround speakers. Add a subwoofer output, and it's a "6.1" channel receiver. Just feeding some Pyle mini bookshelf speakers for now. I've got some nice carpet-covered portable "P.A." speakers that will eventually be the front speakers, and the little Pyle units will get mounted to the walls about half-way towards the garage doors.
So I'm close to finalized on the garage configuration. Ihave a goodly amount of shelf space to support both my automotive and Electronics/Radio hobbies, and it's all neat, clean, and organized.

Even my wife is impressed. Next is to attack "her side" of the garage to get it organized enough to provide ready-access to her gardening tools, and hang the bigger things like the shovels, spades, and rakes up on the walls. I was able to build one good full-height 4-shelf unit, and one good half-height 3-shelf unit out of all the bits and pieces from the two full-height units. The full size shelf will go on "her side" of the garage to store her garden chemicals, potting soil, pots, and other stuff, and the half-size unit, along with another one that was here, are going to either our Handyman Guy or one of the relatives, first-come, first-served.
Oh, this is the "Bubba Job" that powers the garage door openers:

I'm going to run a single cord to a central point on the ceiling, and split it there to feed each door opener. And I'll use the right type of wire hangers to make it look nice and neat.
Doing all this work out in the garage, and making as many trips as I have to Home Depot, has given me ideas to build-out the electronics workbench down in The Dungeon, a.k.a., the basement. Rather than spend $1500~$2k getting a custom one built, I'm going to get some drawer units for end supports, and mount an 8' countertop to them. Gee...just like the Ikea stuff I had in Long Beach, and she made me throw away....
Probably do something similar for the radio desk/console, but that's still undecided.......
One of my favorite authors, and writer of the amazing work "The Right Stuff". The first work of his I read was "The Kandy-Kolored Tangerine-Flake Streamline Baby", which my sister bought for me when I was a Senior in high-school, and I found it fascinating, as I was just "getting into" cars at the time. And in College I read "The Electric Kool-Aid Acid Test" for one of my English courses.
He was quite a guy, and a terrific writer.
R.I.P., Mr Wolfe. Your kind doesn't come along often, and I'm glad I got to see you "live on TV" a few times.
As far as the "Free Shelving" goes.....well.....at least I tried.
Here they are right after I finished the Harbor Fright workbench and got it in place.

I got busy last night trying to square up and straighten out the right-hand steel shelving unit in the picture. The legs were two sections each, overlapped by one screw hole and bolted together. In the process of loosening things up, it got really flippy-floppy, so I took the 'top' section off, and then squared up the bottom half of the legs and two of the four shelves.
The fun began when I tried to get fully assembled, but with all the nuts and bolts loose, top section onto the bottom section. Every which way I tried, the thing would NOT go together in anything approaching a straight, 'square' configuration. I used a long tapered punch to ensure the holes were lined up before I tried to insert a bolt, but while I could get one hole to line up, the other was so far off that even driving the punch in with a soft hammer wouldn't line it up.
Huh....wtf?
Realizing I had another shelf unit about 5 feet away, I scooted my little rolling stool over there and looked at it.
OOOPS!! Big error, Jim. The legs are meant to be butted together, and then bolted with a clip that this shelf unit didn't have. If you look carefully in the first picture at the shelving unit on the left, you can just barely make out the clip about half way up the left front leg, where the diagonal brace comes down.
And if you look at the out-of-focus rear leg towards the bottom in this picture, you can see how the assembler overlapped the legs and pounded in a bolt. The tilt of the leg is caused by it being forced into a position it doesn't want to be in.

A trip to Home Depot was negative with regard to replacement hardware, so instead I came back with another HDX "cake rack" wire shelving unit. It looked so nice I went back today and bought another one for the other side of the workbench.
Here's the finished result:

And we have tunes!!

That's my very first, official, "Home Theater A/V Receiver" that I held on to for quite a few years. 100 Watts per channel @ .08% THD to the left, center, and right front speakers, and 100 Watts to the left, center, and right surround speakers. Add a subwoofer output, and it's a "6.1" channel receiver. Just feeding some Pyle mini bookshelf speakers for now. I've got some nice carpet-covered portable "P.A." speakers that will eventually be the front speakers, and the little Pyle units will get mounted to the walls about half-way towards the garage doors.
So I'm close to finalized on the garage configuration. Ihave a goodly amount of shelf space to support both my automotive and Electronics/Radio hobbies, and it's all neat, clean, and organized.

Even my wife is impressed. Next is to attack "her side" of the garage to get it organized enough to provide ready-access to her gardening tools, and hang the bigger things like the shovels, spades, and rakes up on the walls. I was able to build one good full-height 4-shelf unit, and one good half-height 3-shelf unit out of all the bits and pieces from the two full-height units. The full size shelf will go on "her side" of the garage to store her garden chemicals, potting soil, pots, and other stuff, and the half-size unit, along with another one that was here, are going to either our Handyman Guy or one of the relatives, first-come, first-served.
Oh, this is the "Bubba Job" that powers the garage door openers:

I'm going to run a single cord to a central point on the ceiling, and split it there to feed each door opener. And I'll use the right type of wire hangers to make it look nice and neat.
Doing all this work out in the garage, and making as many trips as I have to Home Depot, has given me ideas to build-out the electronics workbench down in The Dungeon, a.k.a., the basement. Rather than spend $1500~$2k getting a custom one built, I'm going to get some drawer units for end supports, and mount an 8' countertop to them. Gee...just like the Ikea stuff I had in Long Beach, and she made me throw away....
Probably do something similar for the radio desk/console, but that's still undecided.......
Saturday, May 12, 2018
Rainy Day Radio
So what's a guy to do on a cool, rainy day? The grandson is playing with Grandma, and I think I'll connect up the antenna and play radio!
Well...this was actually kind of planned. Today is the day for the "Armed Forces Day Cross-Band Test" where various shore stations, museum ships, military bases and vessels will transmit on certain military frequencies, and listen for replies on Amateur Radio frequencies. Naturally, I wanted to try and contact the Iowa, which is why the vertical was put on-the-air yesterday.
Made my big mug 'O Joe, connected the antenna to the radio and the control cable to +12VDC, turned everything on, and tuned to 14463.5 kHz, where the Iowa was transmitting as NEPM, and there they were, with my buddy Doug at the mic, no less.
After a few minutes of listening to him work a bunch of stations, he announced the Iowa was listening on 14261 kHz, so I enabled the "B" VFO, set it to 14261, went back to the "A" VFO, entered "Split" mode, and started calling NEPM. After he worked a few stations he asked for "The stroke zero only, please", which means he heard me, so I called him again, and we had a short chat. The object of the Cross Band Test is to make sure that Amateur Radio stations have the capability to communicate with U.S. military forces in time of need, and not to carry on long conversations.
Or, as the official announcement states:
"The Army Military Auxiliary Radio System will host this year’s Armed Forces Day Crossband Test, scheduled for May 12, 2018. This annual event is open to all radio operators, and will not impact any public or private communications. For more than 50 years, military and amateur stations have taken part in this event, which is only an exercise scenario, designed to include hobbyist and government radio operators alike.
The AFD Crossband Test is a unique opportunity to test two-way communications between military communicators and radio stations in the Amateur Radio Service (ARS), as authorized in 47 CFR 97.111. These tests provide opportunities and challenges for radio operators to demonstrate individual technical skills in a tightly-controlled exercise scenario that does not impact any public or private communications."
So it's really more of a fun thing to do these days than serving any actual purpose other than getting off their duff and actually operating their radio gear.
And after the contact, I decided to get the temp station here in the sunroom full "Digital Capability" which meant hooking up my SignaLink interface box, installing some software, and then getting it all configured to play nice.
This is all stuff I've done numerous times before, but it was fun digging out the bits and pieces I needed to give my little Elecraft K2 much more capability.
And I even discussed installing a cable penetration into the sunroom with my wife, so I don't have to have the door cracked open to run the cables through. Be pretty easy to do with a short section of 2" PVC pipe and a couple of 90* elbows, painted to match the interior and exterior.......
AND....I broke down and bought a Harbor Freight 48" workbench. Which took two days to assemble and position, including moving a bunch of stuff around in the garage. Now that it's all put together it seems sturdy enough, but I wouldn't bolt a vise down to it....the top worksurface is some kind of particle board with a plastic skin on it, about .6" thick, and I don't think it would take too kindly to having a 6" swiveling vise bolted through it. It came with a 13 Watt (?!?) light above it, but I'm going to replace it with a 36" LED that draws about 34 Watts producing 3600 Lumens. Should be nice and bright on the worktop.

See these old grey steel shelves? They're identical to ones my Dad bought back in 1957 when we moved into the house I grew up in.
Gee...even have the square nuts and slotted screws holding them together!
I was going to buy some of the wire rack shelves like I have along the sides of the garage, but these old things are here, so they're free, and I know from growing up that if I unload them, set them on the mythical "Hard, Flat, Level Surface", loosen the hardware that isn't already loose, square them up, and retighten all them funny 'lil nuts and bolts, and they actually work pretty well. And I'm going to anchor them to the wall with some Really Heavy Duty wall anchors, not for seismic safety, but because it's a work area, and stuff gets banged into. Sometimes it gets knocked over. Makes a big mess. I don't like cleaning up a mess I caused when if I would have spent an extra half hour screwing the shelf to the wall it wouldn't have happened.
I shudder to think how I'd feel if it landed on the Supra......
Did I mention they're free?
SO.....since I'm still negotiating with the electrical guy over a greatly reduced installation, what I'm going to do is mount the 48", 12 outlet plug strip sitting on top of the rack down to the rack, and plug it into the duplex outlet that's now located right smack dab in the middle of the pegboard but behind it, and take advantage of the one 15Amp circuit I have. Two of the outlets will go to the garage door openers. That's a very low duty cycle load, so it can pretty much be ignored. My big LED work light draws "93 Watts" per the nameplate, and that less than an Amp. The new lamp for the workbench is "34 Watts", which added to the worklight makes the running total just about an Amp.
Add two more 48" LED fixtures at "50 Watts" each, and I'm at maybe two Amps. That's the beauty of LED lighting...you can get a lot of Lumens for not too many Watts.
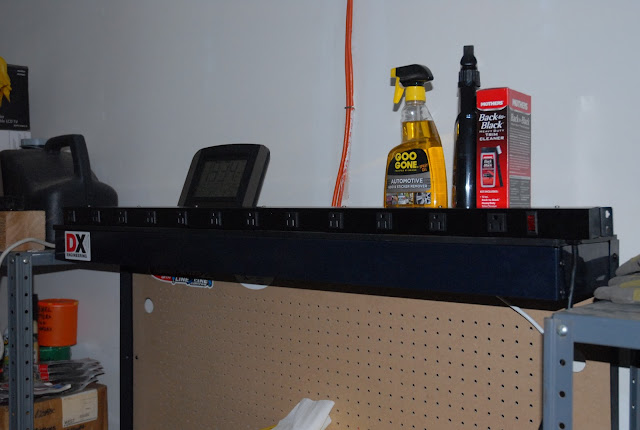
The two orange cords crudely stapled to the wall carry the 120VAC to the garage door openers. Two cords terminated with ONE plug.....really Bubba'd up good! I'll clean all that up, but the first time I saw I saw it I busted up laughing, our real estate agent thought it was pretty funny, too.
Well...this was actually kind of planned. Today is the day for the "Armed Forces Day Cross-Band Test" where various shore stations, museum ships, military bases and vessels will transmit on certain military frequencies, and listen for replies on Amateur Radio frequencies. Naturally, I wanted to try and contact the Iowa, which is why the vertical was put on-the-air yesterday.
Made my big mug 'O Joe, connected the antenna to the radio and the control cable to +12VDC, turned everything on, and tuned to 14463.5 kHz, where the Iowa was transmitting as NEPM, and there they were, with my buddy Doug at the mic, no less.
After a few minutes of listening to him work a bunch of stations, he announced the Iowa was listening on 14261 kHz, so I enabled the "B" VFO, set it to 14261, went back to the "A" VFO, entered "Split" mode, and started calling NEPM. After he worked a few stations he asked for "The stroke zero only, please", which means he heard me, so I called him again, and we had a short chat. The object of the Cross Band Test is to make sure that Amateur Radio stations have the capability to communicate with U.S. military forces in time of need, and not to carry on long conversations.
Or, as the official announcement states:
"The Army Military Auxiliary Radio System will host this year’s Armed Forces Day Crossband Test, scheduled for May 12, 2018. This annual event is open to all radio operators, and will not impact any public or private communications. For more than 50 years, military and amateur stations have taken part in this event, which is only an exercise scenario, designed to include hobbyist and government radio operators alike.
The AFD Crossband Test is a unique opportunity to test two-way communications between military communicators and radio stations in the Amateur Radio Service (ARS), as authorized in 47 CFR 97.111. These tests provide opportunities and challenges for radio operators to demonstrate individual technical skills in a tightly-controlled exercise scenario that does not impact any public or private communications."
So it's really more of a fun thing to do these days than serving any actual purpose other than getting off their duff and actually operating their radio gear.
And after the contact, I decided to get the temp station here in the sunroom full "Digital Capability" which meant hooking up my SignaLink interface box, installing some software, and then getting it all configured to play nice.
This is all stuff I've done numerous times before, but it was fun digging out the bits and pieces I needed to give my little Elecraft K2 much more capability.
And I even discussed installing a cable penetration into the sunroom with my wife, so I don't have to have the door cracked open to run the cables through. Be pretty easy to do with a short section of 2" PVC pipe and a couple of 90* elbows, painted to match the interior and exterior.......
AND....I broke down and bought a Harbor Freight 48" workbench. Which took two days to assemble and position, including moving a bunch of stuff around in the garage. Now that it's all put together it seems sturdy enough, but I wouldn't bolt a vise down to it....the top worksurface is some kind of particle board with a plastic skin on it, about .6" thick, and I don't think it would take too kindly to having a 6" swiveling vise bolted through it. It came with a 13 Watt (?!?) light above it, but I'm going to replace it with a 36" LED that draws about 34 Watts producing 3600 Lumens. Should be nice and bright on the worktop.

See these old grey steel shelves? They're identical to ones my Dad bought back in 1957 when we moved into the house I grew up in.
Gee...even have the square nuts and slotted screws holding them together!

I was going to buy some of the wire rack shelves like I have along the sides of the garage, but these old things are here, so they're free, and I know from growing up that if I unload them, set them on the mythical "Hard, Flat, Level Surface", loosen the hardware that isn't already loose, square them up, and retighten all them funny 'lil nuts and bolts, and they actually work pretty well. And I'm going to anchor them to the wall with some Really Heavy Duty wall anchors, not for seismic safety, but because it's a work area, and stuff gets banged into. Sometimes it gets knocked over. Makes a big mess. I don't like cleaning up a mess I caused when if I would have spent an extra half hour screwing the shelf to the wall it wouldn't have happened.
I shudder to think how I'd feel if it landed on the Supra......
Did I mention they're free?
SO.....since I'm still negotiating with the electrical guy over a greatly reduced installation, what I'm going to do is mount the 48", 12 outlet plug strip sitting on top of the rack down to the rack, and plug it into the duplex outlet that's now located right smack dab in the middle of the pegboard but behind it, and take advantage of the one 15Amp circuit I have. Two of the outlets will go to the garage door openers. That's a very low duty cycle load, so it can pretty much be ignored. My big LED work light draws "93 Watts" per the nameplate, and that less than an Amp. The new lamp for the workbench is "34 Watts", which added to the worklight makes the running total just about an Amp.
Add two more 48" LED fixtures at "50 Watts" each, and I'm at maybe two Amps. That's the beauty of LED lighting...you can get a lot of Lumens for not too many Watts.

The two orange cords crudely stapled to the wall carry the 120VAC to the garage door openers. Two cords terminated with ONE plug.....really Bubba'd up good! I'll clean all that up, but the first time I saw I saw it I busted up laughing, our real estate agent thought it was pretty funny, too.
Friday, May 11, 2018
Houston, We Have Static Again......
Fellow Ham neighbor came by today and we finished getting the 33' vertical On-The-Air.
It was mostly 'busy work', string out the ground radials, placing the junction and tuner boxes, running the cables, etc.

This is not the final position for this antenna. I just dumped it there the day I assembled it without regard to where I'd run the radials. A more optimized position is (and will be....) about 10'~12' to the left in the picture.
What do you do when you can't run the radials exactly 90*, and "straight as a string"? You bend them a bit here and there to make them conform to the real estate you have!

We used a conveniently located rock as out 'pivot point' for the radial to change directions. "Bending" radials like this to fit your lot has been done 'forever', and as long as you don't bend them back on themselves, generally works quite well. The radial in the above picture is bent more than 90*, so by moving the antennas base 10' or so to the left in the top picture will allow me to pull back the turned length of that particular radial, making it straighter, and improving it's effect on the system.
And if you don't have a conveniently located rock, then one of these military antenna guy stakes works great.

And they're great for an end anchor, too.

So we still need some work on this, but it's finally completed and functional.
How's it work? It's still a bit too early to tell, but I talked to a guy in Virginia, and another in New York, and got acceptable signal reports, so it puts out a signal. It'll be interesting to set up the BuddiPole in the vertical configuration and do an A-B on-the-air comparison test.
Monday, May 7, 2018
Quiet Day, and Another RT to DIA....
"RT" as in a round trip.
Took the wife's BFF back to DIA, or DEN, your preference, and had an uneventful trip....always good.
Only had one snag on the way there, and that was a semi trailer that had the back FOUR wheels and tires on the right side go up in smoke, and was just about cleared up when we passed it.
And one snag coming back. Right about milepost 248 on the East side of I-25 is a microwave relay tower, some weather stations on 20' towers, and some commercial antennas for UHF. To my "radio eye", and the lay-of-the-land, it has to be the highest point around. Well, traffic just slowed down a couple of miles before it, flowed over the crest, and then resumed speed. Just one of those baffling "standing waves" that can develop on highways without any visible reason.
And we stopped for dinner at Freddy's, a good place for burgers. I wanted to stop at Johnson's Corner and try the food, but she wasn't in the mood for "Truck Stop Food" as she put it.
Got back home about 1930 and rather than work on the Supra tonight, I busted up cardboard boxes and styrofoam, and cleaned up the garage. I now have the area between the two cars cleaned up, and I'll use my floor jack to play "Slide the Supra" and move the car about two feet in the garage. That will give my wife plenty of room to get out of her car, and I'll have another couple of feet on the driver's side so I can finish cleaning the paint on that side.
One thing I noticed last night was that I haven't really cleaned the hood properly. I started out on the hood using the blue "no scratch" Scotch-Brite and the detailer spray. It took the "surface crud" off the paint and smoothed it out, but wasn't aggressive enough to remove the top layer of stained paint like the green Scotch-Brite does.
SO......I'll have to redo the hood. Hey, I'm a bit rusty on paint cleaning procedures, so I started off gentle and it didn't work. I'm tempted to get out my orbital buffer and try that on the hood, but I think I'll stick to my current method. Over the last couple of weeks I've got the process down to where I understand it pretty well as far as how much pressure to use on the pad, and how much spray to use. I'd hate to change horses midstream and use a different process on the hood. One of the things I'm shooting for in this is good uniformity of surface cleanliness and surface finish. Changing the cleaning process at this late stage could alter the results and leave me with a SHINY hood, and it would stand out like a sore thumb....
Sunday, May 6, 2018
Bye, Bye, Bill Board!
The letters on the rear of the hatch that spell out "S U P R A" are called a "Billboard Decal" in the community. Real, live, gen-you-ine Toyota parts disappeared a couple of decades ago, and good reproductions come and go. Whether or not you have one on your car, or have the JDM "Celica XX" version of it, is up to the individual owner.
Mine was completely shot. 30+ years of Kalifonia sun had polymerized the adhesive into the paint, and the material it was made out of had shrunk and cracked over the years.
It looked really shabby, as shown by an example:

The center of the decal looked really bad, as various kinds of crud and glop had stained it over the years, and the lock cylinder had to come out to properly "sand" the surface.

I first pulled the latch mechanism so I could get at the funky spring clip that holds the cylinder in. I was surprised it went as easy as it did. I had the cylinder and latch out in about 15 minutes, and that includes unhooking an electrical connector. Since the latch is inside the weather seal, it's nice and dry. All it needed was wiping down, and some lubrication. The lock cylinder has one end out in the weather, and gets wet. I squirted some "Gun Butter" synthetic cleaner/lube into all the orifices I could find on it, lubed the external tension spring wound around it, put a key in it, and worked it a bunch of times to free it up. Works smooth as silk now.
Then I proceeded to attack the hatch with the scotch-brite-and-detail-spray method until no more crud came off the paint, and the color was restored.

My poor pinstripe took a beating, but if it came off that easy.......

And the entire area around the lock is now uniform in color. The splotchy area around the two holes directly above the lock is where I had several layers of blue painter's tape glue themselves to the paint. That's gonna have to be power sanded, probably dry as I don't have any air tools, and then primed and re-sprayed. Just gotta be done, ya know? There are several areas on the car that I'm hesitant to do. The top of the hatch/roof interface area wasn't properly painted when the car was built, and the paint on the trailing edge of the hood is pretty thin, and show little orange freckles. To do it right means pulling the hood and hatch, cleaning them, prepping them, spot-painting in the repaired areas, and then reinstalling the hood and hatch, getting the panel alignment correct.
Time to shop it around at a few body shops.

The end result of this is that the rear of the car is now cleaned up. After I did the billboard, I cleaned the taillights and license plate area, and the entire rear bumper. My wife came out after I was working "back there" for several hours in my Harbor Freight "Two-By-Two-Hands-Of-Blue" PPE and said I should hang my shingle out as an "Automotive Proctologist" since I looked right at home doing it.

Sorry for the bad lighting. My camera has a reeeal hard time auto-focusing on dull, matte-finished WHITE objects. The entire area at the end of the hatch is now a "satin white" color, with only the outline of the letters remaining, but diminished.
And back on the homefornt.....we took my wife's visiting friend out for a scenic drive all the way up Rist Canyon, across Stove Prairie, and then down CO-14 to The Mishawaka for lunch. "The Mish" has been there right on the banks of the Cache La Poudre River since 1916, and besides being a decent local eatery, has an outdoor amphitheater where live artists perform. I was looking on the wall, and people from Arlo Guthrie to Bob Weir have performed there, along with local rock and punk bands. It's kind of a mini-sized Red Rocks, and the setting is pretty cool.
The drive up Rist Canyon is pretty neat, because you're driving up a twistie, turnie, road, it's pretty steep, and you crest the road and pop into a true Alpine Meadow. I swear you can hear "The Hills Are ALIIIIIVE" up there when the wind is right.
So we had a nice lunch, a pleasant drive, and I'm back to cleaning the Supra. Got the stainless window trim buffed out on the driver's side, and did the windshield trim, too. They're all a nice, uniform, brushed stainless finish, and look far better than the dirty, stained bits they were before.
Saturday, May 5, 2018
A Bit of This and That.....
Had fun at the Terry Bison Ranch on Friday. Something about that place makes me feel like a little kid. Yeah, it's a "touristy" thing, but I still enjoy going there and taking the train ride around the ranch, and hear the history of the place.
And while the tulips have started to open.....

The iris' are still a bit shy.

And out in the garage, I was ready to say "One Side Is Done", and then I looked at the picture, and it aint done yet!
I forgot to clean the rocker panel and the rear quarter under the gas filler door.

The wheels and tires are a separate project. I wiped a few 'spokes' on one of them last night, and they appear to be a snap to clean as they're coated with some kind of clear coating.
Today's "Music To Clean Your Car By" is a YouTube Glenn Miller compilation. It's 70* today, and the garage is a pleasant place to be while the girls are out gallivanting around....
Thursday, May 3, 2018
Engine Bay Finished For Now
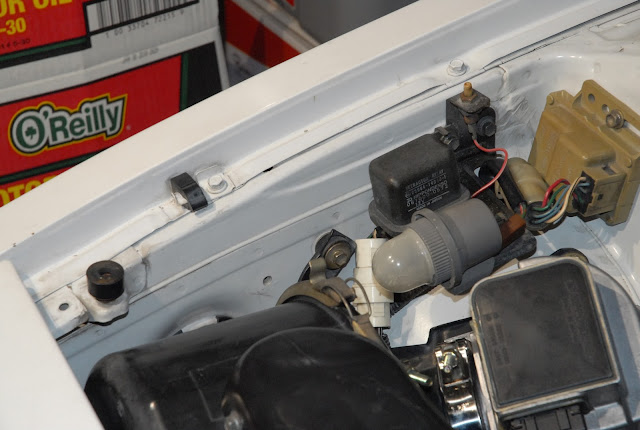
Finished up cleaning and recleaning the final bits and pieces of the AFM, the mounting plate, and the air cleaner parts that also attach to the plate. Since I had the connector to the AFM disconnected, and taped closed for cleaning, I pulled the tape off and cleaned the contacts on the AFM and the harness with DeoxIT 5 before I mated them (with a dab of silicone grease) together.


This the AFM after buffing the corrosion off. I wound up spending another half hour or so cleaning it before I mounted it on the plate, so it looks nicer than this.


Hard to believe that this...
Started out about this bad....


This the AFM after buffing the corrosion off. I wound up spending another half hour or so cleaning it before I mounted it on the plate, so it looks nicer than this.


Hard to believe that this...

Started out about this bad....

Wednesday, May 2, 2018
More Spring Cleaning with Ms Swan
Got the air cleaner assembly all cleaned up, put together, and mounted back on the plate that also holds the Air Flow Meter ("AFM"), along with the now spotless rubber air coupling. This particular coupling, being several feet away from the engine, and located behind the grill, was extremely dirty with "road dirt", but in excellent condition once I spent about 20 minutes in the kitchen sink scrubbing it with hot, soapy water and various small brushes. Finished it up with some of the 'no scratch' Scoth-Brite and a good rinse, and it looked great . And I used some silicone grease on the slip connection to the air cleaner. This helps preserve the rubber, helps seal it from air leaks, and makes it much easier to rotate for alignment during assembly.

This is the side you can't see when it's mounted in the car. Besides the one main 'snorkel' air intake, there's also a smaller one below it, and turned 90* into the airstream coming in from the grille. "Ram Air"? Not a chance...ram air only adds significant power at very high (>>100MPH) speed. No, it's for cold air into the air cleaner. Cold air makes more power than hot under hood air, so although the 60's and 70's muscle cars offered "Ram Air", almost all the benefit of those systems was to feed cold outside air to the carburettor.
In some cases, the temperature difference was 100* or more, resulting in an increase in the air density, and a resultant increase in the amount of Oxygen available for combustion. More Oxygen means you can add more fuel, and get more power.

This is the side the AFM connects to. It's an 80mm flow path all the way from the outlet of the air cleaner, through the AFM, and into the new air intake pipe, which feeds a 75mm Throttle Body via a reducing silicone hose coupling.

OK, turn to your right, please....
My wife sees me scrubbing these parts down, and at first just shook her head and said "Nobody's going to see it. Why clean it so well?". It's a valid question if you look at cars like toasters, and yes, I know, there are people who collect old and "vintage" or "classic" toasters. Those guys look at their toasters like I do my project car and my radio gear. I'LL know it's dirty there, and as long as it's apart, I'll at least wipe the grunge off it. It actually looks a notch or two nicer now, as after I took the pix, I noticed a couple of spots on it I missed, so they got the windex-and-scotch-brite treatment, and now the entire metal bracket looks pretty spiffy.

The AFM also cleaned up nicely. Not sure why I didn't take any pix. All the dirt on the alloy casting was "road dirt", and not greasy at all. It came right off with the previously mentioned method, and the stains on the housing came off with some green Scotch-Brite, Windex, and elbow grease.
One thing that troubled me when I took these assemblies off to clean was the corrosion I found in the rubber air coupling between the AFM and air cleaner. See all that "white stuff"? It's residue of the corrosion on the inlet to the AFM. Looking through the air coupling you can see a shinky area at the other end of the house. That's where the hose clamps to the air cleaner, which is plastic.

I buffed both the inlet and outlet of the AFM with the green Scotch-Brite, and it cut the white oxide/chloride/whateveride right off the metal, and it looks much better ow. The connections these make to their air couplings will also get some silicone grease for the same reasons, but it's curious that this surface, NOT in "electrical" contact with anything, could have that kind of corrosion. I don't know what alloy this casting is. It might be aluminum, or it might be zinc, but it sure got attacked a noticeable amount.
And the timing belt cover is a real PITA to clean. 30+ years of belt dust, oil vapor, and engine heat combined to cook a layer of "stuff" on the backside of the cover that requires Good Old Gunk and a stiff brush to get loose, and then everything has to be wiped down again, and put back together.
I took a break from the outside paint because I was getting "dazzled" by staring at dirty white paint being scrubbed to clean white paint under bright LED lighting.
And I'll be equally glad to take a break from scrubbing under the hood! At least I've been wearing the 5 mil nitrile "Two By Two Hands Of Blue" gloves from Harbor Freight. Keeps the solvents and cleaners off my dainty hands, makes clean-up easier, and my hands don't smell like Gunk....
Tuesday, May 1, 2018
Meanwhile, Back In Jim's Garage.....
We have progress on the cleaning project. The right front corner of the engine bay is about as clean as I'm going to get it without expending significantly more time, and making significantly more MESS in the process.

Further cleaning of the engine bay goes on hold after the air cleaner/AFM bracket and rubber air coupling get cleaned up and reinstalled.
These bits are a bit dirty.....

One of the numerous semi-flexible (30 years ago...) molded rubber air couplings in the air intake ducting. These are one of the many unobtainium parts for this car. Somebody, somewhere, might have a new set of them, or some of them, but these have been out of stock for many years. I was fortunate to be able to get a complete set of these in excellent condition from a friend in the PNW. Stuff like this lasts forever up there because of the climate, while it dry rots, bakes out, and cooks off down in SoCal, where this car came from.

This is the outlet of the air cleaner housing, it's 80mm in diameter, the same as the inlet on the AFM. The rubber air coupling connects the air cleaner outlet to the Air Flow Meter (AFM), and needs a really good scrubbing. It doesn't appear to be cracked at all, but I'm going to order an 80mm 45* bend silicone hose and see if I can trim it to fit.
And the backside (bottom side) of the bracket showing 33 years of road dust and dirt caked on. These parts have been cleaning up very nicely using my Secret Sauce Spray formula on the "dry" dirt, and Good Old Gunk on a shop towel for the "wet" looking stuff. After they're clean, I wipe them down with "303 Protectant" to try and preserve what's left of the original finishes. You want "patina"? Yup we got it!

And I pulled "Timing Cover Number 3" to get a quick look at the cam belt and tensioner.

It's pretty clean in there for 168,000 miles. The timing belt and tensioner are "Unkowns" on the maintenance list and have to be cleared eventually, but I wanted to pull the cover to clean it, it's only 5 bolts, and it was off the car in ten minutes.
This car has the "Round Tooth" belt and pulleys, a Toyota refinement leading to quieter operation, and longer belt life.

The tensioner is the puller under the belt on the right side of the picture, and I think it's getting to be and end-of-life item, as I see little flecks of distinctly shiny, metallic looking "stuff", and I've seen it before when bearings like that first begin to fail.
The inside of the cover was pretty clean, but again, I have no idea if/when this was ever off the engine.

It's much easier to get glop like this stuff off when the part is off the car and on the bench, then it is to clean it on the car.

Anywhoo....As soon as this stuff is cleaned up and back on the car, I'm going to get back on the paint. I'll have all upcoming winter to do more cleaning, clear items from the maintenance punch list, and get the new carpet installed, but I want to get the paint cleaned and sealed before I take the car out again. I can do a 'quickie' wipe down of the rims and tires, vacuum out the interior, clean the glass, and roll if the paint is cleaned and sealed.

Further cleaning of the engine bay goes on hold after the air cleaner/AFM bracket and rubber air coupling get cleaned up and reinstalled.
These bits are a bit dirty.....

One of the numerous semi-flexible (30 years ago...) molded rubber air couplings in the air intake ducting. These are one of the many unobtainium parts for this car. Somebody, somewhere, might have a new set of them, or some of them, but these have been out of stock for many years. I was fortunate to be able to get a complete set of these in excellent condition from a friend in the PNW. Stuff like this lasts forever up there because of the climate, while it dry rots, bakes out, and cooks off down in SoCal, where this car came from.

This is the outlet of the air cleaner housing, it's 80mm in diameter, the same as the inlet on the AFM. The rubber air coupling connects the air cleaner outlet to the Air Flow Meter (AFM), and needs a really good scrubbing. It doesn't appear to be cracked at all, but I'm going to order an 80mm 45* bend silicone hose and see if I can trim it to fit.
 |
And I pulled "Timing Cover Number 3" to get a quick look at the cam belt and tensioner.

It's pretty clean in there for 168,000 miles. The timing belt and tensioner are "Unkowns" on the maintenance list and have to be cleared eventually, but I wanted to pull the cover to clean it, it's only 5 bolts, and it was off the car in ten minutes.
This car has the "Round Tooth" belt and pulleys, a Toyota refinement leading to quieter operation, and longer belt life.

The tensioner is the puller under the belt on the right side of the picture, and I think it's getting to be and end-of-life item, as I see little flecks of distinctly shiny, metallic looking "stuff", and I've seen it before when bearings like that first begin to fail.
The inside of the cover was pretty clean, but again, I have no idea if/when this was ever off the engine.

It's much easier to get glop like this stuff off when the part is off the car and on the bench, then it is to clean it on the car.

Anywhoo....As soon as this stuff is cleaned up and back on the car, I'm going to get back on the paint. I'll have all upcoming winter to do more cleaning, clear items from the maintenance punch list, and get the new carpet installed, but I want to get the paint cleaned and sealed before I take the car out again. I can do a 'quickie' wipe down of the rims and tires, vacuum out the interior, clean the glass, and roll if the paint is cleaned and sealed.
Subscribe to:
Posts (Atom)
A Week With Luna....
She's settling in quite nicely. She's very obedient, affectionate, friendly, and amazingly good with both our grandsons. She's ...

-
Yawn....just more Kabuki Theater, but interesting reading, nonetheless. Read All About It Here.....
